Chapter 6 - Installing and Configuring DOS Workstations
This chapter provides instructions for installing and configuring DOS workstations in a Banyan network. Chapter 7 provides instructions for managing interprocess communications on a Banyan network. Before going any further, you should:

Read the planning information in Chapter 1 and Chapter 2. 
Decide where the Banyan workstation directory will reside, either on a bootable diskette or on the hard drive of the workstation. Make sure the media is properly formatted. 
Prepare the workstation hardware according to instructions in Chapter 2, and have your Workstation Configuration Worksheet ready (see Figure 2-1).
VINES software for DOS workstations is shipped on three diskettes:

A System Diskette, which contains all the software required to connect your DOS workstation to a Banyan network except the LAN drivers and the diagnostic programs. The Diskette includes programs such as BAN.EXE, NEWREV. EXE, PCCONFIG.EXE, and the REDIRALL redirector. 
Two LAN Driver Diskettes, which contain the LAN drivers and diagnostic programs for each LAN card supported under VINES software. For a complete list of LAN drivers on these diskettes, refer to Appendix A.
VINES software for OS/2 workstations is shipped on three diskettes:

These diskettes contain the VINES software for OS/2 workstations and the LAN drivers for OS/2. Some of the programs are BAN.EXE, NEWREV. EXE, PCCONFIG.EXE files and the VCLIENT utility. See Chapter 12 for more information about Banyan networking software for OS/2 workstations.
Installing the First Workstation
You must get one workstation up and running on the network to be able to install the rest of your workstations. Follow the instructions in this section to install and configure Banyan networking software on your workstations. Logging in to the network and installing additional workstations is covered later in this chapter.
Installing the first workstation involves:
1. Installing and testing the LAN card
2. Copying Banyan networking software to the workstation
3. Configuring Banyan networking software
Installing and Testing the LAN Card
To install and test the LAN card, follow these steps:
1. Configure and install the LAN card according to instructions in Chapter 2 and Appendix A.
2. Run the LAN card diagnostics available from the manufacturer.
Once the workstation passes the diagnostics, create the Banyan directory, <bandir>, and configure the network software.
Copying Banyan Networking Software to the Workstation
The Banyan workstation directory can reside either on a diskette or fixed disk drive, but must contain the following Banyan files:

BAN (.EXE and .MSB) 
REDIRxxx (.EXE and .MSB) 
PCCONFIG (.EXE, .MSB, and .DB) 
NEWREV (.EXE and .MSB) 
xxxBAN.COM (LAN card driver)
The System Diskette is a high capacity diskette; therefore, you must use a workstation with a high-capacity drive to copy the files. Be sure to back up the System Diskette first.
The next section describes copying Banyan networking software to a diskette. This procedure sets up one workstation to function on the Banyan network using a VINES boot diskette.
To Copy Banyan Networking Software to a Diskette
1. Use the FORMAT /S command to prepare a blank, formatted diskette. The /S switch installs DOS system files on the diskette.
2. Use the DOS COPY or XCOPY command to copy all of the files from the System Diskette onto the blank DOS system diskette.
3. Copy the LAN driver software you will need from the appropriate LAN Driver Diskettes onto the DOS diskette. Make sure you copy the drivers to the same directory as the rest of the VINES files.
4. This is now your working diskette; label it clearly.
5. Place the working diskette in drive A of the workstation. Put the original master diskettes in a safe place.
If you want the workstation to boot from this diskette you must create or copy an AUTOEXEC.BAT file to the diskette. The AUTOEXEC.BAT file might look like this:
echo off
prompt $p$g
ban
To Copy Banyan Networking Software to a Fixed Disk Drive
1. Create a separate directory for your Banyan networking software, for example, \bandir.
2. Use the DOS COPY or XCOPY command to copy all of the files from the System Diskette to the Banyan workstation directory, <bandir>.
3. Copy the LAN driver software from the LAN Driver Diskettes to the Banyan directory. You must copy the drivers required to run the LAN card installed in this workstation.
Make sure the drivers reside in the same directory as the rest of the Banyan networking software.
There are two ways you can configure the Banyan workstation directory on a fixed disk drive:

Create a separate directory for the VINES files. 
Place all of the VINES and DOS files in the root directory. This method is not recommended as it is harder to manage.
If you want the user to log in to the Banyan network automatically each time the workstation boots, add BAN to the workstation's AUTOEXEC.BAT file.
If your VINES files reside in a separate directory on the workstation, you must modify the AUTOEXEC.BAT file to change to the Banyan directory and then execute BAN. The AUTOEXEC.BAT file might look like this:
echo off
path=c:\;c:\dos\
prompt $p$g
cd \bandir
ban
You now need to configure the Banyan networking software on the diskette or fixed disk so that the workstation recognizes the hardware configuration of the LAN card installed in the workstation.
Configuring Networking Software
Before the workstation can access the network, you must configure the network software using the PCCONFIG program. This program allows you to match the LAN driver's software configuration to the LAN card hardware configuration. Use the workstation configuration worksheets from the Administrator's Worksheets as described in Chapter 2 to complete the procedure.
Chapter 3 contains a detailed discussion on the PCCONFIG command. Follow the instructions in Chapter 3 to:
1. Configure the Network Card Settings options to match the configuration documented in the workstation configuration worksheets.
Note: If your workstation is on a Token-Ring LAN, you might need to enable Token-Ring source-level routing. See Chapter 3 for more information.
2. Set the Edit/View Login Group Searchlist from the Login Environment Settings menu.
3. Select support for Netbios or Named Pipes applications from the Special Software Settings menu, if necessary. Refer to PCNETB in Chapter 7 for information on using all the features of this command.
4. Make any necessary changes to the workstation communications parameters, using the Communications Setting menu.
Once the software is loaded and the workstation is configured, test the installation by logging in to the network.
To Test the Installation of Banyan Networking Software
1. Enter the BAN command at the command prompt. If you modified AUTOEXEC.BAT to execute BAN at startup, boot the workstation.
2. If you see the login prompt, proceed to step 3.
If you do not see a login prompt, make sure the workstation is connected to the network and then run diagnostic tests.
3. If you have an MCA workstation, run the Reference diskette and check the card settings. Confirm that the server is operational and connected to the network.
4. Run PCCONFIG to check that the configuration matches the configuration of the LAN card. In addition, check that the values used do not conflict with other devices in the workstation.
5. When the login prompt appears, log in to the network and exercise the basic network functions. Verify that all workstation devices operate normally.
6. If there is a problem with any of these items, check for a configuration conflict between one of the values on the LAN card and a value used by another device in the workstation. Refer to the vendor documentation and your workstation worksheets.
Once you successfully log in, you are ready to install Banyan networking software on additional DOS workstations.
Installing Additional Workstations
When you successfully install one workstation, there are two ways to install additional workstations. Use either:

Master diskettes included with your DOS LAN package 
Customized installation diskettes created using the PCCOPY command
Using the System Diskettes to install and configure each workstation, as described in earlier sections of this chapter, can be time consuming. "To Create Installation Diskettes Using the System and LAN Diskettes" and "Creating Installation Diskettes Using PCCOPY," which follow, describe how you can create customized installation diskettes to help you to streamline the installation process.
If you decide to boot the workstation from a diskette, use different procedures for copying VINES files onto low-capacity (360K bytes) and high-capacity diskettes. These procedures are explained in "To Use PCCOPY with Low-capacity Diskettes" later in this chapter.
You can create any number of installation diskettes, each with a full set of Banyan networking software and preconfigured for specific workstation groups. Create one installation diskette for each type of LAN card or LAN card configuration in your network.
Example Custom Installation Diskettes
If one half of a department's workstations use 3Com EtherLink LAN cards and the other half use 3Com TokenLink cards, create two installation diskettes: one configured for the 3Com EtherLink card, the other configured for the 3Com TokenLink card.
To Create Installation Diskettes Using the System and LAN Diskettes
1. Create two blank diskettes using the DOS FORMAT command. Label one "Installation" and the other "Diagnostics."
2. Copy the VINES files from the System Diskette to the diskette labeled "Installation." Copy the necessary LAN driver from the LAN Driver Diskettes to "Installation."
3. Use the PCCONFIG program to match the LAN card hardware configuration to the settings in the Network Card Settings screen. See "Configuring Networking Software" earlier in this chapter.
4. Copy the LAN diagnostic file to the diskette labeled "Diagnostics:"
5. Copy the following files from the diskette labeled "Installation" and not from the System Diskette:
- PCCONFIG.EXE
- PCCONFIG.MSB
- PCCONFIG.DB
Note: If you plan to install NDIS LAN drivers, read the Banyan NDIS Configuration Guide for information on configuring your NDIS LAN driver software, and how to make necessary edits to the workstation CONFIG.SYS file.
6. Install the LAN cards in all of the workstations.
7. Boot each workstation with the Diagnostics diskette and run the LAN diagnostics.
8. When you finish installing and testing all the LAN cards, copy the files from the Installation diskette to each workstation fixed disk drive or provide each workstation with copies of the Installation diskette.
Note: Include an accurate PCCONFIG.DB file for each workstation. You cannot use the DOS COPY command to obtain the PCCONFIG.DB file directly from the network. Copy the PCCONFIG.DB file from the Master Diskette or your customized installation diskettes.
Creating Installation Diskettes Using PCCOPY
Once one workstation is running and can log into the network, you can use the PCCOPY command to copy Banyan software across the network to a local workstation drive. PCCOPY can copy Banyan networking software to:

The fixed disk drive of the workstation from which the command is issued 
High-capacity diskettes 
Low-capacity (360K bytes) diskettes
Typically, use PCCOPY to create new VINES installation diskettes when the network is operational. This eliminates using the Master Diskette to create boot diskettes. You should only use the Master Diskette to create your first VINES diskettes. Using PCCOPY lets you obtain the latest revision of VINES software available on the network.
Note: If you create bootable diskettes, put operating system boot files and Banyan networking software on the same diskette to make it easier to manage diskettes that you distribute to users on the network. Use the DOS FORMAT /S command to create a DOS boot diskette.
PCCOPY sets the default Banyan communications driver in the PCCONFIG.DB file. When the program finishes writing the files to the diskette, be sure to run PCCONFIG if the workstations to be installed use a different LAN card or LAN card configuration than that used in the workstation from which you ran PCCOPY.
There are different procedures to follow for fixed disks, high-capacity, and low-capacity diskettes. These are described in the following sections.
Selecting PCCOPY Software Options
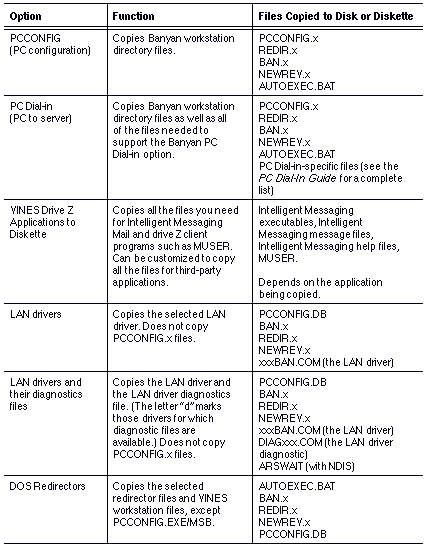
The PCCOPY command provides a number of software options to copy files from the Z drive to a local (or fixed) disk or high-capacity diskette. Table 6-1 describes those options.
To Create Installation Diskettes with PCCOPY
1. At an operating system prompt, enter pccopy. The PCCOPY Main menu, Figure 6-1 appears.
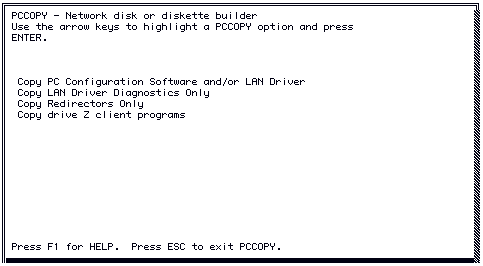
2. Select one of the following types of files to copy:
- PC configuration software or LAN driver. The Multiple Selection screen appears.
- LAN driver diagnostics only. The Multiple Selection screen appears.
- Redirectors only. The DOS Redirector screen appears.
- Drive Z client programs.
3. If you select Copy LAN Driver Diagnostics Only, proceed to step 6. If you select Copy Redirectors Only, proceed to step 8. If you select VINES Z drive client programs, proceed to the section "Creating Application Diskettes Using PCCOPY," later in this chapter.
4. If you select Copy PC Configuration software and/or LAN Drivers, the Multiple Selection screen, Figure 6-2, allows you to select any combination of the following items:
- PC configuration software
- PC Dial-In (PC to server) software
- LAN drivers
- LAN drivers and their diagnostics files
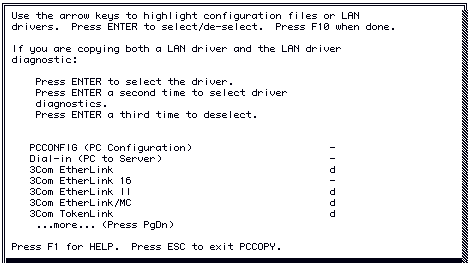
5. To select either PCCONFIG or Dial-In, use arrow keys to highlight the item. Press ENTER once to select the item. Press ENTER a second time to deselect it.
6. If you are in the LAN drivers section of the screen:
- Press ENTER once to select a driver; an asterisk (*) appears next to the driver.
- Press ENTER a second time to select the driver's diagnostics file. A "d" appears to the right of the asterisk.
- Press ENTER a third time to deselect both the driver and the diagnostics file; both the asterisk and the "d" disappear.
Drivers with available diagnostic files are marked with a "d." Those without diagnostics are marked with a hyphen (-).
7. When you finish, press F10. The DOS Redirector screen, Figure 6-3, appears. The Redirector Selection screen lets you select the versions of the redirector that support individual revisions of DOS.
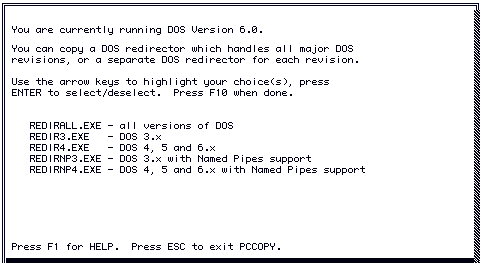
8. Select the version of the redirector that supports the revision of DOS you are using. You can also select REDIRALL.EXE, which supports all versions of DOS. See Chapter 4 for more information.
9. When you finish using the DOS redirector, press F10. The Destination Directory screen, Figure 6-4, appears. This screen lets you specify the complete pathname of the directory into which all selected files are copied. This directory must already exist on the specified drive.
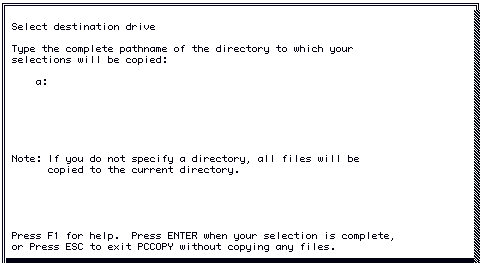
If you do not specify a directory, the current directory of the current drive is used. If you enter just a drive letter, the files are copied to the current directory of the specified drive. To enter a full pathname, use the backspace key to delete the current default drive before entering the new name.
If you are creating a boot diskette, type a: as the destination drive.
10. Press F10, the names of the files being copied are listed on the screen.
Do not interrupt the PCCOPY process, even if you make a mistake. Let the process finish. Then delete files from the diskette and start over.
If you are creating boot diskettes, repeat this procedure for every high-capacity VINES diskette that you want to create.
Note: If you create a dial-in diskette, see the PC Dial-in Option for more information.
Some LAN drivers have diagnostic files available on the VINES LAN diskette. If you use a LAN driver for which no diagnostics are available from VINES, use the diagnostics programs provided by the LAN driver vendor.
To Copy LAN Diagnostic Files
1. Select Copy LAN Driver Diagnostics Only from the PCCOPY Main menu. The Select Drive Diagnostics screen, Figure 6-5, appears. This screen lists the LAN drivers in alphabetical order. Drivers for which diagnostics are available are marked with the letter "d."
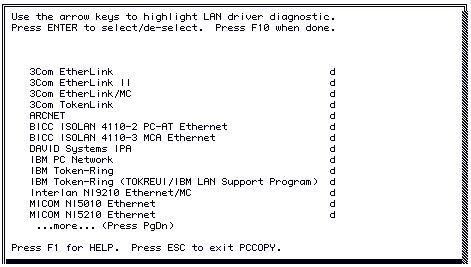
2. Use the arrow keys to highlight an item.
3. Press ENTER once to select the item. Press ENTER a second time to deselect it.
4. When you finish, press F10. The Redirector Selection screen appears. See step 7 in "To Create Installation Diskettes with PCCOPY" earlier in this chapter for information on using this screen.
You can use this diskette to install other workstations by copying its contents to the fixed disk drive of the new workstation, or you can use it as a boot diskette, inserting it into diskette drive A of the workstation.
To Use PCCOPY with Low-Capacity Diskettes
1. At the DOS prompt, enter pccopy. The PCCOPY Main menu appears.
2. Select Copy PC Configuration software and/or LAN Driver. The Multiple Selection menu appears.
3. Select the name of the driver to be copied. You can also select the driver diagnostics. Press F10 when done. The Redirector Selection screen appears.
Note: Do not select PCCONFIG. The files copied by this option are too large for a single low-capacity diskette. Choose only one of the drivers listed - they are large and cannot all fit on a low-capacity diskette.
4. Select the appropriate redirector file. Remember, REDIRALL.EXE supports all revisions of DOS, but uses the most memory of any of the available redirectors. When you press F10, the Select Destination Drive screen appears.
5. Specify the pathname to which all selected files are copied.
The files are copied to the current directory of the specified drive. To enter a full pathname, use the backspace key to delete the current default drive.
When you press F10, the names of the files being copied are listed on the screen.
6. PCCOPY prompts you to insert a diskette into the diskette drive you chose at step 5. Insert the low-capacity diskette and press ENTER.
PCCOPY lists the programs as it copies them to the fixed disk or diskette. When the process is complete, a confirmation message appears.
Do not interrupt the PCCOPY process, even if you make a mistake. Let the process finish. Then delete files and start over.
The low-capacity diskette that you created does not contain the PCCONFIG.EXE and PCCONFIG.MSB files. The diskette does contain the PCCONFIG database file, PCCONFIG.DB.
To Run PCCONFIG from a Low-Capacity Diskette
1. Copy PCCONFIG.DB to another diskette.
2. Copy PCCONFIG.EXE and PCCONFIG.MSB from drive Z to that same diskette.
3. Run PCCONFIG.
4. Copy the modified PCCONFIG.DB file back to the low-capacity boot diskette.
You may want to provide more than one Banyan communications driver on the VINES diskette for a given workstation, as in the following situations:

More than one Banyan driver is available for a LAN card and you want the user to have access to both drivers. 
Two different LAN cards exist in a workstation, each requiring a different driver. 
The workstation contains both a LAN card and an asynchronous communications card, and you want the user to be able to access Banyan networking software both ways.
The PCCONFIG.DB file contains a setting for the default communications driver. This driver is loaded by default whenever the BAN command runs at the workstation.
Note the following information when managing multiple drivers on one workstation:

The PCCOPY and NEWREV programs reset the default communications driver whenever they copy more than one driver to the VINES diskette. 
NEWREV automatically updates all the driver programs on the VINES diskette. When you use PCCOPY, be sure to select all the driver programs required at the workstation. 
You can override the default driver by specifying the name of an alternate driver as a switch on the BAN command. For example, assume that the default driver in the PCCONFIG.DB file is ETHRBAN.COM. The command, BAN /TOKNBAN, loads one of the VINES drivers for a Token-Ring adapter, overriding the default. 
You can change the default driver with the PCCONFIG program at any time. The change takes effect when you reboot the workstation.
Creating Application Diskettes Using PCCOPY
PCCOPY now has a feature that helps you copy all the files you need for application programs such as Intelligent MessagingTM mail and drive Z client programs such as MUSER. You can also customize PCCOPY to copy all the files you need for third-party applications.
1. At the DOS prompt, enter pccopy. The PCCOPY Main menu, Figure 6-6, appears.

2. Choose VINES Z drive client programs. The Client Program Selection screen, Figure 6-7, appears.
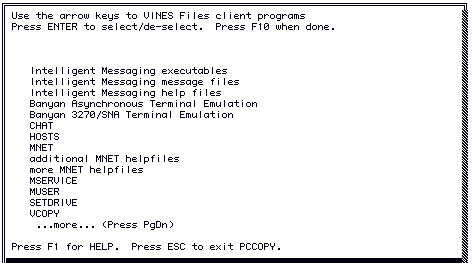
3. Select a program by using the arrow keys to position the cursor next to the item. Press ENTER once to select the item. (Pressing ENTER a second time deselects it.) You may select more than one item.
4. Press F10. The Destination Directory screen, Figure 6-8, appears. This screen lets you specify the complete pathname of the target directory into which all selected files are copied. This directory must already exist on the specified drive.
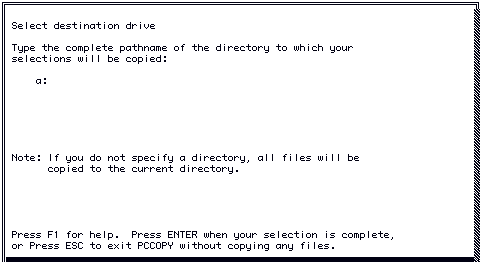
For a different destination drive, delete the C: and type in the correct drive letter. For example, to use a floppy, delete C: and type A: in its place. If the pathname includes a subdirectory that does not exist, PCCOPY will create it when it copies the files.
5. You are asked to place a diskette in drive A. Press ENTER when you have done so. PCCOPY begins to copy the files and lists the names of the files being copied on the screen.
You can customize PCCOPY, adding additional applications to the list of applications you can copy.
For copying applications to disk, PCCOPY uses two text files as input:

f_zprogs.txt - Determines which application names display in PCCOPY 
f_zfile.txt - Determines which files are copied when you choose a particular application
The two files work together to tell PCCOPY what files to copy for which application. The files f_zprogs.txt and f_zfile.txt are in the same directory as PCCOPY.EXE.
The following sections describe the format of f_zprogs.txt and f_zfile.txt. You can edit them using any ASCII text editor. You must have Write access to the files. At the end of this section is a detailed example.
Defining the Application Name
The application file, f_zprogs.txt, consists of a series of statements that contain three fields:

A constant, the letter z (lowercase) that begins the definition line 
A unique two-character abbreviation for the application 
The application name, as you want it to appear on the PCCOPY screen
Figure 6-9 illustrates this concept.
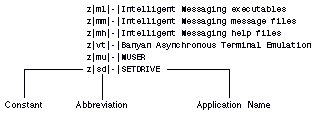
The three fields are separated by the vertical bar character (|). A hyphen (-) appears between the two-character abbreviation and the application name. You must use these special separation characters.
Defining the Files
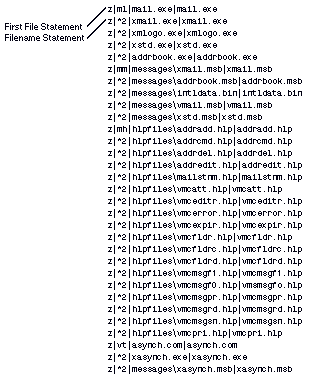
The file containing the filenames, z_file.txt, contains two types of statements for each application:

A first file statement, which names the first of the files to be copied. This can be any application file, but generally the executable file that starts the application is used. 
One or more filename statements, which identify the remaining files that make up the application.
First File Statements
The first file statement contains four fields separated by the vertical bar character (|):

A constant, the letter z (lowercase) 
The same unique two-character abbreviation for the application that you used in z_progs.txt 
The from file, or source, pathname, relative to z:\ 
The to file, or destination, filename. Note: To specify a subdirectory for the destination files, use the Destination Directory screen described in "To Copy Files Using PCCOPY" earlier in this chapter.
Filename Statements
Each filename statement has the same format as the first file statement, with one exception: The second field is the constant *2, instead of the unique two-character abbreviation used in the first file statement. This identifies the entry as a filename statement.
Figure 6-10 shows the beginning of a sample z_file.txt file with its first file and filename statements. Detailed descriptions of each statement follows.
Example Adding an Application
Your department created a small program to track sales calls. You need to make a copy of the sales program (TRACKIT.EXE) and its associated databases (TRACK01.DB, TRACK02.DB, TRACK03.DB) for every sales engineer who dials in from the road. You choose the abbreviation TR for the application. Using a standard ASCII text editor, you add the following statement to z_progs.txt:
z|tr|-|Sales Tracking System
Your z_progs file now looks like the sample in Figure 6-11.

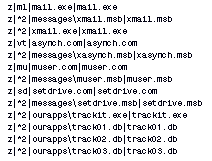
You decide to place all the TRACKIT files in a subdirectory on the diskette called STS. You must add the following statements to the z_file.txt file:
z|tr|ourapps\trackit.exe|trackit.exe
z|*2|ourapps\track01.db|track01.db
z|*2|ourapps\track02.db|track02.db
z|*2|ourapps\track03.db|track03.db
Your z_progs file now looks like the sample in Figure 6-12.
Third-Party Applications Diskettes
For third-party applications, make sure that the user has a complete application package and the appropriate licenses. Make sure any existing .BAT files or Windows startup files reflect the new location of the applications.
Selecting a Redirector for a DOS Workstation
The redirector program diverts DOS commands entered at the workstation to the network. A redirector executable file must be in the Banyan workstation directory, <bandir>.
DOS workstations, as well as Windows workstations, can use numerous DOS revisions. The DOS revision, however, must match the version of the redirector installed on the workstation. Use the PCCOPY command to load the correct version of the redirector.
VINES provides five kinds of redirector files, as shown in Table 6-2.
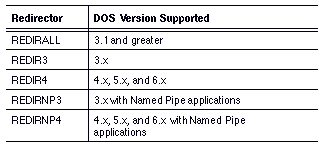
The REDIRALL.EXE file is larger than the other redirector files and, therefore, consumes more workstation memory. To save memory, you can use one of the individual redirector files and delete the others from your diskette or fixed disk.
If you use an individual redirector program and want to change your version of DOS, you must change the corresponding version of the redirector first.
Example Changing a Redirector File
If you run DOS version 3.1 in your workstation with REDIR3.EXE and want to upgrade to DOS version 5.0 or higher, install REDIRALL.EXE or REDIR4.EXE before you upgrade.
The REDIRx.EXE file is copied to the Banyan workstation directory when you install Banyan networking software. Any time you change your version of DOS or add Named Pipe support, use the PCCOPY command to load the correct version of the redirector from the Z:\PCINIT directory.
To Load a New Version of the Redirector
1. Use the CD command to change to the Banyan workstation directory.
2. At the prompt, enter pccopy. The PCCOPY Main menu appears. See Figure 6-6.
3. Select Copy Redirectors Only. The Redirector Selection screen appears. See Figure 6-3.
4. Select the version of the redirector you want to load on the workstation and press F10. The destination directory screen appears. See Figure 6-8.
5. Specify the complete pathname of the directory into which the selected redirector is copied. To enter a full pathname, use the backspace key to delete the current default drive, then enter the new pathname. If you:
- Do not specify a directory - the current directory of the current drive is used.
- Enter just a drive letter - the files are copied to the current directory of the specified drive.
6. Press F10. The names of the files being copied are listed on the screen.
Do not interrupt the PCCOPY process, even if you make a mistake. Let the process finish. Then you can delete files and start over.
Changing the Redirector Location in Memory
Each time you run BAN, the redirector is loaded in workstation memory. You can use the REDIR command to load the redirector into a different area of workstation memory as follows:
1. Use BAN /NC instead of BAN.
2. Use the REDIR command to load the redirector into high memory using the /H switch.
3. Once the redirector is loaded, use the LOGIN command to log in to the network.
Note: Do not use the REDIR command to load the redirector into high memory for workstations running version DOS 5.0 or higher. The memory management in version DOS 5.0 or higher handles the placement of software components (or third-party utilities) more efficiently than you can by moving the redirector. For workstations running DOS 5.0 and 6.x, load DOS high in memory and load BAN low in memory.
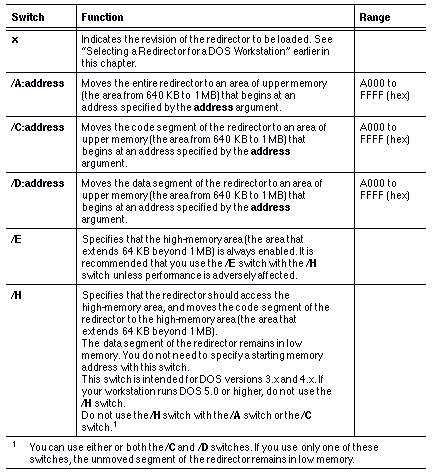
The format of the REDIR command is:
REDIRx [/A:address] [/C:address] [/D:address] [/E] [/H]
The switches in the REDIR command are described in Table 6-3.
Changing the Hop Count Used by the Redirector
When you need to reach a specific server more than one hop count away, you can increase the number of hops that a workstation broadcast travels when attempting to locate a drive Z (VINES Files). By default, workstations broadcast to all servers that are 0 or 1 hop away. Increasing the number of hops gives users access to a wider range of servers when they log in, because they are no longer limited to obtaining drive Z files from servers that are no more than one hop away from their workstation.
You can set the hop count by entering the appropriate information on the command line for the following commands:

BAN 
REDIR3, REDIR4, REDIRALL, REDIRNP3, REDIRNP4
You set the hop count once, using any of the preceding commands. After you set the hop count using one command, you do not need to set it again using the other command.
Note: Do not enter the BAN /B switch and /NC switch on the same command line.
The use of the switch is as follows:
/B: initial_hop_count[: final_hop_count]
The square brackets indicate that the last parameter is optional. The redirector interprets the <initial hop count> as the number of hops to use in the initial file service broadcast.
To Set the Hop Count
1. Place the following line in the AUTOEXEC.BAT file of your workstation:
programname /B: initial_hop_count [: final_hop_count]
2. Reboot the workstation. A message appears notifying you that the settings of the default hop count have been changed.
The redirector attempts to locate a VINES Files service by broadcasting to servers at the distance specified by the initial hop count. If the initial broadcast fails and you specify a final hop count, the redirector increments the hop count by one and broadcasts again. Broadcasting continues until either a VINES Files file service is found or the hop count exceeds the value specified by the final hop count.
You do not need to specify a final hop count. However, if the initial broadcast fails and you do not specify a final hop count, no further broadcasts occur. As a result, the login from the workstation fails.
You can enter a maximum value of 15 for the Final Hop Count. Packets that travel 15 hops are broadcast across the entire network. Entering a value greater than 15 for the Final Hop Count does not cause the drive Z broadcast to travel further than the maximum 15 hops.
The following are some examples of BAN and REDIR commands that can be used to increase the hop count:
BAN /B:2 - The workstation attempts to locate a VINES File Service by broadcasting to servers 2 hops away. Servers less than 2 hops away do not receive the broadcast.
BAN /B:2:4 - Initially, the workstation attempts to locate a VINES File Service by broadcasting to servers 2 hops away. If the initial broadcast fails to locate a VINES Files service, the workstation issues a second broadcast to servers 3 hops away. If the second broadcast fails, a final broadcast attempts to locate VINES Files on servers 4 hops away.
REDIR4 /B:3 - The workstation attempts to locate a VINES File Service by broadcasting to servers 3 hops away.
For more information on using BAN
and the REDIR
commands, see Managing Workstations
and the Command Reference.
If an attempt to run the BAN, LOGIN, or LOGOUT commands fails, VINES displays a message on the screen that describes the error condition. Each command sets an error level (also called an exit code) after execution ends.
The following section describes VINES exit codes that can be used when setting up user workstations. These exit codes are returned by the BAN, LOGIN, and LOGOUT commands.
You can capture the exit codes with a batch program so that it displays the error code and name, in addition to the error message that VINES displays on the screen. By capturing the exit code, you can tell the probable cause of the error condition (for example, if LOGIN fails to execute properly).
The codes are not displayed after the VINES programs execute. You can write your own script or program to capture the codes with DOS errorlevel calls and echo them on the screen or copy them into a temporary file. If the execution is successful, the error code 0 is returned. If the execution is aborted, one of the error codes in the range 1 through 22 is returned. The exit codes are explained in the section "VINES Exit Codes."
A sample DOS batch file named LOGERR17.BAT follows:
#logerr17.bat
logout /yy
if errorlevel 17 goto e17
if errorlevel 1 goto e1
echo No errors
goto exit
:e17 echo Error 17 goto exit
:e1 echo Error 16 through 1 goto exit
:exit
The batch file performs one of these tasks, depending on the conditions of LOGOUT execution:
|
|
If the error level returned is 17, display "Error 17". |
|
|
If the error level returned is 0, display "No errors". |
|
|
If the error level returned is neither 17 nor 0, display "Error 16 through 1". |
For the batch file to work correctly, put the file in the directory on the drive from which you boot your workstation. For example, if you normally boot from the root directory of your hard disk (drive C), copy the file to C:\.
The following list provides an explanation for each VINES exit error code.
Number (Code Name) Explanation
0 (None) Completion of execution is correct.
1 (invalidFile) Cannot open LOGIN.MSB. LOGIN.MSB has been corrupted. Cannot execute POSTLOGIN files.
2 (loginCancelled) User pressed F10 while entering username or password, or user entered no username and pressed ENTER.
3 (STunavailable) StreetTalk service is unavailable.
4 (unknownParameter) User specified an invalid switch during login.
5 (banNotLoaded) Network software is not loaded. Network software cannot be accessed. Incorrect version of network software. Network PC software is not running.
6 (alreadyLoggedIn) User is already logged in.
7 (INTENORULES) No international rules found in INTLDATA.BIN resource file.
8 (INTENOFILE) Resource file INTLDATA.BIN cannot be found.
9 (noAsyncSess) Generic ASYNCH session error.
10 (noAsyncBan) ASYNCBAN.COM cannot be run or be found.
11 (errConfig) Configuration error in SCRIPT.COM (PC Dial-in file).
12 (errPhoneBook) Not enough memory to read SETDIAL.DB.
13 (notEnoughMem) Not enough memory available for execution.
14 (scriptNotOpen) SCRIPT.COM (PC Dial-in file) cannot be run.
15 (InvalidScriptSyntax) Script syntax is invalid in SCRIPT.COM.
16 (errOpenWindow) Not enough memory to generate a screen window for PC Dial-in users.
17 (invalidUsage) Invalid usage. User not logged in.
18 (notLoggedIn) LOGOUT was called but user could not be logged out because user was not logged in.
19 (loggedOut) LOGOUT was called successfully and logged out user due to an error.
20 (asynchLineBusy) Telephone line is busy. No asynchronous connection can be established.
21 (asynchTimeout) Timeout occurred during dial-in; unable to establish an asynchronous connection.
22 (asynchCancelled) User pressed ESC during asynch communications session.