Chapter 7 - Interprocess Communications for DOS Workstations
Interprocess communication applications that use the Netbios and Named Pipe Application Program Interface (API) are supported on all DOS workstations running VINES version 4.1 and greater.
Additional commands, such as SEND_NO_ACK and CHAINSEND_NO_ACK, are supported in VINES version 6.00. For more information about these commands, refer to your Netbios documentation.
Chapter 3 describes how support for Netbios and Named Pipe APIs is provided and Chapter 5 describes various issues in planning for interprocess communications support. This chapter describes how to configure a DOS workstation to support applications using the processes described in Chapter 3 and Chapter 5.
Providing Netbios Support for DOS Workstations
Once a Netbios name service is added to the network and started, you must make it available to users by using the following procedures:

Loading Netbios emulation software on the workstation using PCCONFIG or PCNETB 
Registering with a Netbios name service on a network server using the SETNETB command
See Managing VINES Services for more information on adding Netbios name services to the network.
The following sections describe how to use PCCONFIG, PCNETB, and SETNETB on DOS workstations.
Loading Netbios Software Using PCCONFIG
Workstation-resident software must be loaded before users can access the service. This software takes up approximately 32.5K of workstation memory.
You can use the PCCONFIG program to specify that the software should be loaded at login time. Otherwise, the user executes the PCNETB command from DOS. However, you cannot use PCCONFIG if BAN /NC was used to load network software on the workstation.
PCCONFIG modifies the PCCONFIG.DB file in the Banyan workstation directory. See Chapter 3 for a complete description of PCCONFIG.
To Provide Access to the Netbios Name Service
1. From the Banyan workstation directory, enter pcconfig. The Configuring a PC for the Network menu appears.
2. Select Special Software Settings. The Special Software Settings menu, Figure 7-1, appears.
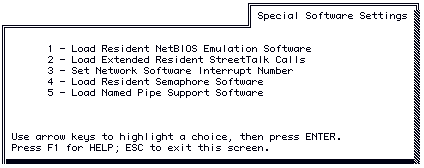
3. Select Load Resident Netbios Emulation Software. The Netbios Emulation screen, Figure 7-2, appears.
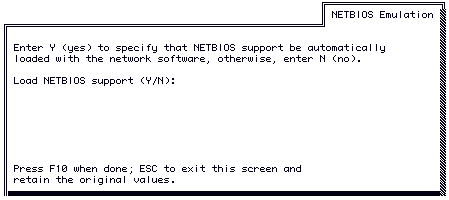
4. Enter Y and press F10. You return to the Special Software Settings menu.
5. Press ESC to exit the Special Software Settings menu and return to the Configuring A PC for Network menu.
6. Press F10 to exit the PCCONFIG program and save your changes.
7. Reboot the workstation. You are now ready to run SETNETB.
Loading Netbios Software Using the PCNETB Command
You can use the PCNETB command instead of PCCONFIG to load Netbios software at a workstation. Unlike PCCONFIG, however, you must manually execute PCNETB each time a workstation boots unless you add it to a batch file. The format of PCNETB is described in this chapter and in the Command Reference.
To Use PCNETB to Load Netbios
1. Boot the workstation.
2. Run BAN to load network software.
3. At a DOS prompt, enter the PCNETB command or create a batch file containing the PCNETB command.
Configuring Netbios Using the PCNETB Command
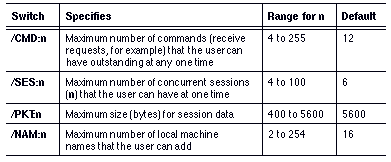
Using PCNETB and the /CMD, /SES, /PKT, and /NAM switches, you can configure the number of Netbios sessions and Netbios commands available at the workstation.
The PCNETB command has the following format:
PCNETB [/SES:n] [/CMD:n] [/PKT:n] [/NAM:n]
The switches used in this command are described in Table 7-1.
You are now ready to run SETNETB.
Connecting to the Netbios Name Service with SETNETB
Once you load the Netbios software on the workstation you must connect the workstation to a specific Netbios name service. This is done using the SETNETB command, which ensures proper addressing.
Note: All users of any given program requiring the Netbios interface must use the same Netbios name service.
The format of the SETNETB command is:
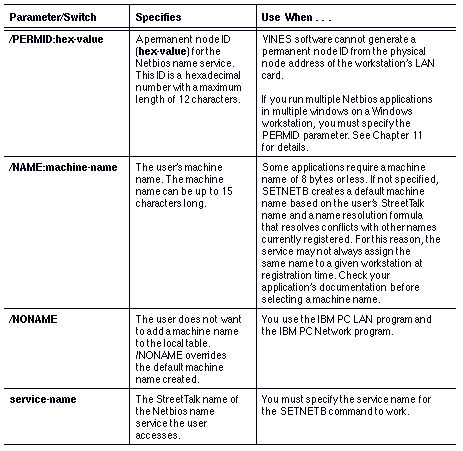
SETNETB [/PERMID:hex-value]
[/NAME:machine-name | /NONAME] service-name
The switches used in this command are described in Table 7-2.
To Use SETNETB on a DOS Workstation
1. At a DOS workstation on which Banyan networking software is installed, use the CD command to change to the Banyan workstation directory, and enter ban.
2. Log in using your StreetTalk name and user password.
3. At the command prompt, enter the SETNETB command with the workstation name and name of the Netbios name service the workstation will access. For example:
setnetb /name:machine1 netb@accounting@WCTUS
Your workstation is now ready to run your Netbios applications.
The following sections describe precautions to observe when using SETNETB.
Naming Conflicts
Although the SETNETB command is supported in the user profile, it is not recommended that you include it there. To prevent name conflicts, always run SETNETB from a batch file so that the same computer name is always assigned to a specific workstation, rather than to a specific user who could log in at any workstation.
The SETNETB command includes a switch that lets you enter no computer name at the time you register with the service. When you do this procedure, the Netbios name registration service assigns the name based on the user's StreetTalk name. It is recommended, however, that you always specify a name in the SETNETB command line.
If a user does not specify a computer name in SETNETB, the service assigns it a unique computer name. For this reason, the service may not always assign the same name to a given workstation at registration time.
Naming Service Issues
Running SETNETB against a Naming Service that is overloaded causes SETNETB to become unusable and the following message appears:
WARNING: Permanent node id not set correctly.
Once in this state, you cannot rerun SETNETB against any naming service (busy or not) to establish a connection with a service. You must reboot the workstation and retry until you successfully establish a session.
See Chapter 5 for more information on the SETNETB command.
You can set up a workstation to provide Netbios support to users in the following ways:

Enter the SETNETB and PCNETB commands from the DOS prompt. 
Set PCCONFIG to provide Netbios support each time the workstation boots, then manually enter SETNETB to connect to a name registration service. 
Set PCCONFIG for Netbios support, then use the workstation's AUTOEXEC.BAT file or a batch file to connect with the Netbios name service. This batch file can execute the Netbios application if desired.
Example Providing Support Manually
There are two separate commands issued at the DOS prompt:

Load Netbios support software. 
Provide the machine name Berber to the Netbios name service Names@Sales@WCTUS: pcnetb
setnetb /name:berber names@sales@WCTUS
Example Using a SETNETB Batch File
A batch file is used to:

Log in to the network. 
Connect to the Netbios name service. 
Launch an application.
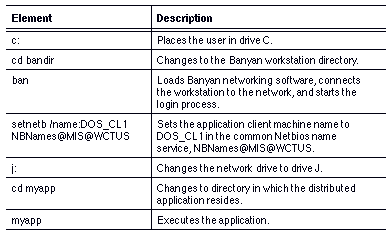
This example assumes that PCCONFIG loads Netbios software:
c:
cd bandir
ban
setnetb /name:DOS_CL1 NBNames@MIS@WCTUSj:
cd myapp
myapp
The elements of this batch file are listed in Table 7-3.
Creating a Binary Trace Output from PCNETB Using NBTRACER
If you are having difficulty with your installation, Banyan may ask you to create a file to help solve the problem. You can use NBTRACER with PCNETB to create a binary trace output from the DOS Netbios client software. In addition, NBTRACER generates an ASCII text analysis file.
For more information on using PCNETB, refer to the Command Reference.
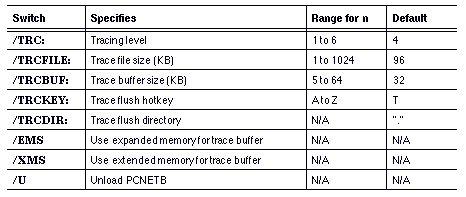
The PCNETB command with the /TRCFILE, /TRCBUF, /TRCDIR, /TRCKEY, EMS, /XMS, or /U switches has the following format:
PCNETB [/SES:n] [/CMD:n] [/NAM:n] [/PKT:n] [/TRC:n] [/TRCFILE:n] [/TRCBUF:n] [/TRCDIR:directory] [/TRCKEY:c] [/EMS or /XMS] or [/U]
If no tracing options are specified, tracing is disabled.
If no parameters are provided, then the Netbios emulation is loaded using the default parameters, with trace output disabled. The /SES:n and /CMD:n default parameters are obtained by using the PCCONFIG.EXE settings.
If any of the tracing parameters are specified, then all other tracing parameters adopt their defaults unless they are also specified.
The switches used only with the PCNETB command are described in Table 7-1. The switches for using PCNETB with NBTRACER are described in Table 7-4.
Using NBTRACER to Display a Trace Analysis
You can use NBTRACER to display a trace analysis and to direct an analysis to file. The format is as follows:
NBTRACER PCNETB_Trace_Output_Filename
For example:
NBTRACER PCNETB1.TRC > PCNETB1.OUT
In this example, PCNETB1.TRC is the file generated by the PCNETB /TRC command. PCNETB1.OUT is the redirected file.
Named Pipe client application support is available for DOS. To provide this support, complete the following tasks:
1. Use PCCOPY to copy a Named Pipe redirector to the workstation's drive Z. See Chapter 6 for a complete description of PCCOPY. Use REDIRNP4 with DOS versions 4.x and 5.x, and 6.x
2. Use PCCONFIG to load Netbios software. See Chapter 3 for a complete description of PCCONFIG.
3. Use PCCONFIG to load Named Pipe software.
To Provide Named Pipe Support for a DOS Workstation
1. At the DOS prompt, enter pccopy. The PCCOPY Main menu appears.
2. Select Copy Redirectors Only. The DOS Redirector screen appears.
3. Select REDIRNP4.EXE and press F10. The Destination Directory Selection screen appears.
4. Enter the full pathname of the Banyan workstation directory. When PCCOPY finishes copying files, the DOS command prompt appears.
5. Enter pcconfig. The Configuring a PC for the Network menu appears.
6. Select Special Software Settings. The Special Software Settings menu appears.
7. Select Load Resident Netbios Emulation Software.
8. Enter Y and press F10. You return to the Special Software Settings menu.
9. Select Load Named Pipe Support Software and press ENTER. The Named Pipe Support screen appears.
10. To load Named Pipe software support, enter Y and press F10. You return to Special Software Settings screen.
11. Press ESC to return to the Configuring a PC for the Network menu.
12. Press F10 to save your changes and exit the program.
13. Reboot your workstation.
14. If you did not do so already, create a login batch file that contains the BAN command and the SETNETB command, like the following example:
ban
setnetb /name:machine_name service_name@group@org
The workstation can now run Named Pipe client applications.