Chapter 12 - Installing OS/2 Workstations
Banyan networking software supports OS/2 versions 2.0 and greater. This chapter describes the installation procedures for installing VINES on an OS/2 workstation. In addition, this chapter contains instructions for making multiple installation diskettes. Each installation diskette can be tailored to match the different LAN cards, LAN drivers, and login environment settings needed by users in your network.
Before you begin the installation procedure, be sure you have completed the procedures listed in "Pre-installation Requirements," which follows.
Before you begin installing the first workstation, complete these tasks:
1. Install the LAN cable.
2. Record the LAN configuration on the Workstation Configuration Worksheet.
3. Install the LAN card in the workstation.
4. Test the LAN card using the diagnostic tests provided by the LAN card vendor.
5. Load the OS/2 operating system. Your workstations require at least 6 MB of RAM. The recommended amount is 8 MB or more.
6. Install IBM's Extended Services software, if you plan to use this product.
Note: Banyan networking software for OS/2 2.x requires Extended Services. If you do not plan to install Extended Services software, follow the steps for installing the IBM LAPS diskette, described in the Banyan NDIS Configuration Guide. Extended Services software is not required for earlier versions of OS/2.
7. For workstations running OS/2 2.x, refer to the Banyan NDIS Configuration Guide and make the required edits to the PROTOCOL.INI and the CONFIG.SYS files.
8. Make backup copies of the VCLIENT and IBM LAPS diskettes. (The VCLIENT diskette contains VINES software for OS/2 workstations.) Use the OS/2 XCOPY command.
Workstation Installation Overview
Review the following steps before installing VINES on an OS/2 workstation:
1. Install the IBM Extended Services software (if not already installed) using the IBM LAPS diskette. This procedure is described in the Banyan NDIS Configuration Guide.
2. Copy the Media Access Control (MAC) driver for the LAN card and modify the PROTOCOL.INI file. This is described the Banyan NDIS Configuration Guide.
3. Edit the CONFIG.SYS file as required. This procedure is described in the Banyan NDIS Configuration Guide.
4. If your workstation runs OS/2 version 2.0 or greater, or if you are installing NDIS LAN drivers, create or edit the PROTOCOL.INI file. This procedure is described in the Banyan NDIS Configuration Guide.
5. Install VINES software using the VCLIENT diskette.
6. Use the PCCONFIG program to:
- Create a login group searchlist.
- Enable source-level routing for Token-Ring LANs, if necessary. For more information about source-level routing, refer to Managing Communications.
The next section, "Installing VINES from the VCLIENT Diskette," describes the installation procedure.
Installing VINES from the VCLIENT Diskette
Complete all of the steps in the following installation procedures. If you make a mistake or decide not to load part of the software at this time, it is easier to correct mistakes if all the installation procedures are complete.
Before you install the VCLIENT diskette make sure you back up existing CONFIG.SYS and PROTOCOL.INI files to a diskette.
To Install VINES Software on an OS/2 Workstation
1. Go to an OS/2 command prompt.
2. Insert the backup copy of the VINES VCLIENT diskette in drive A.
3. At the OS/2 command prompt, enter a:\vclient and press ENTER. The VINES Installation screen, Figure 12-1, appears.

4. Press ENTER to select the default directory, c:\VINES.
To select any other directory, enter the drive letter and directory name and press ENTER.
If you enable the dual-boot option, you must create separate directories for the VINES software, one for each operating system.
The Additional Software Selections screen, Figure 12-2, appears.
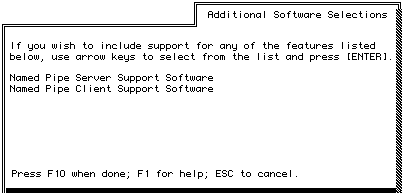
5. Use the cursor keys to highlight your choice and press ENTER. This selects any additional software needed to support features used in your network. An asterisk (*) appears next to the selected item.
Press ENTER again to deselect software. The asterisk next to the item is removed.
6. Press F10 when you complete making your selections.
7. Press ESC to exit this screen and continue the installation without selecting any additional software. A confirmation screen appears.
8. Press ENTER to continue.
VCLIENT checks that the destination drive has enough space for the selected files. As VCLIENT copies the selected software, a "copying files" message appears and VCLIENT lists each file. When all the files are copied, the New Driver Selection screen, Figure 12-3, appears.
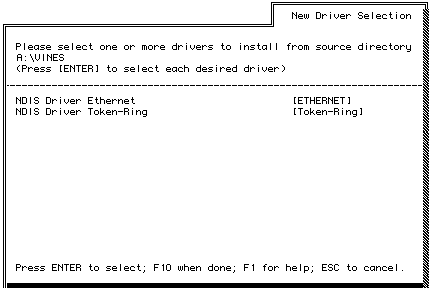
Note: OS/2 2.x supports NDIS drivers only; they are the only choice in the installation and configuration screens.
9. Press ENTER to select the LAN drivers you want to install. An asterisk (*) appears next to the LAN driver you select. Press F10 to load this driver onto your workstation.
VCLIENT again checks that the drive has enough space for the selected drivers. As VCLIENT copies the selected software, a "copying files" message appears and VCLIENT lists each file. After VCLIENT loads additional software support and driver software, the Update CONFIG.SYS screen appears.
This completes the first part of installing Banyan networking software. The next procedure describes how to update the CONFIG.SYS file.
1. From the Update CONFIG.SYS screen (Figure 12-4), enter the appropriate additions. Sample additions appear in bold typeface. Suggested additions are to the LIBPATH and SETPATH statements.
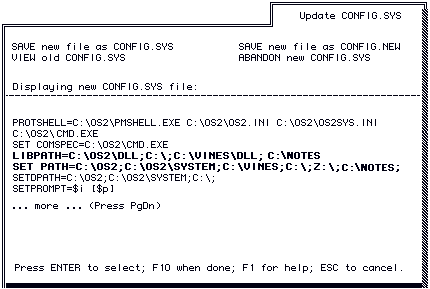
2. Select SAVE new file as CONFIG.SYS. Other options are described in Table 12-1.
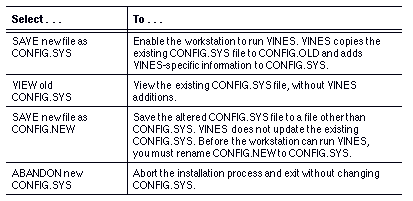
When you select Save new file as CONFIG.SYS, the file is updated. You are returned to the OS/2 command prompt.
A series of messages appears informing you that the installation procedure is complete.
3. Choose the Shutdown command and restart the workstation. You can now log in to the network.
For more information on logging in and out of the network, refer to Chapter 15.
Creating Additional Installation Diskettes
Although you can install VINES software at other workstations in the same way you installed VINES at the first workstation, VCLIENT simplifies the process. Using the VCLIENT Build an Install Diskette option, you can create a diskette containing pre-configured software for use in installing additional workstations.
You can tailor the installation diskette as you create it, making one installation diskette match the different LAN cards, LAN drivers, and login environment settings needed by users in your network.
When you create installation diskettes, run VCLIENT at an OS/2 workstation with VINES installed so you can access the VCLIENT program from the drive Z. This operation lets you use the most recent versions of software to create the installation diskette.
To Use VCLIENT to Create Additional Installation Diskettes
1. At an OS/2 workstation running VINES, open an OS/2 window. The OS/2 command prompt appears.
2. Use the CD command to change to the VINES directory.
3. Log in to the network using your StreetTalk username and password.
4. At the prompt, enter vclient. This command executes VCLIENT from drive Z on a Banyan server. The VINES Installation Options screen, Figure 12-5, appears.
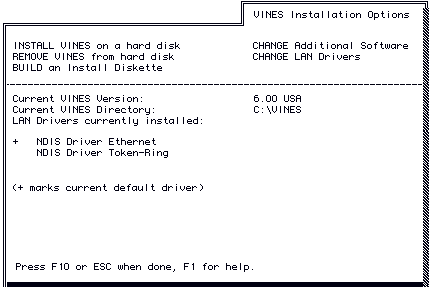
5. At the VINES Installation Options screen, select BUILD an Install Diskette. The VINES Directory Selection screen, Figure 12-6, appears.
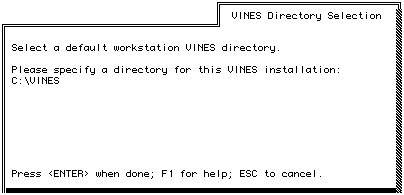
6. Specify the directory to be created for VINES files on each workstation. When you finish, the VINES Installation Diskette Selection screen, Figure 12-7, appears.
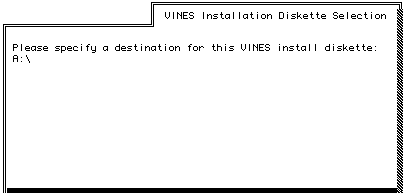
- To use the same directory name as the current workstation, press ENTER.
- To enter an alternate directory, type the directory name and press ENTER.
7. Specify the destination drive for the file being copied.
- To select drive A, press ENTER.
- To store software on another drive, enter the drive name and press ENTER.
The Additional Software Selection screen appears.
At this point, follow the installation procedures described in the section "To Install VINES Software on an OS/2 Workstation," earlier in this chapter. You can tailor the installation diskette as you create it, making one installation diskette match the different LAN cards, LAN drivers, and login environment settings needed by users in your network.
Selecting a Redirector for an OS/2 Workstation
The redirector program diverts OS/2 commands entered at a workstation to the network. A redirector executable file must be in the Banyan workstation directory.
OS/2 workstations currently use OS/2 version 2.x of the redirector. On an OS/2 workstation, the redirector is loaded as a standard OS/2 Installable File System (VINES.IFS or VINES2.IFS for OS/2 2.x).
Because OS/2 can manage multiple Installable File Systems (IFSs), the redirector can co-exist with IFS redirectors from other network vendors. For information about the redirector program for a DOS workstation, refer to Chapter 6.