![]()
![]()
Chapter 4 - Managing Source-level Routing
This chapter describes how the Banyan networking software chooses source-level routing (SLR) routes and metrics. It also describes how to configure SLR on your server. Topics include the following:
You can also configure preferred routes and servers on networks without Token-Ring by using the Add Cards/Change Card Configuration menu. Refer to the Banyan Server Operations Guide for additional information about configuring a preferred route by setting server thresholds. Refer to Chapter 8 for information about configuring a preferred route by changing the routing metric.
A Token-Ring LAN is a group of nodes that are directly connected in a ring topology by a common physical medium. The nodes use medium access protocols that conform to the IEEE 802.5 standard to communicate. A Token-Ring LAN is also called a ring.
A Token-Ring bridge connects two Token-Ring LANs. Examples of Token-Ring bridges include an IBM computer that runs the appropriate IBM Token-Ring Bridge software or a computer that emulates one, such as a VINES server equipped with the Banyan Token-Ring Bridge option.
A server can send and receive Token-Ring frames through both local IBM Token-Ring bridges and remote IBM Token-Ring bridge pairs.
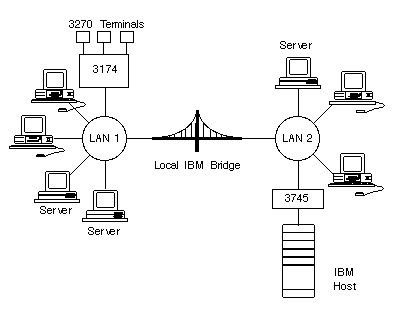
A local Token-Ring bridge connects two Token-Ring LANs directly. Figure 4-1 shows a local Token-Ring bridge.
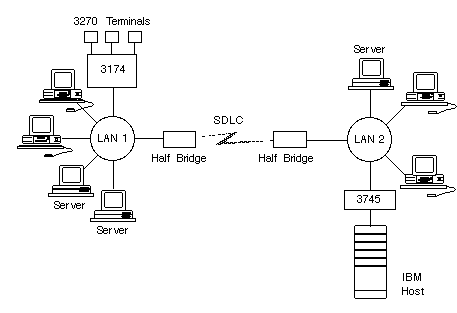
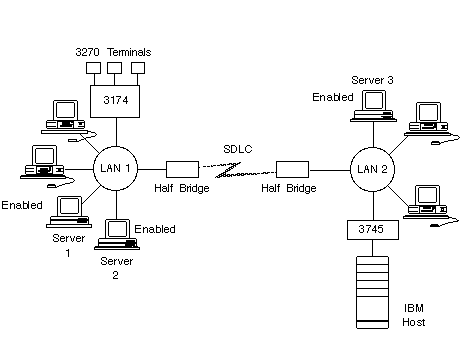
A remote Token-Ring bridge pair consists of two IBM computers that connect two Token-Ring LANs across a serial line. Each member of the pair is called a half bridge and uses IBM's Synchronous Data Link Control (SDLC) protocol to exchange data. Half bridges must be IBM computers; a Banyan server with the VINES Token-Ring Bridge option cannot emulate a half bridge. Figure 4-2 shows a remote Token-Ring bridge pair.
Banyan SLR uses IBM source routing protocols to route across bridges. If a server is emulating a bridge, SLR is not used; the Banyan networking software routes the packets through the server.
SLR protocols are described in Chapter 1. This chapter describes how SLR is implemented in VINES 5.50 and greater revisions, and how to manage SLR. "Guidelines for Mixing Versions of the Banyan Networking Software" later in this chapter describes the issues in mixing revisions.
How the Banyan Networking Software Chooses Source-level Routes
When choosing a route between two servers, Banyan networking software performs the following tasks:
1. The Banyan networking software looks at all the possible routes between the two servers.
2. If any of the routes are source-level routes (direct routes involving a source ring, a bridge, and a destination ring), the networking software ignores all but the first source-level route associated with an RTP broadcast from the destination server. The Banyan networking software assumes that the packet containing the source-level route was received first because:
- Fewer hops occur in that route
- A faster link exists in that route
- The route is less congested
3. The Banyan networking software checks to see if there is a gateway from the first server to the second server. If there is a gateway, the Banyan networking software compares the metric of the route through that gateway with the metric of the source-level route it chose in step 2.
4. If the metric of the source-level route in step 2 is less than the metric for the gateway route in step 3, the Banyan networking software chooses the source-level route. Otherwise, the Banyan networking software chooses the gateway.
Example Choosing Between Source-level Routes
When only multiple source-level routes exist between one server and another, the Banyan networking software always uses the first source-level route associated with an RTP broadcast from a neighbor server.
For example, Figure 4-3 shows two routes from Server 1 to Server 3.
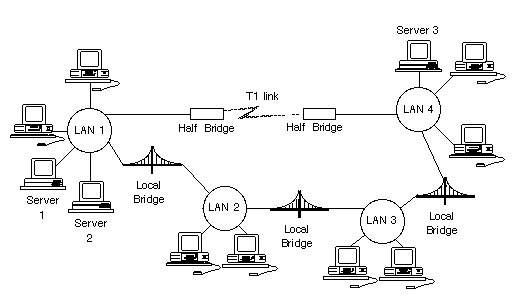
The first route is across a remote bridge pair connected by a T1 link. If Server 1 receives an RTP broadcast from Server 3 across the T1 link before it receives the same broadcast across the three local bridges, Server 1 uses the source-level route across the T1 link to reach Server 3.
If the T1 link either becomes congested or goes down, Server 1 receives the RTP broadcast packet traversing the three local bridges first. In that case, the route across the three local bridges becomes the route that the Banyan networking software uses to get from Server 1 to Server 3.
Example Choosing Between Multiple Source-level Routes and a Server
In Figure 4-4, in routing traffic from Server 1 to Server 2, the Banyan networking software has a choice between a server (Server 3) and two source-level routes.

In choosing between the two source-level routes, the Banyan networking software:

Compares the metrics of the two source-level routes and picks the best one Compares the metrics of the best one to the metrics associated with the route through Server 3 Picks the route with the best metrics
A routing metric is an estimated round-trip delay time associated with a route in 200-millisecond units called ticks. You can configure the routing metrics that are used for communications across IBM local bridges and IBM remote bridge pairs. These metrics are used by the Banyan Sequenced Packet Protocol (SPP) and the Banyan Interprocess Communications Protocol (IPC) to set timeouts for service-to-service and client-to-service connections.
The Banyan networking software does not use routing metrics for best-route calculation when the choice of routes is between two or more source-level routes. See "How the Banyan Networking Software Chooses Source-level Routes" earlier in this chapter for more information on when the Banyan networking software uses metrics in routing decisions.
You can set the routing metrics for source-level routes. For routes that are not source-level routes (for example, the route between one server and another), the Banyan networking software calculates the metrics based on the cost of the links.
Guidelines for Assigning Metrics
You can set the routing metric for a bridge route. A bridge route consists of a source ring, a bridge, and a destination ring. The bridge can be either a local bridge or a remote bridge pair. (See "Configuring SLR Bridge Routes" later in this chapter to configure bridge routes.)
Note: If you are calculating metrics for a server in a network that contains mixed revisions of the Banyan networking software, follow the guidelines in "Guidelines for Mixing Versions of the Banyan Networking Software" later in this chapter.
Each type of data link is assigned a metric. Table 4-1 lists the metrics for some popular data link types. The metrics in this table are the same ones that the Banyan networking software uses when calculating metrics for routes between servers. Although a local bridge is not a type of link, it is included in this table because the Banyan networking software assigns a metric of 1 to a local bridge. If a particular data link is not listed on this table, use the value for a similar type of link.
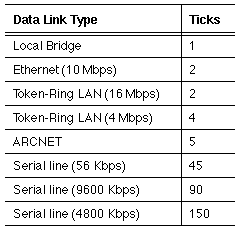
Note: The metric for an Ethernet data link is always two ticks, even if the links are Ethernet bridges or Ethernet-to-T1 bridges.
To calculate the metric for a bridge route, follow these steps:
1. Using a network map or a rough sketch of the bridge route, identify the data links in the route.
2. Using the figures in Table 4-1, assign a metric to each data link in the bridge route. You do not need to assign a metric to the source ring; the metric for the source ring is automatically assigned.
3. Add up the metrics for all the links.
Example Assigning Metrics for a Simple Bridge Route
Figure 4-5 shows a simple bridge route. Server 1 and Server 2 are both servers on which SLR has been configured. Both servers are connected to a Token-Ring LAN, which is then connected by a remote bridge to the other LAN. LAN 1 is using a 4 Mbps Token-Ring LAN, and LAN 2 is using a 16 Mbps Token-Ring LAN. The serial link connecting them runs at 9600 bps.
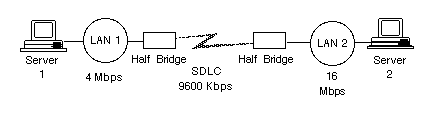
According to Table 4-1, the values for the metrics are:
Bridge: Serial Line (9600 Kbps) 90
Destination ring: Token-Ring LAN (16 Mbps) 2
Add the values. The total is 92 (90+2). The Banyan networking software adds the metric (4) for the link between Server 1 and the first ring. Therefore, 96 is the metric to assign to this bridge route.
Example Assigning Metrics for a Complex Route
To assign metrics for a complex route, follow these steps:
1. Break the route into bridge routes; that is, into sections composed of source ring, bridge, and destination ring.
2. Calculate the metrics for each individual component the same way you would for a simple bridge route by adding the metrics for each individual link in the route.
Figure 4-6 shows a complex route broken into bridge route components.
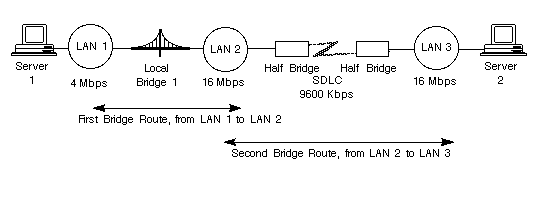
According to Table 4-1, the values for the first bridge route are:
Bridge: Local bridge 1
Destination ring: Token-Ring LAN (16 Mbps) 2
Add the values. The metric for this bridge route is 3.
For the second bridge route, the values are:
Bridge: Serial Line (9600 Kbps) 90
Destination ring: Token-Ring LAN (16 Mbps) 2
Add the values. The metric for this bridge route is 92.
When the Banyan networking software calculates the metric for a route from one server to another across many bridge routes, it adds the metrics for each segment to the metric for the local source ring.
For example, when the Banyan networking software calculates the route between Server 1 and Server 2 shown in Figure 4-6, the Banyan networking software adds the following values:
Metric for local source ring:
Token-Ring LAN (4 Mbps) 4
Metric for first segment 3
Metric for second segment 92
You can set metrics so that SLR either favors or avoids a specific route. Set lower metrics for a route you want the Banyan networking software to favor and higher metrics for a route you want the Banyan networking software to avoid.
Example Favoring a Route Through a Server
In Figure 4-7, traffic going from Server 1 to Server 3 can go through either Server 2 or through the local bridge.
The Banyan networking software takes the route with the smallest metric. In this example, the metrics for the routes are as follows:
Through Server 3, the metric that the Banyan networking software automatically calculates is 2 + 2, or 4. Through the local bridge, the metric you usually assign is 1 + 2, or 3. The Banyan networking software adds the metric for the source ring (2), bringing the total metric for the route to 5.
The Banyan networking software routes traffic through Server 3, because the metric for that route is smaller than the metric for the route through the local bridge. If you want traffic to go through the bridge instead, assign a smaller metric to the bridge route. (For example, assign the bridge route a metric of 1. When this metric is added to the source ring metric of 2, the total metric value is 3. This value is lower than that for either of the other two routes.)
By assigning different metrics, you can often avoid timeouts. For example, if you have a route that is prone to timeouts because of congestion, increase the routing metrics until the timeouts stop.
Guidelines for Mixing Versions of the Banyan Networking Software
SLR in VINES operates in the following ways:
You can configure metrics for a specific network interface, thereby selecting or avoiding a specific route. Refer to the Chapter 8 for additional information. You can specify a routing threshold for a specific server, thereby balancing server load. Refer to the Banyan Server Operations Guide for additional information. You can configure metrics for a bridge route. When choosing between two or more source-level routes, the Banyan networking software chooses the best route based on the first packet received from a Routing Update Protocol (RTP) broadcast. RTP is a VINES network layer protocol that distributes network topology information. When choosing between a zero-hop route that involves a source-level route (such as two servers connected by a Token-Ring bridge) and a route through a gateway, VINES takes the route with the best metric. Metrics are described in "Routing Metrics" earlier in this chapter. Unlike in previous versions of the Banyan networking software, enabling SLR on one server does not automatically enable SLR on all other servers. The Banyan SLR software enables and disables SLR dynamically on the card. You do not have to reboot the server to enable or disable SLR. SLR is supported across remote bridges.
Example Routing Between a Server and a Single Source-level Route
In previous versions of the Banyan networking software, if the Banyan networking software had to choose between a source-level route and a server, it always chose the direct path using the source-level route.
At VINES 5.50 (and later revisions), if the Banyan networking software chooses between a source-level route and a server, it chooses the route with the best metric.
In Figure 4-8, traffic going from Server 1, which is running VINES 6.00, to Server 3, which is running VINES 5.00, passes through either Server 2 or through the local bridge depending on how you set the metrics.
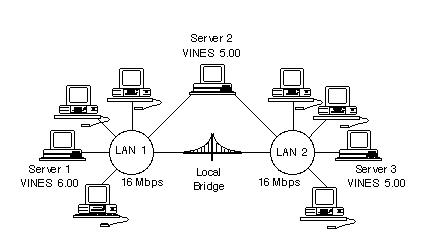
Traffic going in the opposite direction, however, routes differently. Traffic going from Server 3 to Server 1 always routes through the local bridge, because that is how VINES 5.00 routes traffic.
Because of the differences, there are certain guidelines you must follow if you plan to mix versions of the Banyan networking software in your network. These guidelines are:
All workstations on any rings attached by remote bridges must be running VINES 5.50 (and later revisions) to communicate with each other. (SLR is not supported across remote bridges in VINES versions earlier than 5.50.) If servers running SLR on VINES 4.xx are on the same ring with servers running either VINES 5.00 or greater, performance will not equal the performance of a pure 5.xx or 6.xx network. Do not configure any bridge routes in a mixed-version environment. If you want to configure bridge routes in preparation for upgrading and you are mixing VINES 5.00 with VINES 5.50 (and later revisions), use a metric of 5 for each bridge route; do not raise or lower the metric arbitrarily. By using a metric of 5, your metrics will match the metrics that VINES 5.00 uses, and routing metrics will be consistent between the two revisions. When you upgrade the entire network to VINES 5.50 (and later revisions), you can change the metrics to the appropriate values.
You must enable SLR on servers and, in some cases, on workstations. The following sections provide rules for enabling SLR and examples of these rules.
You must enable SLR on servers when Banyan servers on Token-Ring LANs are separated by IBM bridges unless the Banyan server is emulating an IBM local bridge. The IBM bridges can be either IBM local bridges or IBM remote bridge pairs. All the servers on the LANs must have SLR enabled to communicate with each other. Manually enabling a server for SLR does not require a reboot of the server.
Enabling SLR on just one server on the LAN does not allow the other servers to communicate across the bridge. (These servers might be able to communicate with other servers temporarily, but StreetTalk databases will not propagate.) Figure 4-9 and Figure 4-10 illustrate this rule for enabling SLR on servers. Figure 4-9 shows two LANs connected by an IBM local bridge.
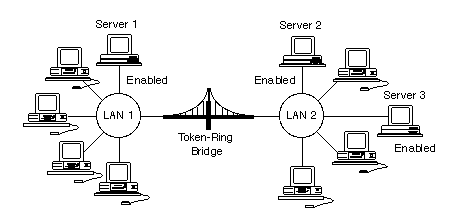
In Figure 4-9, Server 1 is the only server on LAN 1. Server 2 and Server 3 are the only servers on LAN 2. SLR is enabled on every server on each LAN.
The exception is if a server has two Token-Ring interfaces on the same LAN. In this case, you can enable SLR on one interface and disable SLR on the other.
In Figure 4-10, a remote Token-Ring bridge pair connects two Token-Ring LANs across a serial line.
The half bridges (the two members of the pair) use the IBM SDLC protocol to exchange data. SLR is enabled on all the servers on LAN 1 and LAN 2.
Note: You do not have to manually enable SLR for VINES 3270/SNA service communications across IBM local Token-Ring bridges, IBM remote Token-Ring bridge pairs, and Banyan servers that emulate these bridges. For example, if a server communicates with an IBM host on another Token-Ring LAN through either an IBM local bridge or an IBM remote bridge pair and the server does not use the Banyan networking software to communicate with nodes on the other LAN, the server does not need SLR manually enabled.
TCP/IP Communications Across Bridges
For TCP/IP communications across IBM local bridges or remote bridge pairs, a server on each side of the bridge must have:
The Banyan TCP/IP Routing option The other server configured as a server gateway for the corresponding TCP/IP network SLR enabled
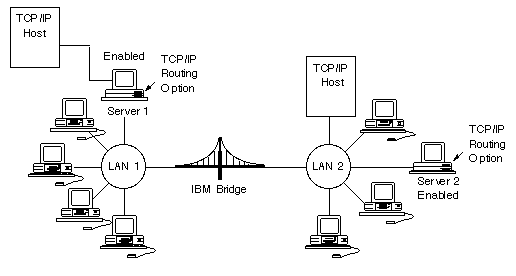
Figure 4-11 illustrates this configuration.
In Figure 4-11:
Server 1 and Server 2 both have the TCP/IP Routing option installed. Server 1 has configured Server 2 as a gateway, and Server 2 has configured Server 1 as a gateway. SLR is enabled on both Server 1 and Server 2.
When the servers are properly configured, the servers route the TCP/IP packets through the Banyan network.
When to Enable SLR on Workstations
You must enable SLR on Banyan workstations under the following conditions:
To send and receive data through local Token-Ring bridges when no servers with SLR enabled are on the Token-Ring LAN to which the workstations are connected When the only server running the same version of the Banyan networking software as the workstation is across a bridge
Figures 4-12 and 4-13 illustrate the conditions under which you must enable SLR on workstations.
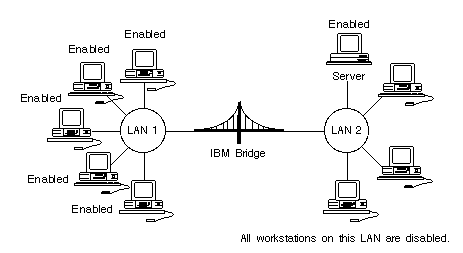
In Figure 4-12, no servers on LAN 1 exist where SLR has been enabled; therefore, you must enable SLR on each workstation. On LAN 2, SLR is enabled on Server 1; therefore, you do not need to enable SLR on the workstations on the ring.
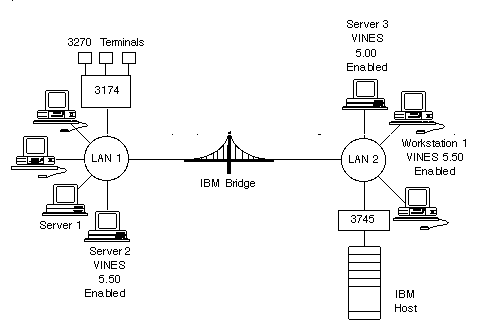
In Figure 4-13, the Banyan workstation on LAN 2 (Workstation 1) is running version 5.50 of the workstation software. The only server on its LAN, Server 3, is running a different version of the software: version 5.00. The only server running the same version of the software is Server2, which is across a bridge. SLR must be enabled on Workstation 1.
Note: If a server running the same version of the Banyan networking software as Workstation 1 is available on another LAN connected through Server 3, you do not need to enable SLR on Workstation 1.
Prerequisites for Configuring SLR
Before you configure SLR on your server, you must:
1. Install any necessary hardware (Token-Ring cards, cables, and so on).
2. Configure LAN cards. (See Managing Workstations for more information on configuring LAN cards.)
3. Enable SLR on the interfaces. (See "Enabling SLR Interfaces" later in this chapter.)
4. Configure bridge routes and their metrics. (See "Configuring SLR Bridge Routes" later in this chapter.)
5. Enable the configuration. (See "Enabling Database Configuration" later in this chapter.)
The remaining sections of this chapter describe steps 3 through 5.
You configure SLR at the server console using menus you reach from the Manage Communications menu. The configuration information is saved in two different configurations, the database configuration and the runtime configuration.
Database and Runtime Configurations
Two types of SLR configuration information reside on the server: database and runtime.
The database configuration contains the most recent SLR configuration changes. However, these changes are not implemented until you specifically enable them. Then, the database configuration becomes the runtime configuration, which is the SLR configuration that is currently in effect.
The database configuration is your working file. You can make changes to the database configuration and leave SLR without putting the changes into effect. You will still be able to work with the changes the next time you use the SLR menus and screens. The changes are not implemented until you specifically enable them with the ENABLE Database Configuration menu. You cannot work directly with the runtime configuration; the runtime configuration is created from the database configuration when you use the ENABLE Database Configuration menu.
You can display both the database and runtime configurations through the SLR menus and screens.
Table 4-2 summarizes the differences between the two types of configurations.
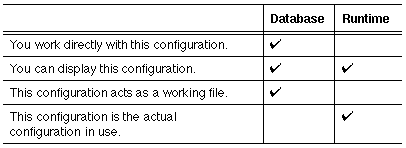
Having the two configurations, database and runtime, lessens the impact of configuration changes. You can make configuration changes at your convenience and can interrupt configuration entry at any time and return to it later. You can then enable the changes when you and the network are ready for them.
Using the Manage Source-level Routing Menus
This section describes how to access the SLR menus on a native VINES server. This menu gives you access to the following functions, which are described later in this chapter:
CONFIGURE SLR Interfaces - Lets you enable interfaces to support SLR.
CONFIGURE SLR Bridge Routes - Lets you add a bridge route, delete a bridge route, and modify the current configuration of a bridge route.
ENABLE Database Configuration - Makes the changes you have made to the database configuration become the runtime configuration. The runtime configuration is the configuration that is used by the network.
DISPLAY Runtime Configuration - Lets you look at the current runtime configuration.
To Reach the SLR Main Menu
1. From the Operator Menu, choose Manage Communications. The Manage Communications menu appears.
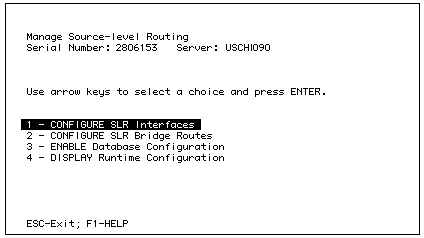
2. Choose Source Level Routing. The Manage Source-level Routing menu appears, displaying the serial number and name of the server, as shown in Figure 4-14.
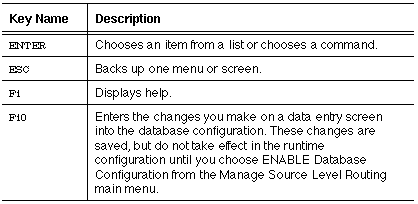
This section describes the standard keys used in the menus and screens for configuring SLR. Table 4-3 lists the keys.
To configure an interface for SLR, use the CONFIGURE SLR Interfaces menu and enable the interface for SLR.
To Enable the Interface for SLR
1. From the Operator Menu, choose Manage Communications. The Manage Communications menu appears.
2. Choose Source Level Routing. The Manage Source-level Routing menu appears.
3. Choose CONFIGURE SLR Interfaces. The CONFIGURE SLR Interfaces menu appears.
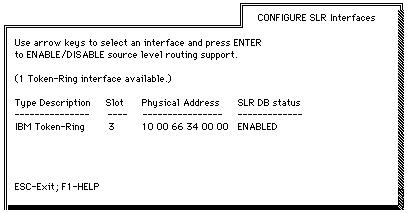
4. Using the arrow keys, choose the interface that you want to enable or disable for SLR.
5. Press ENTER. The following prompt appears:
Do you really want to disable source level routing support on this interface?
6. Choose YES to disable the interface. Choose NO if you do not want to disable the interface. The default is YES.
Repeat these steps for any interface that you use for SLR.
A bridge route designates specific bridges used to reach destinations.
1. From the Operator Menu, choose Manage Communications. The Manage Communications menu appears.
2. Choose Source Level Routing. The Manage Source-level Routing menu appears.
3. Choose CONFIGURE SLR Bridge Routes. The CONFIGURE SLR Bridge Routes menu appears, as shown in Figure 4-16.
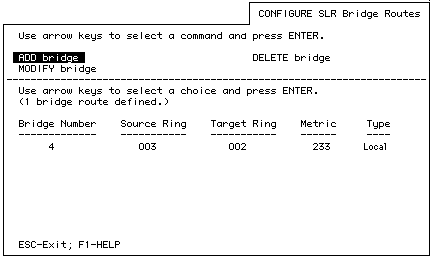
You can add, delete, or modify a bridge.
To add a bridge route, follow the instructions in "To Add a Bridge Route," which follows. To modify a bridge route, follow the instructions in "To Modify a Bridge Route" later in this chapter. To delete a bridge route, follow the instructions in "To Delete a Bridge Route" later in this chapter.
1. From the CONFIGURE SLR Bridge Routes menu, choose ADD Bridge. The ADD Bridge screen appears, as shown in Figure 4-17.
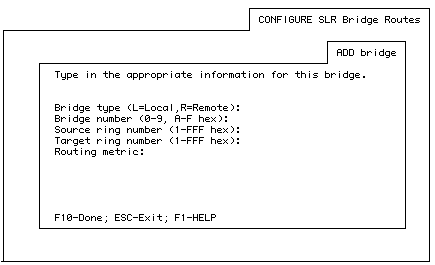
2. When prompted, enter the following information:
Bridge type (L=Local, R=Remote): - The type of bridge associated with the route. Enter L for a local Token-Ring bridge, or R for a remote Token-Ring bridge pair.
Bridge number (0-9, A-F hex): - The number assigned to the local Token-Ring bridge or the remote Token-Ring bridge pair. Enter a hexadecimal number from 0 to F.
If you do not know the bridge number, ask your network administrator or planner. Note that a remote Token-Ring bridge pair is assigned a single bridge number because it appears to the rest of the network as a single entity.
Source ring number (1-FFF hex): - The ring number of the Token-Ring LAN that the server shares with the local Token-Ring bridge or remote Token-Ring bridge pair. Enter a hexadecimal number from 1 to FFF.
Target ring number (1-FFF hex): - The ring number of the Token-Ring LAN on the other side of the local Token-Ring bridge or remote Token-Ring bridge pair. Enter a hexadecimal number from 1 to FFF.
Routing metric: - An estimated round-trip delay time associated with the route, specified in 200-millisecond intervals called ticks. After that delay, the connection times out. For example, if you specify the routing metric for a connection between two services as 20 ticks (4 seconds), the connection times out if there is no activity on the connection for more than 4 seconds. The lowest value possible is 1 tick. The highest value possible is 4095. The value must be a decimal number.
Configure a metric for any bridge route that will be used. See "Guidelines for Mixing Versions of the Banyan Networking Software" earlier in this chapter for important information about bridge routes in a network containing mixed versions of VINES. If you do not enter a metric for a bridge route and that bridge route is used to reach a server, the Banyan networking software uses a metric of 5 for that bridge route.
For information on calculating metrics, see "Guidelines for Assigning Metrics," earlier in this chapter. For a list of commonly used metrics, see Table 4-1.
3. When you finish entering the information, press F10.
1. From the CONFIGURE SLR Bridge Routes menu, choose MODIFY Bridge. The Modify Bridge screen appears, as shown in Figure 4-18.
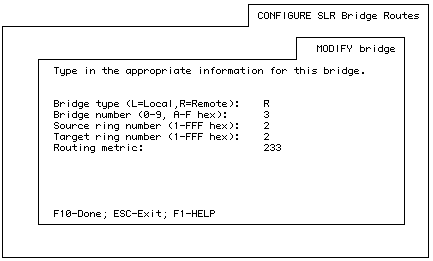
2. When prompted, modify the information desired. You can modify any of the information shown on the screen. "To Add a Bridge Route" earlier in this chapter describes each of the fields.
3. When you finish entering the information, press F10.
1. From the CONFIGURE SLR Bridge Routes menu, choose DELETE Bridge. The DELETE Bridge screen appears, as shown in Figure 4-19.
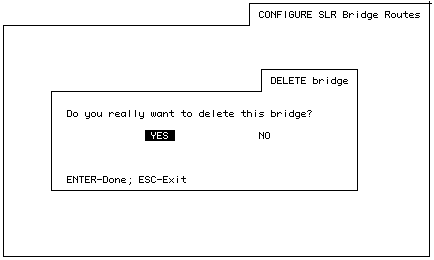
2. Choose YES (the default) to delete the bridge route. Choose NO to leave it alone.
The CONFIGURE SLR Bridge Routes screen, shown in "Configuring SLR Bridge Routes" earlier in this chapter, lists all configured bridge routes. You can also view bridge routes when using VINES Network and Systems Management (VNSM).
To View SLR Bridge Routes from VNSM
If you have the VNSM option installed and want to monitor a server from another server or from a workstation, follow the instructions for reaching the VINES Network Summary menu in Monitoring and Optimizing Servers.
1. To reach the VINES Network Summary menu from the server console, choose Run Network Management from the Operator Menu. If the server from which you run VNSM is the only server in the network, the VINES Network Summary menu for that server appears.
2. If there is more than one server in your network, choose the server whose SLR bridge routes you want to view.
3. Press F10. The Network Summary menu appears.
4. Choose Show Protocol Information.
5. If you have the VNSM option installed, choose a server. If you do not have the VNSM option installed, proceed to the next step. The Protocol Information menu appears.
6. Choose VINES Source Level Routes.
A screen appears, showing the following information:
Route number Bridge type Bridge number Source ring Destination ring (target ring) Metric
For more information on these statistics, see Monitoring and Optimizing Servers.
Enabling Database Configuration
To reduce the impact of changes to your network, two places for configuration information reside on the server: database and runtime.
When you change an SLR configuration, the information is stored in the database configuration. When you enable the database configuration, these changes become the runtime configuration. The runtime configuration is the configuration used by the network.
To Enable the Database Configuration
1. From the Operator Menu, choose Manage Communications. The Manage Communications menu appears.
2. Choose Source Level Routing. The Manage Source-level Routing menu appears.
3. Choose ENABLE Database Configuration. The ENABLE Database Configuration menu appears, as shown in Figure 4-20.
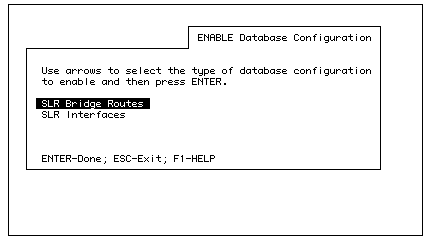
4. Choose the type of configuration, either bridge route or interface, you want to enable.
If you are not sure what the current runtime configuration is, use DISPLAY Runtime Configuration described in the next section to check the runtime configuration.
Caution: If you downgrade (that is, go from one version of the Banyan networking software to an earlier version), all configuration information is lost. Then, you must re-enter the configuration information if you upgrade back to the later revision.
Displaying Runtime Configuration
The DISPLAY Runtime Configuration menu shows the current runtime configuration.
To Display Runtime Configuration
1. From the Operator Menu, choose Manage Communications. The Manage Communications menu appears.
2. Choose Source Level Routing. The Manage Source-level Routing menu appears.
3. Choose DISPLAY Runtime Configuration. The DISPLAY Runtime Configuration menu appears, as shown in Figure 4-21.

4. Choose either SLR Bridge Routes or SLR Interfaces.
The following sections describe the information you see when you display the current runtime configuration.
If you choose SLR Bridge Routes at the DISPLAY Runtime Configuration menu, the DISPLAY Runtime SLR Bridge Route screen appears, as shown in Figure 4-22.
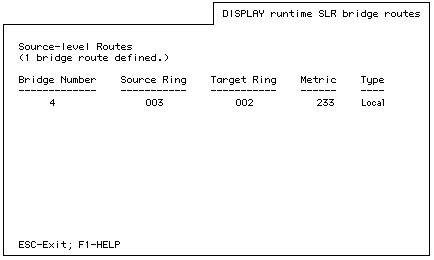
This screen shows the current runtime configuration information for SLR bridge routes, as follows:
Bridge Number - The number assigned to the local Token-Ring bridge or the remote Token-Ring bridge pair. The bridge number is a hexadecimal number from 0 to F. Note that a remote Token-Ring bridge pair is assigned a single bridge number because it appears to the rest of the network as a single entity.
Source Ring - The ring number of the Token-Ring LAN that the server shares with the local Token-Ring bridge or remote Token-Ring bridge pair. The source ring number is a hexadecimal number from 1 to FFF.
Target Ring - The ring number of the Token-Ring LAN on the other side of the local Token-Ring bridge or remote Token-Ring bridge pair. The target ring number is a hexadecimal number from 1 to FFF.
Metric - The estimated round-trip delay time associated with the route in 200-millisecond intervals called ticks. Values will be from 1 to 4095, in decimal.
Type - The type of bridge associated with the route. L means a local Token-Ring bridge. R means a remote Token-Ring bridge pair.
If you choose SLR Interfaces at the DISPLAY Runtime Configuration menu, the DISPLAY Runtime SLR Interfaces screen appears, as shown in Figure 4-23.
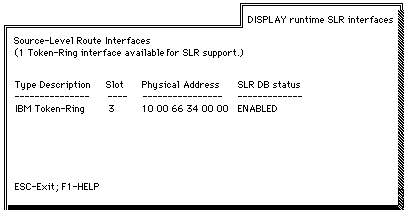
The DISPLAY Runtime SLR Interfaces screen shows the following information for all interfaces enabled for SLR:
Type Description - The type of interface card (for example, IBM Token-Ring, IBM Token-Ring /A, IBM Token-Ring II, IBM Token-Ring Adapter 16/4, or IBM Token-Ring 16/4 /A).
Slot - The slot number of the interface card.
Physical Address - The card's Token-Ring address in hexadecimal.
SLR Status - The status of SLR in the database configuration. The status can be ENABLED or DISABLED. When the software is first installed, DISABLED is the default. Note that the card can be enabled in the database configuration, but disabled in the runtime configuration (and vice versa).
The Banyan networking software enables SLR on the card in the server. However, for a period of time the card may not be ready, though traffic is being sent to the card. The following message may be displayed:
Controller - Slot - Detected VINES Server on remote ring.
Token-Ring Address of detected server is .
This network configuration is invalid. Either this
server must have SLR enabled or the other server
must have SLR disabled.
where trintname is the Token-Ring interface name, sn is the slot number, and addr is the Token-Ring address.
If you see that message, verify that the interface was configured as enabled in the runtime configuration.
If the interface was not configured as enabled:
1. Configure it as enabled.
2. Enable the database configuration.
If the interface was enabled in the runtime configuration and the problem is not resolved in a few minutes, perform the following tasks:
1. Disable SLR, then enable it again.
2. If the message persists, the problem might be with the card itself. Check the card using any diagnostics provided by the manufacturer.
- If the card is faulty, replace it.
- If the card is not faulty and the message still persists, try rebooting the server. If this does not clear the problem, contact your technical support organization.
![]()
![]()
![]()