![]()
![]()
Chapter 4 - Using AppleTalk on a VINES Network
Servers can act as routers or as file servers, and can perform print spooling. This chapter describes how to set up AppleTalk on a VINES network to provide the AppleTalk support that these services use.
Configuring the VINES AFP Service
If you plan to use file sharing, after you configure AppleTalk for your VINES network, the VINES AFP service must be running. If it is not running now, use the Control a Service menu to start it.
If you plan to use DOS extension mapping, use the VINES configuration menus to configure the VINES AFP service using the VINES AFP configuration menus described in Managing VINES Services.
The VINES AFP service handles file sharing, guest logins, and mapping DOS filename extensions to Macintosh file types and file creators.
Macintosh workstations that are connected to an AppleTalk network do not need any additional software or any additional cables for VINES support. If all your Macintosh workstations are connected to an AppleTalk network, go to "Communicating with a Macintosh Workstation".
If, however, the Macintosh workstation was not connected to a network before, or if it was part of a LocalTalk network and now you are switching to EtherTalk or TokenTalk, you need to install the AppleTalk network drivers. LocalTalk driver support is part of your Apple system software and is supplied with the Macintosh workstation. EtherTalk and TokenTalk drivers are supplied by the vendors who manufacture the cards and come with the cards.
If you are using EtherTalk or TokenTalk, you need to install network drivers in the Macintosh workstation's System Folder.
If you are installing a card manufactured by Apple Computer, to install a driver for the first time, sometimes you must use the Apple Network Product Installer. Follow the instructions that come with the Network Product Installer. (To replace a driver with a later revision, see the Apple Computer documentation.)
If you are installing a card made by another manufacturer, follow the instructions for installing drivers that come with the card.
For EtherTalk, make sure that you have the appropriate driver for the AppleTalk phase you are using. If you are using a card made by Apple Computer, you need the following drivers:

If you are running AppleTalk Phase 1, you need EtherTalk 1.0. If you are running AppleTalk Phase 2, you need EtherTalk 2.0 or a later version.
All Macintosh workstations on the same LAN segment must use the same phase of AppleTalk unless you are using tunneling through VINES to connect two servers on the same LAN segment running different phases of AppleTalk (see "Using Tunneling to Connect Phase 1 and Phase 2" in Chapter 2) or you are using a transition bridge.
In these cases, each workstation would use the version of the EtherTalk driver appropriate to the phase it is using.
If you are not using tunneling or a transition bridge to connect Phase 1 and Phase 2 networks, all Macintosh workstations on the same LAN segment must have the same version of EtherTalk to communicate.
Follow the instructions that came with your network card for connecting the network cables to the network card.
Caution: Make sure that the network cable is connected to your Macintosh workstation when you activate the AppleTalk software, reboot, or switch to another LAN segment. The Macintosh workstation uses dynamic node assignment, and must be able to communicate with all other nodes on the LAN segment so that it can pick a node number not already in use.
When the cables are properly connected, for each Macintosh workstation, perform the following steps to verify that the workstation can connect to the network:
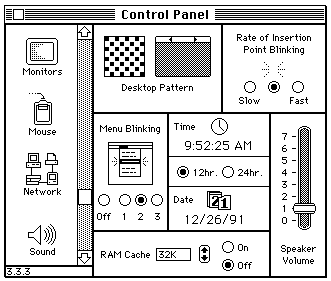
1. Choose the Control Panel from the Apple menu. Your actual Control Panel might look slightly different from the one in the following illustration depending on how you have customized your Macintosh system, and depending on the revision of the operating system that you are using. The illustrations on the following pages were taken from a Macintosh workstation running System version 6.0.7. The Control Panels used in System 7.0 vary slightly.
2. Click on the Network icon. (You might have to scroll to find it. In the preceding illustration, the Network icon is the third icon down on the left side of the Control Panel.) If the Network icon does not appear, it means that only the LocalTalk (built-in) driver is installed. You must install the EtherTalk or TokenTalk driver for the Network icon to appear.
The Control Panel now displays which network types are available to you (that is, which drivers you have in your System Folder). The following figure shows a Control Panel for a Macintosh that has Built-in (LocalTalk), EtherTalk Phase 2, and TokenTalk drivers, all from Apple Computer.
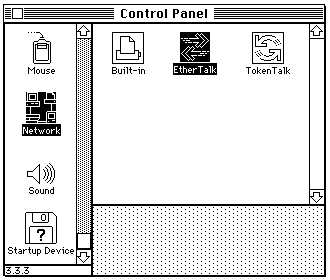
3. Click the icon for the network type you want to use. For example, if you want to use EtherTalk Phase 2, click on the icon for EtherTalk version 2.0 or greater. In the illustration, the EtherTalk icon shown is the icon for EtherTalk 2.0 (EtherTalk 2.0 has double-headed arrows in its icon). If you are not sure which version of EtherTalk you have installed, check the System Folder.
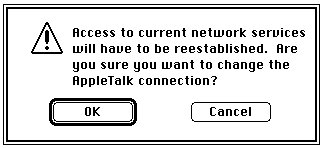
If this is a change from what was being used, or if this is the first time the Macintosh workstation is connecting to the network, a dialog box like the one in the following figure appears.
Click the OK button. The dialog box disappears, and the Control Panel is again in view.
4. To choose the default zone, click the icon for the network type once more (in this case, click EtherTalk once more). A dialog box appears similar to the one in the following illustration asking you to select this computer's AppleTalk zone. In the following illustration, there is only one zone available. Your dialog box might show a list of zones.

5. Click the name of the zone that contains the server you want to log onto.
If you were able to perform these steps, you now know that the workstation can connect to the network.
Communicating with a Macintosh Workstation
The VINES User's Guide for Macintosh gives detailed instructions for logging on to the VINES network and describes how to use a Macintosh workstation in a VINES environment.
If you want to use electronic mail, you need the VINES Mail for Macintosh option. The VINES Mail for Macintosh User' s Guide describes how to use this option.
Monitoring Your AppleTalk Network
Once your AppleTalk system is configured and running, you may want to make changes and adjustments to improve performance. One tool that helps you do this is the VNSM software. Monitoring and Optimizing Servers helps you understand network management statistics, and helps you use those statistics to optimize server performance. One chapter is dedicated to the statistics that Network Management displays on communication protocol activity on the server. It gives statistics on the following AppleTalk protocols:
Address Resolution Protocol (ARP) Datagram Delivery Protocol (DDP) Name Binding Protocol (NBP) AppleTalk Transaction Protocol (ATP) Zone Information Protocol (ZIP) Routing Table Maintenance Protocol (RTMP) AppleTalk Session Protocol (ASP) AppleTalk Echo Protocol (AEP)
Monitoring Communications Buffers
When you install VINES 5.0, the communications buffer is allocated 150KB of memory. This should be enough to run AppleTalk on a VINES network. Do not reduce the size of the communication buffer below this amount.
You should periodically use the VINES Network and Systems Management (VNSM) software to monitor the communications buffer use. Monitoring and Optimizing Servers explains communication buffer use and what conditions cause high percentages. It also gives guidelines for adjusting the communications buffer size.
The VINES Network and Systems Management (VNSM) software allows you to view topology information, including AppleTalk routes. You don' t need to go to the server to look at routing tables. You can run VNSM from a workstation. Routing tables are maintained on each server on which AppleTalk is configured. These tables contain entries for AppleTalk routes to destination AppleTalk networks.
Other tables that help you monitor and troubleshoot your AppleTalk network include the AppleTalk ARP entries table, the AppleTalk zones table, and the AppleTalk names table. To view these tables, follow these steps:
1. From the Operator Menu, choose Run Network Management. Use the arrow keys to choose the server or servers you want to check from the list of available servers. Press F10.
2. From the VINES Network Summary menu, choose SHOW protocol information. Press RETURN. Using the arrow keys, choose the server you want to check. Press RETURN.
3. At the Protocol Information menu, use the arrow keys to choose the table you want to view. Press RETURN.
For information on using the VINES Network and Systems Management software to view routes, see Monitoring and Optimizing Servers.
For more information on planning your VINES network in general, refer to Planning a Banyan Network.
For more information on the AppleTalk protocols or network numbers, refer to AppleTalk Network System Overview or Inside AppleTalk, both from Apple Computer.
![]()
![]()
![]()