![]()
![]()
Chapter 2 - Managing the Mail Service
This chapter provides instructions for adding a mail service to a network; and starting, configuring, and managing a mail service that is installed on a network server. If you need instructions for installing the service, refer to the release notice that ships with the product.
When using MSERVICE, be sure that you are logged on to the group that contains the Intelligent Messaging mail service. For example, to manage a mail service that is running on Tech@Organization, you should be accessing that group (Tech). If you are not, from the Manage Services menu, select Search for Other Services to locate that service.
Before proceeding with this chapter, refer to Chapter 1, which describes the major concepts of the mail service and describes features that can be monitored and managed.
Adding a Mail Service to the Network
If your mail option and network server were purchased at the same time, the mail service was created and started as part of the installation process. The service name is:
MS@server-name@Servers
where server-name is the name of the server where the mail service is installed. You do not need to read this section. Proceed to "Configuring the Mail Service."
If you installed the mail option on a running server, you must add and start the mail service before it is available to users.
The Windows NT File System
If your mail service resides on a Windows NT Server, you need to identify the Windows NT File System (NTFS) partition on the disk, not the DOS File Allocation Table (FAT) file system. Your mail service, including all data areas such as mailboxes, must be added to an NTFS partition.
Adding and Starting a Mail Service
Only one mail service can reside on a server in a network. If your network has more than one server, install the mail service on the server that is physically closest to all or most of its users. The proximity of the mail service to its users maximizes its performance. If, however, you have users on many different servers that require mail, try to select one of your less heavily loaded servers.
To Add and Start a Mail Service Using StreetTalk Explorer
Begin this procedure from the StreetTalk Explorer.
1. Select New, Service on the File menu. The Create New Service window appears.
Figure 2-1. Create New Service Window
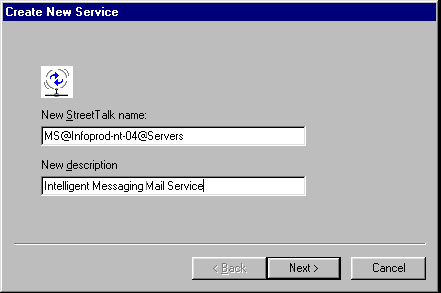
2. Enter the following information:
- The StreetTalk name for the mail service you are creating.
- A description of the mail service.
3. Click Next.
Figure 2-2. Select a PC or Server Based Service Dialog Box
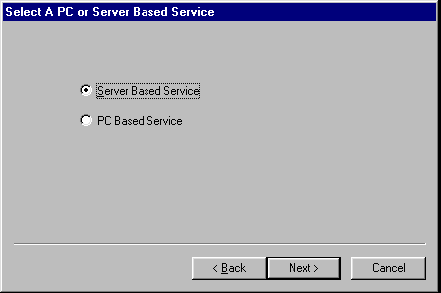
4. Select one of the following
- Server Based Service
- PC Based Service
5. Click Next. The Select a Server dialog box appears.
Figure 2-3. Select a Server Dialog Box
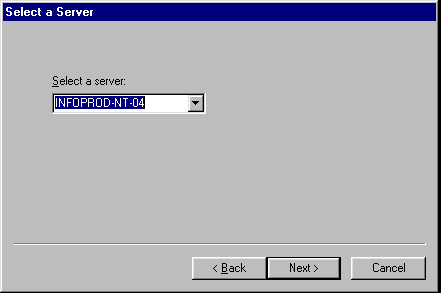
6. Select a server from the list. Click Next. The Select a Service Type dialog box appears.
Figure 2-4. Select a Service Type Dialog Box
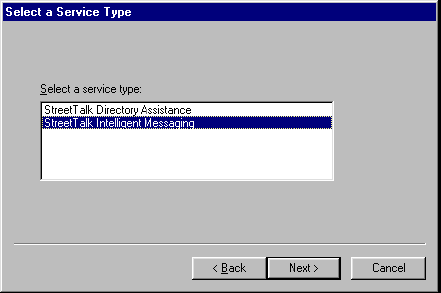
7. Select StreetTalk Intelligent Messaging. Click Next. The Select a Drive dialog box appears.
8. Select the drive on which you are creating the mail service. Click Next. The Create and Start dialog box appears.
Figure 2-5. Create and Start Dialog Box
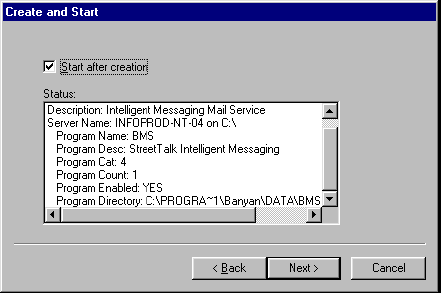
Do one of the following:
- To automatically start the service after it is created, select the Start after creation check box.
- If you do not want to automatically start the mail service, do not select the Start after creation check box.
9. Click Next. The service is created. The mail service status displays in the Status box.
10. Click Done.
To Add and Start a Mail Service Using MSERVICE
1. Enter MANAGE at the command prompt and press ENTER. When the System Management Main Menu appears, select Services.
or
Enter MSERVICE at the command prompt and press ENTER. The Manage Services menu appears.
2. Select Add a Server-based Service. The Add a Service screen appears.
3. At the Add a Service screen, type the name and description for the new service and press ENTER.
If your network has only one server, go to step 5.
4. At the Select a Server menu, select the name of the server on which you want to add the new service. The Select Type of Service menu appears.
5. At the Select Type of Service menu, select Banyan Intelligent Messaging Service.
6. At the next screen, select the disk on which you want the mail service to reside. All mail messages and attachments will be stored on this disk.
For best performance, select a disk with ample space for current needs, as well as for future growth. For example, to maximize performance on a server that has multiple disks, you can add the mail service onto a disk other than disk1.
7. At the next screen, select YES to start the mail service. Select NO to create the mail service, but not start it.
Note You can follow your company's standards for naming services. If no standards exist, it is recommended that you name the service MS@server-name@Servers, where server-name is the name of the server where you want to add the service. This service name is easy to recognize because it uses the same naming scheme as services that are created and started as part of the server installation process.
For instructions on starting and stopping the mail service, refer to "To Start or Stop the Mail Service Using StreetTalk Explorer" or "To Start or Stop the Mail Service Using MSERVICE".
Mail service configuration information is stored as StreetTalk attributes. When a mail service is started, it retrieves configuration information from these attributes. If you do not supply mail configuration information, the mail service uses its default settings. Refer to Table 2-6 for a list of mail service configuration attributes and their defaults. You can use StreetTalk Explorer to modify the default configuration settings.
You can configure a mail service by specifying:
In addition to configuring these mail service settings, you can specify settings for individual mailboxes. For instructions on configuring user mailbox settings, refer to "Defining User Mailbox Settings" in Chapter 3.
Intelligent Messaging uses mailbox folders to organize and store mail messages, similar to the way in which folders or directories and subdirectories are used to store files. For each individual user mailbox, Intelligent Messaging creates two default folders. Both are described in Table 2-1.
Table 2-1 User Mailbox Folders
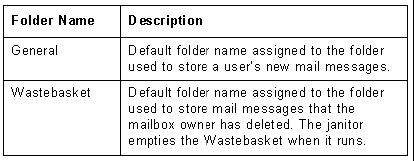
The mail client may create other mailbox folders, such as Sent, Unsent, Save, and so on. Refer to the mail client documentation for details.
The following sections contain information about using StreetTalk Explorer to configure mail service attributes.
The mail janitor automatically deletes messages from the Wastebasket folders of all users in the mail service. By default, this process runs at 3:00 AM, but you can configure it to run at any time. Do not configure the janitor to run at the same time as other disk-intensive processes on the server, such as backups or STDA rebuilds.
If, at any time, you want to override the configured time and have the janitor run as soon as possible, reconfigure the janitor start time to the hourly value that is 15 minutes from the current time. For example, if the current time is 10:12, reconfigure the janitor start time to 10. If the current time is 10:50, reconfigure the janitor start time to 11.
You must stop and restart the mail service before the new time takes effect.
Keep in mind that the janitor runs every day at this new time until you reconfigure the time again.
To Configure the Start Time for the Janitor Using StreetTalk Explorer
1. Right-click the mail service in the right pane and select Properties from the shortcut menu.
2. Click the Message Store tab.
3. In the Janitor Start Time field, specify the time to run the janitor. Enter a value between 0 (midnight) and 23 (11:00 PM).
You can also configure the start time by manually setting attribute <7:1>.
Deleting the Mailbox of a Deleted User
The mail janitor automatically deletes the mailboxes of any deleted users, provided that the mailboxes are empty.
When you delete a user, you must also delete the username from any StreetTalk lists and have users delete the username from any address book lists in which the name appears. When users send messages to lists, mail verifies only that the lists exist, not that each name on the lists exists.
If you do not remove the username of a deleted user from a list, users sending mail to that list will receive the following message from the mail service of undeliverable mail:
Name not found
To avoid these messages, be sure to remove deleted usernames from lists and advise network users to remove deleted usernames from their address books.
For more information on deleting a user, refer to Managing Users and StreetTalk.
Specifying Expiration Times for Messages
A message expires and is returned to the sender when the Message Transfer Agent (MTA) cannot resolve its recipient address within an assigned time period. You can specify a unique expiration time for messages sent at low, normal, and high priorities.
The default expiration times for mail messages are:

Low - 168 hours (7 days) Normal - 96 hours (4 days) High - 24 hours (1 day)
To Specify Message Expiration Times Using StreetTalk Explorer
1. Right-click the mail service in the right pane and select Properties from the shortcut menu.
2. Click the Message Transfer tab.
3. In the Message Expiration section, specify the expiration time for messages sent at each priority level. Specify expiration times between 1 and 743 hours.
You can also specify the expiration times for messages of each priority by manually setting attributes <7:4>, <7:5>, and <7:6>. Resetting the expiration values to their defaults deletes the corresponding attribute.
Specifying the Number of Buffers Used When Accessing the Message Store Database
You can enhance mail service performance by increasing the buffer space available to cache data from the message store database. Each buffer is 1 KB.
To Specify the Number of Database Buffers Using StreetTalk Explorer
1. Right-click the mail service in the right pane and select Properties from the shortcut menu.
2. Click the Message Store tab.
3. In the Database Buffers field, specify the number of buffers. Enter a number between 5 and 100. The default value is 10. The recommended value is 50.
Setting the value too high can degrade performance by using more system resources.
You can also set the number of database buffers by manually setting attribute <7:7>. Resetting the value to its default deletes the attribute.
Monitoring Mail Service Disk Usage
To monitor the amount of disk space used by the mail service and by user mailboxes, you can configure the maximum disk space usage threshold. When the janitor runs, if the actual amount of disk space exceeds this threshold, usage statistics for each mailbox on the server are written to the mail service log. If you are running Intelligent Messaging on a Windows NT Server, usage statistics are written to the Windows NT Event Viewer, Application Log. The Event Viewer enables you to review the events that have been recorded.
The following usage statistics are available:
StreetTalk name of each mailbox Total number of messages Number of unread messages Amount of disk space, in megabytes, that the messages occupy Total disk space used Keep in mind the following information about statistics reported to the mail service log or the Application Log:
When calculating message counts, the janitor does not include messages contained in a user's Wastebasket folder. When calculating disk space usage, the janitor adjusts for messages that are shared among mailboxes. For example, when the mail service receives a mail message that is destined for four users, the mail service maintains only one copy of the file and creates four directory pointers (one for each recipient) to the file. The Share Count of a message indicates the number of directory pointers to the mail message or its attachments. The amount of disk space that a message occupies is calculated as:
(Message Size) divided by (Share Count)
If the Share Count is greater than the message size, the calculated disk space is 0 bytes.
To Specify the Mail Service Disk Space Threshold Using StreetTalk Explorer
1. Right-click the mail service in the right pane and select Properties from the shortcut menu.
2. Click the Message Store tab.
3. In the Mail service field, enter the disk usage limit for the mail service. The default value of 0 indicates that no disk space threshold exists.
You can also configure this value by manually setting attribute <7:8>.
Monitoring Disk Space Usage by Mailbox
By default, the mail service does not set a limit on the size of a user's mailbox. To prevent user mailboxes from consuming excessive disk space, you can specify a set of disk usage thresholds and associate these thresholds with a list of user mailboxes. When the janitor runs, it checks the disk usage of the specified users' mailboxes. If one of these mailboxes exceeds the threshold size, an entry is made in the mail service log. Log entries for StreetTalk for Windows NT mail services appear in the Application Log of the Windows NT Event Viewer.
To configure the maximum disk space, create three StreetTalk lists:
Low disk space limit list (attribute <7:9>) Medium disk space limit list (attribute <7:10>) High disk space limit list (attribute <7:11>) For each list, specify the StreetTalk names of users, lists, or patterns that represent the mailboxes to be associated with a disk limit. The low list contains the mailbox names associated with one disk limit, the medium list contains the mailbox names associated with another disk limit, and so on. Each list can contain nested lists.
The disk space limits do not have to increase from the Low list through the Medium list to the High list, but when a mailbox name appears on more than one list, the lowest specified limit takes precedence.
To Specify the Disk Space Threshold for User Mailboxes Using StreetTalk Explorer.
1. Create a list of users for whom you want to set a given disk limit. Refer to Managing Users and StreetTalk for information about how to create a list. You can create up to three lists, and assign a unique disk limit to each. Each list can contain StreetTalk names, patterns, or other lists.
2. Right-click the mail service in the right pane and select Properties from the shortcut menu.
3. Click the Message Store tab.
4. In the Disk Usage Limits section, double-click a category (Low, Medium, or High) in the window.
5. In the User Limit dialog box, specify the name of the list you created in step 1, and assign it a limit. Each list corresponds to a StreetTalk attribute, as described above.
The following example describes how to set up and configure disk space limit lists.
Example: Setting Up Disk Space Limit Lists
Jim Allen wants to monitor the amount of disk space utilized by users of the mail service. He sets up three StreetTalk lists: each list contains users to be associated with a particular disk space limit. Once Jim has set up the StreetTalk lists, he will configure the disk space limit for each list.
Jim starts by deciding what limit to set for each list and what mailbox names to associate with the limit. He decides to set a general limit for all mailbox names on the network, a higher limit for system administrators, and a lower limit for temporary employees.
To associate all mailbox names on the network with a limit of 1 MB, Jim creates a list named GenList@Mkt@WCTUS that contains:
The StreetTalk pattern *@*@*
To associate mailbox names in the list AdminList@Mkt@WCTUS with a higher limit of 10 MB, he creates a list named SysList@Mkt@WCTUS that contains:
The StreetTalk list name AdminList@Mkt@WCTUS
To associate mailbox names in the StreetTalk group Temp with a lower limit of 50K, he creates a list named TempList@Mkt@WCTUS that contains:
The StreetTalk pattern *@Temp@WCTUS
Jim associates these lists with the mail service disk limits as follows:
Medium (1,000 KB): GenList@Mkt@WCTUS
High (10,000 KB): SysList@Mkt@WCTUS
Low (50 KB): TempList@Mkt@WCTUS
Once the limits take effect, all mailbox names on the network become associated with the limit of 1000 KB. However, any mailbox names in the list AdminList@Mkt@WCTUS become associated with the higher limit of 10,000 KB, because SysList takes precedence over GenList. Likewise, any mailbox name in the group Temp becomes associated with the lower limit of 50 KB, because TempList takes precedence over both SysList and GenList.
Configuring Message Transfer Agent (MTA) Queue Processing
By default, the mail service processes the MTA queues and updates the metrics to other mail services after every network event, such as a server coming on-line. If network events occur frequently (for example, several events per minute), the mail service consumes an increased amount of server resources in updating its cost metrics. In addition to being an expensive process, frequent updates can affect the performance of other processes running on the server.
You can specify how frequently the mail service processes the queues and updates its metrics due to network events. The value you specify represents the minimum time period between updates of the cost metrics. Instead of updating the cost metrics after every network event, the mail service waits for the specified time to elapse before updating the metrics. This can improve performance during periods when frequent network events occur.
If you set this value too high, the mail service may not learn of a server coming on line. If the transient link is lost before the mail service next updates its metrics, messages destined for that server remian in the transfer queue. Therefore, you should set a value that allows the mail service to transfer messages over transient links.
To Specify the Minimum Time Between Full MTA Queue Processing
1. Right-click the mail service in the right pane and select Properties from the shortcut menu.
2. Click the Message Transfer tab.
3. In the field Minimum Time Between Queue Processing, specify the interval at which the mail service processes the queues and updates metrics.
Specifying Restrictions on Using Wildcards
You can restrict the ability to send messages to wildcard addresses on two levels. First, you can change a user's mailbox settings to restrict wildcard usage. By default, when you create a user mailbox, the mailbox settings permit the unrestricted use of wildcards when sending messages. Refer to Chapter 3 for information on how to change the addressing capabilities for a user mailbox.
Secondly, you can configure the mail service so that it does not send any messages to addresses that have wildcards in specified portions of the StreetTalk name. However, such a restriction only applies to users whose mailbox settings do not already restrict wildcard use. You can specify the portions of a StreetTalk name for which the mail service restricts wildcards as follows:
No wildcards in the organization field of the recipient's StreetTalk name
(No messages to Item@Group@*)No wildcards in either the group or organization fields of the recipient's StreetTalk name
(No messages to Item@*@*, Item@Group@*, or @*@Organization)The mail service returns as undeliverable any message addressed using the restricted wildcards.
Although mail service restrictions on using wildcards apply only to users whose mailbox settings do not already restrict wildcard use, you can exercise some discretion in how you apply the restrictions. For example, you can specify that you want the constraints on sending to wildcard addresses to apply to all users whose mailbox settings permit unrestricted use of wildcards, or you can specify that you want to exempt certain users from the restrictions. Users who retain the default permissions for using wildcards after an administrator changes and saves other mailbox settings (message limit, permitting reception of wildcard messages, and so forth) can be exempted from the retrictions.
Table 2-2. Mail Service Settings Restricting Wildcard Addressing (Attribute 7:13)
| Value | Setting | Description |
| 0 | None (default) | Specifies that the mail service imposes no restrictions on the use of wildcards in a recipient's StreetTalk name. |
| 1 | Organization | Specifies that the mail service prohibits the use of a wildcard in the organization portion of a recipient's StreetTalk name (Name@NamedGroup@*). Applies only to users whose current mailbox settings permit unrestricted use of wildcards. Users are exempt if an administrator has previously saved the user's mailbox settings. |
| 2 | Organization. Override No Restrictions |
Specifies that the mail service prohibits the use of a wildcard in the organization portion of a recipient's StreetTalk name (Name@NamedGroup@*). Applies to all users of this service whose current mail settings permit unrestricted use of wildcards, overriding administrator-specified settings allowing unrestricted wildcard use. |
| 3 | Group and Organization | Specifies that the mail service prohibits the use of a wildcard in the group and organization portions of a recipient's StreetTalk name (Name@*@*). Applies only to users whose current mail settings permit unrestricted use of wildcards. Users are exempt if an administrator has previously saved the user's mailbox settings. |
| 4 | Group and Organization. Override No Restrictions |
Specifies that the mail service prohibits the use of a wildcard in the group and organization portions of a recipient's StreetTalk name (Name@*@*). Applies to all users whose current mail settings permit unrestricted use of wildcards, overriding administrator-specified settings allowing unrestricted wildcard use. |
To Specify Wildcard Restrictions for Recipient Addresses Using StreetTalk Explorer
1. Right-click the mail service in the right pane and select Properties from the shortcut menu.
2. Click the Message Transfer tab.
3. In the Override Wildcard Permissions section, select the type of restriction to place on users of this mail service. Refer to Table 2-2 for information about the available settings.
You can also implement these restrictions by manually setting attribute <7:13>.
Enabling Sending to Unlimited Recipients Lists
By default, Intelligent Messaging mail services can send messages to recipient lists that contain a maximum of 1000 characters. You can configure the mail service to enable sending messages to recipient lists of unlimited length.
For more information on the recipients field and unlimited recipients, refer to "Browsing a Message Envelope" in Chapter 3.
To Enable Support for Unlimited Recipients Lists Using StreetTalk Explorer
1. Right-click the mail service in the right pane and select Properties from the shortcut menu.
2. Click the Message Transfer tab.
3. Select the Enable Unlimited Recipients checkbox.
You can also enable this support by manually setting attribute <7:50>.
You can use the two REMS alias cache attributes (<7:70> and <7:71>) to configure the creation of a Message Transfer Agent (MTA) cache. The MTA cache is used for storing the resolved versions of mail service names used by REM-style addressing. This enhancement allows the mail service to avoid excessive StreetTalk lookups.
Table 2-3 describes the attributes <7:70> and <7:71>.
| Attribute | Description |
| Aliases to cache 7:70 | The maximum number of resolved aliases allowed to be
stored in any given service at any given time. Setting this attribute turns on the alias
caching for the mail service. Minimum value: 4 Maximum value: 100 Data type: string Each alias takes approximately 300 bytes of memory. |
| Time the alias entries remain in cache 7:71 | The number of minutes that a resolved alias remains in
memory per mail service. Default: 60 minutes Minimum valeu: 2 minutes Data type: string Any alias entry that has exceeded this time in cache is removed and a newly resolved alias entry is put in its place. |
Enabling the REM Address Cache
By default, each time a mail service receives a force-routed message with a REM-style address, it checks with the StreetTalk Naming service to resolve the address. You can reduce the frequency of requests to StreetTalk and improve performance by enabling the REM alias cache and specifying the number of resolved aliases to store.
To Enable the REM Address Cache and Specify the Number of Aliases to Cache Using StreetTalk Explorer
1. Right-click the mail service in the right pane and select Properties from the shortcut menu.
2. Click the Message Transfer tab.
3. In the Number of Aliases to Cache field, specify the maximum number of REM aliases the cache can contain.
You can also enable the cache and specify the number of aliases to cache by manually setting attribute <7:70>.
Specifying How Long Alias Entries Remain in Cache
If you enable REM address caching, you can also specify an expiration time, in minutes, for resolved alias entries in the Message Transfer Agent (MTA) cache. After an alias has remained in the cache for the specified time, it is removed. The next time the same alias is resolved, the newly resolved entry is placed in the cache.
To Specify How Long Alias Entries Remain in Cache Using StreetTalk Explorer
1. Right-click the mail service in the right pane and select Properties from the shortcut menu.
2. Click the Message Transfer tab.
3. In the Time in Cache field, specify how long REM aliases remain in cache. Enter any value of 2 or more. The default value is 60 minutes.
You can also specify this value by manually setting attribute <7:71>.
Rebuilding the Folder Database
If error number 3116 is in the mail service logs or mail service users report error number 3116, or if user mailboxes are missing folders, the folder database (FOLDER.DB) may be damaged or contain errors. Intelligent Messaging lets you rebuild a damaged folder database.
To Rebuild the Folder Database Using StreetTalk Explorer
1. Right-click the mail service in the right pane and select Properties from the shortcut menu.
2. Click the Message Store tab.
3. In the Startup Rebuild Options section, select the Rebuild Folder Database checkbox. The rebuild takes place the next time you stop and restart the service.
You can also rebuild the folder database by manually setting attribute <7:96> to any value. Set the attribute and then stop and restart the mail service. When the mail service starts, FOLDER.DB is rebuilt and attribute 7:96 is reset to no value and has no further impact.
Rebuilding the Envelope Database
If error number 3024 is in the mail service logs or mail service users report error number 3024, the user envelope database (ENVELOPE.DB) may be damaged or contain errors and must be rebuilt. You rebuild a user's envelope database during the next mail service startup.
Note Rebuild operations increase the startup time for the service.
Rebuilding Mailboxes and Folders
You can rebuild all mailboxes in the service, or specify a single mailbox to rebuild. You cannot specify multiple individual mailboxes to rebuild. In addition, you can choose to rebuild all folders in the mailbox or specify a single folder to rebuild. You cannot specify multiple individual folders.
The rebuild operation extracts all messages from the current database file and adds them to a new file. Messages with no existing data fields (records) are removed. During a rebuild, the envelope database files are compacted so you can use a rebuild to compact user mailboxes.
To Rebuild User Mailboxes and Folders Using StreetTalk Explorer
1. Right-click the mail service in the right pane and select Properties from the shortcut menu.
2. Click the Message Store tab.
3. In the Startup Rebuild Options section select a mailbox from the Mailbox drop-down list.
4 If you want to rebuild a specific folder only, select it from the Folder drop-down list.
You can also rebuild user mailboxes and folders by manually setting attributes <7:97> and <7:98>.
attributes <7:97> and <7:98> are used together. Define a value for attributes <7:97> that designates the folder that contains the envelope database to be rebuilt. The value can be one folder name or All for all folders. Next, specify a value for attributes <7:98> to designate which user mailboxes are to have their envelope databases rebuilt. Used together, these attributes designate which user folders are to have their envelope databases rebuilt when the mail service starts.
Table 2-4 describes attributes <7:97> and <7:98>.
Table 2-4. Envelope Database Rebuild Attributes
Attribute Description Folders to Rebuild 7:97 In the value field, enter a specific folder name (e.g., General) or the keyword _ALL_ to rebuild envelope.db in all folders. Users to Rebuild 7:98 In the value field, enter a specific folder name (e.g., General) or the keyword _ALL_ to rebuild all users mailboxes.
Limiting the Size of Messages Sent at Peak Hours
Typically, the amount of traffic on the network varies throughout the day. If the system experiences performance problems during hours of peak usage, consider restricting the size of messages sent. The Intelligent Messaging mail service allows you to specify the maximum message size users are allowed to send during defined peak and off-peak hours. If a user sends a message that exceeds the size limit specified for the time of day, the message is returned as undeliverable. The total size of a message is considered to be the sum of the size of the message text and the size of all the message's attachments. If desired, you can also specify a list of users who are exempt from the size limits.
To Limit the Size of Messages During Peak Hours Using StreetTalk Explorer
1. Right-click the mail service in the right pane and select Properties from the shortcut menu.
2. Click the Message Store tab.
3. In the Message Size Restrictions window, double-click the Period column.
4. In the Message Size Restriction dialog box, specify the start and end of the peak and off-peak hours. If the times specified for peak and off-peak usage are the same, the mail service checks all messages against the peak hour limit. By default, the off-peak period is defined as 6 p.m. to 6 a.m.
5. In the Limit field for each period, enter the maximum message size. The default value of 0 indicates that no message limit exists. If you don't specify a maximum message size, the mail service sends messages as usual and does not check the message size.
You can also specify the off-peak hours by manually setting attributes <7:111> and <7:112>.
You can also specify the size limits for each period by manually setting attributes <7:113> and <7:115>.
Attributes 7:111 and 7:112 define the beginning and end of the off-peak period, in 24-hour clock time, for the mail service. The default off-peak period is defined as from 6 P.M. to 6 A.M.
Attribute 7:113 defines the maximum message size limit, in bytes, for the peak period, and attribute 7:115 defines the maximum message size limit, in bytes, for the off-peak period. Message size limit is the sum of the message text and the attachment sizes. If you do not define either the peak or the off-peak maximum message size, messages are sent with no size checks.
If the time is in the peak period and the maximum peak message size is defined, each message sent is compared against the peak limit. If the time is in the off-peak period and the maximum off-peak message size is defined, each message sent is compared against the off-peak limit.
Attribute 7:114 allows you to specify a StreetTalk list of users who are exempt from message size limits. If the message size exceeds the maximum and the sender is not a member of the exemption list, IM returns an Undeliverable Message to the sender. Otherwise, IM sends the message as usual.
Table 2-6 defines the default and allowable values for these attributes.
To Specify List of Users Exempt from Message Size Restrictions
1. Create a list of users you want to make exempt from the message size restrictions.
2. Right-click the mail service in the right pane and select Properties from the shortcut menu.
3. Click the Message Store tab.
4. In the Exemption List field, enter the name of the list you created in Step 1, or click Browse to locate it. You can also specify an exemption list by manually setting attribute <7:114>.
To Define or Edit Attributes Using StreetTalk Explorer
Mail service configuration information is stored as StreetTalk attributes. When a mail service is started, it retrieves mail configuration attributes from StreetTalk. If no mail configuration attributes exist, the mail service uses its system default settings. Table 2-6 lists the mail service configuration defaults.
Begin this procedure from the StreetTalk Explorer, with the StreetTalk name of the mail service displayed in the right pane.
1. Right-click the name of the mail service whose attributes you are defining or editing and select Attributes on the shortcut menu.
or
Select Attributes on the File menu.
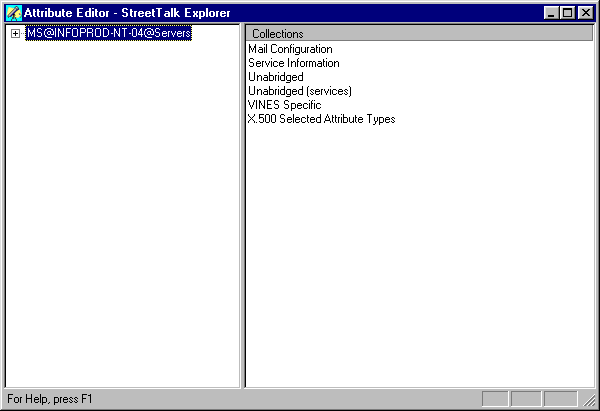
The Attribute Editor window appears.
Figure 2-6. Attribute Editor Window
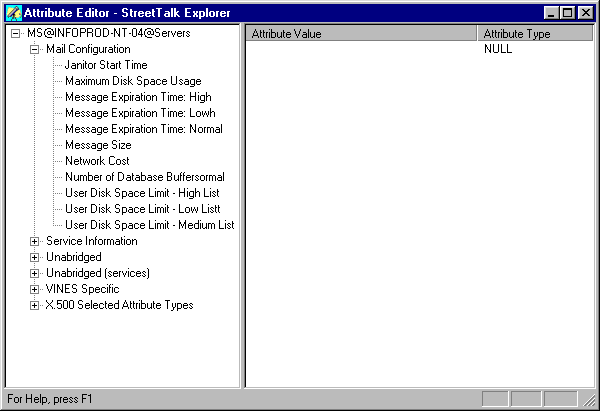
2. Select Mail Configuration. The mail service configuration attributes display.
Figure 2-7. Attribute Editor Window - Mail Service Configuration Attributes

3. Select the attribute whose value you are assigning. The Attribute Value and Attribute Type fields appear.
Figure 2-8. Attribute Editor Window - Edit Attribute Value
4. Click the Attribute Value field and then enter a value in the Attribute Value field on the right pane.
5. Continue defining or editing attribute values as necessary.
To Define or Edit Mail Service Attributes Using MATTR
1. At the command line, enter MATTR in the following command format:
MATTR object name
where object name is the StreetTalk name of the mail service. The Select Access Method menu appears.
Figure 2-9. Select Access Method Menu

2. From the Select Access Method menu, access the attribute you want to create or edit as follows:
SELECT from name list - Select attributes by their text names rather than by their number identifiers. If you choose SELECT from name list, the Select Attribute Collection menu appears. Go to step 3.
SPECIFY <v:a> identifier - Select attributes by their specific vendor attribute pair. If you choose SPECIFY <v:a> identifier, the Specify Attribute Identifier menu appears. Go to step 5.
SCAN existing attributes - Select attributes by scanning a list of all defined mail attributes. If you choose SCAN existing attributes, the Select Existing Attribute menu appears. Go to step 6.
Note The attribute names are defined in the Attribute View Definition (AVD) file that shipped with the software.
Figure 2-10. Select Attribute Collection Menu
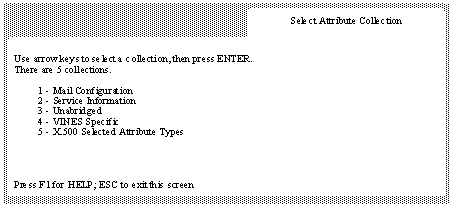
3. From the Select Attribute Collection menu, select Mail Configuration. The Select Attribute Name menu appears.
Figure 2-11. Select Attribute Name Menu

4. From the Select Attribute Name menu, select the attribute you want to create or edit. The attributes are described in Table 2-6. Go to step 7.
Figure 2-12. Specify Attribute Identifier Menu
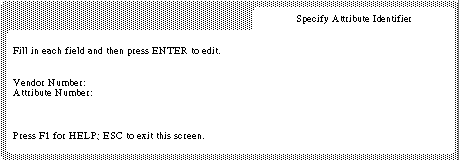
5. In the Vendor Number field of the Specify Attribute Identifier menu, enter the value 7. In the Attribute Number field, enter the number of the attribute you want to create or edit. Press ENTER. Go to step 7.
6. From the Select Existing Attribute menu, select the attribute you are editing.
7. The Edit Attribute menu appears, showing the current information for the attribute you are editing or creating, as shown in Table 2-5.
Table 2-5. Attribute Information
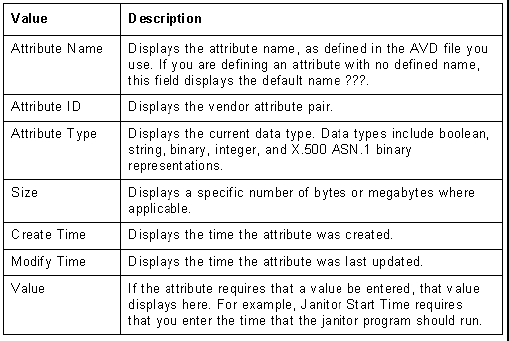
Note If you are defining a new attribute, the attribute data type is set to the default data type "String". Use this data type for both integer type attributes and character type attributes.
8. From the Edit Attribute menu, select EDIT attribute value. The attribute editing screen appears.
9. Use the arrow keys to position the cursor anywhere in the Attribute Editing screen and enter or change the appropriate values.
10. Press F10 to save the changes. You return to the Edit Attribute menu. The Size and Value fields of the Edit Attribute menu reflect any changes you made during editing.
Once restarted, the mail service retrieves the configuration attributes from StreetTalk and stores the information to local variables. If you specify a value that is outside the parameters for that attribute, the mail service sets the attribute to the system default setting and sends a warning message to the mail service log, or if your mail service is running on Windows NT, the Windows NT Event Viewer, Application Log.
Table 2-6. Mail Service Configuration Attributes
Attribute |
Default Value | Valid Values | |
Number |
Name |
||
7:1 |
Janitor Start Time | 3 | 0 - 23 |
7:2 |
Message Compression Size | 4999 | > 0 |
7:3 |
Network Cost for Compression | 480 | > 0 |
7:4 |
Message Expiration Time: Low | 168 hours | 1 - 743 |
7:5 |
Message Expiration Time: Normal | 96 hours | 1 - 743 |
7:6 |
Message Expiration Time: High | 24 hours | 1 - 743 |
7:7 |
Number of Database Buffers | 10 | 5 - 500 Recommended value is 50; highest recommended value is 100. |
7:8 |
Maximum Disk Space Usage in Megabytes | 0 | 0 for unlimited, > 0 for actual limit. |
7:9 |
User Disk Space Limit in Bytes -Low List | Unlimited | For Limit: 0 for unlimited, > 0 for
actual limit. For List Name: valid StreetTalk name. |
7:10 |
User Disk Space Limit in Bytes -Medium List | Unlimited | For Limit: 0 for unlimited; > 0 for
actual limit. For List Name: valid StreetTalk name. |
7:11 |
User Disk Space Limit in Bytes -High List | Unlimited | For Limit: 0 for unlimited; > 0 for
actual limit. For List Name: valid StreetTalk name. |
7:12 |
Minimum Time in Minutes Between Full MTA Queue Processing | 5 | 0 for processing after every network event; non-zero for actual time value. |
7:13 |
Restrictions to User Override of Send Wildcard Capability | 0 if attribute is not used or if the value set is out of range | 0 - 4, inclusive. See Table 2-2. |
7:50 |
Unlimited Recipients List | Disabled | 0,1 The attribute value must be 1 to be enabled. |
7:70 |
REMS Alias Cache Attribute: Number of Aliases to Cache | Disabled | 4 - 100, inclusive. See Table 2-3. |
7:71 |
REMS Alias Cache Attribute: Time the Alias Entries Remain in Cache | 60 | Minimum value 2. See Table 2-3. |
7:96 |
Folder Database Rebuild Attribute | None | Any value. |
7:97 |
Envelope Database Rebuild Attribute: Folders to Rebuild | None | Folder name or the keyword _ALL_.The folder name passed must be the short name presented by the MMAIL utility.The BeyondMail long folder names should not be used here. |
7:98 |
Envelope Database Rebuild Attribute:User Mailbox Rebuild | None | StreetTalk username or the keyword _ALL_ |
7:111 |
Off-peak Start Hour Attribute | 18 (6 p.m.) | 0 through 24 hours |
7:112 |
Off-peak Stop Hour Attribute | 6 (6 a.m.) | 0 through 24 hours |
7:113 |
Maximum Peak Message Size in Bytes Attribute | None | Any positive integer (If not set or 0, no size limit is set.) |
7:114 |
Exemption List Attribute | Empty list | StreetTalk list of users exempt from size limit. |
7:115 |
Maximum Off-peak Message Size in Bytes Attribute | None | Any positive integer. (If not set in or 0, no size limit is set.) |
7:119 |
International Code Page | 437 | Enter either 437 (for MS DOS Latin US) or 850 (MS DOS Latin 1). Available in IM 5.0. Enter the domain name associated with the Intenet address for the organization. For example: domain.com. Available in IM 5.0. |
7:200 |
Domain | None | Enter the domain name associated with the Intenet address for the organization. For example: domain.com. Available in IM 5.0. |
7:201 |
Maintenance Timer | 720 | Enter any integer value to indicate the number of minutes. Valid values range from 2 minutes to 1440 minutes (24 hours). Available in IM 5.0. |
Maintaining a mail service includes the following:
Starting and stopping the service Displaying the service status Displaying service users Changing the mail service description
Starting or Stopping a Mail Service
You must start a mail service before users can use it.
To Start or Stop the Mail Service Using StreetTalk Explorer
Begin this procedure from the StreetTalk Explorer with the StreetTalk name of the mail service displayed in the right pane.
1. Right-click the mail service that you are starting or stopping, and select Properties on the shortcut menu.
or
Select Properties on the File menu.
The Mail Service property sheet displays with the Summary page active.
Figure 2-13. Mail Service Property Sheet -Summary Page
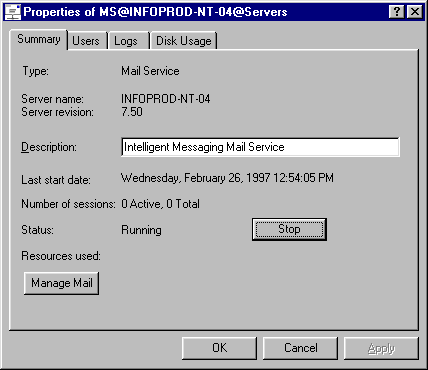
2. If the mail service is running, click Stop and OK.
or
If the mail service is stopped, click Start and OK.
The Status field displays the changed status.
To Start or Stop the Mail Service Using MSERVICE
1. Type MSERVICE at the command prompt and press ENTER. Search for and select the appropriate mail service.
or
Type MSERVICE and the complete StreetTalk name of the mail service and press ENTER.
2. From the Manage a Service menu, select Control the Service. The Control a Service menu appears.
3. To start the mail service, select Start service.
or
To stop the mail service, select Stop service.
4. Press ESC to exit.
Displaying Mail Service Status
To Display Mail Service Status Using StreetTalk Explorer
Begin this procedure from the StreetTalk Explorer with the StreetTalk name of the mail service displayed in the right pane.
1. Right-click the name of the mail service whose status you want to display and select Properties on the shortcut menu.
or
Select Properties on the File menu.
The Mail Service property sheet displays with the Summary page active. The Status field displays the status of the mail service.
Figure 2-14. Mail Service Property Sheet - Summary Page
2. Click OK.
To Display Mail Service Status Using MSERVICE
Type MSERVICE at the command prompt and press ENTER. Search for and select the appropriate mail service.
or
Type MSERVICE and the complete StreetTalk name of the mail service and press ENTER.
The Manage a Service menu shows the mail service status.
Changing the Mail Service Description
To Change the Mail Service Description Using StreetTalk Explorer
Begin this procedure from the StreetTalk Explorer with the StreetTalk name of the mail service displayed in the right pane.
1. Right-click the StreetTalk name of the mail service whose description you are changing and select Properties on the shortcut menu.
or
Select Properties on the File menu.
The Mail Service property sheet appears with the Summary page active.
Figure 2-15. Mail Service Property Sheet - Summary Page
2. Enter a new description in the Description field.
3. Click Apply
4. Click OK.
To Change the Mail Service Description Using MSERVICE
1. Type MSERVICE at the command prompt and press ENTER. Search for and select the appropriate mail service.
or
Type MSERVICE and the complete StreetTalk name of the mail service and press ENTER.
2. Select Change service description.
3. Enter a new mail service description. Press ENTER.
4. Press ESC to exit.
To Display a List of Mail Service Users Using StreetTalk Explorer
Begin this procedure from the StreetTalk Explorer with the StreetTalk name of the mail service displayed in the right pane.
1. Right-click the mail service name and select Properties on the shortcut menu.
or
Select Properties on the File menu.
The Mail Service property sheet appears with the Summary page active for the selected mail service.
Figure 2-16. Mail Service Property Sheet - Summary Page

2. Click the Users tab. The Users page displays a list of the users currently using the mail service.
Figure 2-17. Mail Service Property Sheet - Users Page
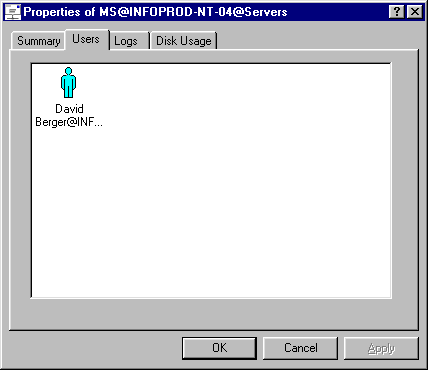
3. Click OK.
To Display a List of Mail Service Users Using MSERVICE
1. Type MSERVICE at the command prompt and press ENTER. Search for and select the appropriate mail service.
or
Type MSERVICE and the complete StreetTalk name of the mail service and press ENTER.
2. From the Manage a Service menu, select Control the Service. The Control a Service menu appears.
3. Select Look at service users. Press ENTER. A list of mail service users appears.
4. Press ESC to exit.
Managing the Mail Service Mailbox
To manage the mailbox for the mail service, you must be an administrator of the server where the mail service resides.
To Manage the Mail Service Mailbox Using StreetTalk Explorer
Begin this procedure from the StreetTalk Explorer with the StreetTalk name of the mail service displayed in the right pane.
1. Right-click the mail service name and select Mail on the shortcut menu. Click the mail service name on the right pane of the Mail Manager.
or
Select Properties on the File menu. The Mail Service property sheet appears with the Summary page active. Click Manage Mail.
The Mail Manager window displays the mail queues that reside in the mail service.
Figure 2-18. Mail Manager Window - Mail Queues
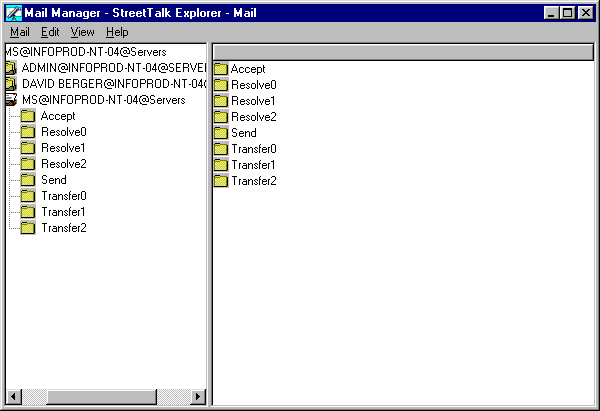
2. To open one of the mail queues displayed in the left pane, right-click the name of the mail queue and select Properties on the shortcut menu.
3. You can browse the messages in the queue, delete messages, or you can empty a mail queue.
- To browse a message, right-click the message ID and select Properties on the shortcut menu. The envelope fields and Responsible Recipients List for the message are displayed.
- To delete a message, right-click the message ID and select Delete on the shortcut menu.
- To empty a mail queue, right-click the mail queue and select Empty on the shortcut menu.
To Manage the Mail Service Mailbox Using MMAIL
1. Type MMAIL at the command prompt and press ENTER. At the Select a Server menu, use the arrow keys to select the server on which the mail service resides.
or
Type MMAIL and the server name. Press ENTER.
The Manage Mail menu appears.
2. Select Manage a Mailbox.
3. Select the mail service mailbox.
Note To display the number of messages in the mail service mailbox, press F3. Mail displays the total message count for the mail service mailbox. It includes messages in special folders that the service uses to process mail messages.
4. To manage the mail service mailbox, press ENTER. The Manage Mailbox menu appears.
Figure 2-19. Manage Mailbox Menu - Mail Service
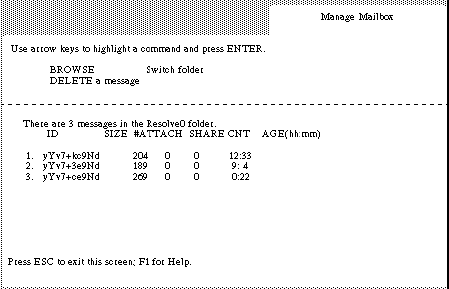
5. From the Manage Mailbox menu, you can browse, delete a message, or switch folders.
When you browse the fields of a message envelope in the MTA queues, you also see a set of fields known as the Responsible Recipient List. These fields provide information on recipients for whom the message is destined.
Figure 2-20 shows the fields in the Responsible Recipient List.
Figure 2-20. Responsible Recipient List
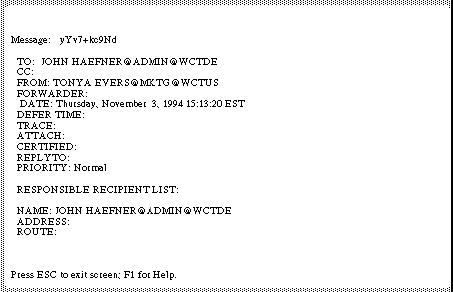
Table 2-7 describes each field.
Table 2-7. Responsible Recipient List Fields
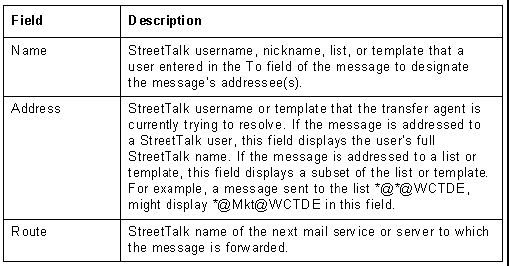
If a message is sent to more than one user, mail sends multiple copies of the message. Each copy of the message can have a different Address field and a different Route field.
To Manage the Mail Service Mailbox Using MSERVICE
1. Type MSERVICE at the command prompt and press ENTER. Search for and select the appropriate mail service.
or
Type MSERVICE and the complete StreetTalk name of the mail service and press ENTER.
2. From the Manage a Service menu, select Control the Service. The Control a Service menu appears.
3. From the Control a Service menu, select Configure Service. The Manage Mail menu appears.
4. Select Manage a Mailbox.
5. When the cursor moves to the lower part of the menu, highlight the mail service mailbox.
Note To display the number of messages in the mail service mailbox, press F3. Mail displays the total message count for the mail service mailbox. It includes messages in special folders that the service uses to process mail messages.
6. To manage the mail service mailbox, press ENTER. The Manage Mailbox menu appears.
7. From the Manage Mailbox menu, you can browse, delete a message, or switch folders.
Making a Mail Service Available to Users
To make a mail service available to users, set up their user profiles with the SETMAIL command. This command specifies which mail service a user uses for sending and receiving mail on the network. Enter the SETMAIL command in the following format:
SETMAIL service-name
For example,
SETMAIL MS@DEFRA001@servers
where MS@DEFRA001@Servers is the name of the Intelligent Messaging mail service the user will use to send and receive mail. The mail service is maintained on the server identified in the second part of the StreetTalk name.
Once you set up a user profile with SETMAIL, the mail service is available to the user the next time the user logs in. No further steps for setting up the mail service are required. However, you can use additional management features to customize and manage mailboxes in a mail service. These features are described in the sections that follow.
To Establish a User Profile Using StreetTalk Explorer
Begin this procedure from the StreetTalk Explorer.
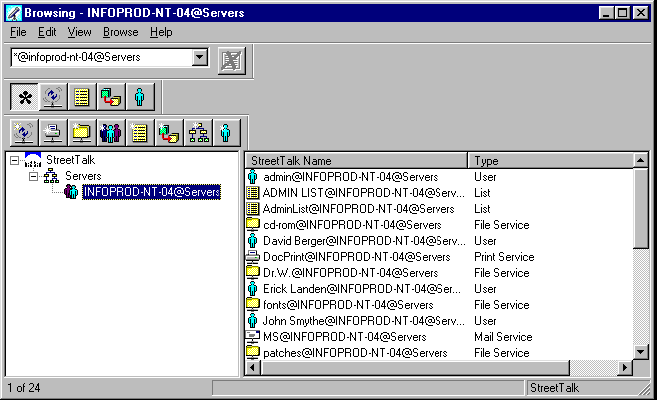
1. Select the StreetTalk group and organization that the user belongs to. A list of items in the selected group displays.
Figure 2-21. StreetTalk Explorer Browser
2. Right-click the user name and select Properties on the shortcut menu. The User property sheet appears with the Summary page displayed.
Figure 2-22. User Property Sheet - Summary Page
3. From the User property sheet, click the Profile tab. The Profile page appears.
Figure 2-23. User Property Sheet - Profile Page
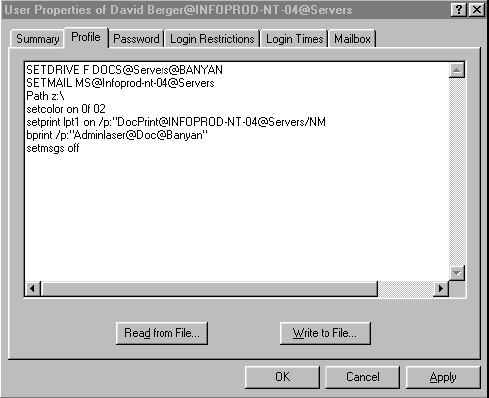
4. Do one of the following
- Add the following statement to the user's profile
SETMAIL service-name
- Click Read from File to copy a saved user profile to the current user profile. The Open dialog box appears. Select the directory and filename that contain the profile. Click Open.
- Click Cancel to close this operation without modifying the user profile.
5. Do one of the following:
- Click Write to File to save the user profile to a file so that it can be used again. The Save As dialog box appears. Enter a directory and filename and click Save.
- Click OK.
To Establish a User Profile Using MUSER
1. At the command prompt, type MUSER and press ENTER. The Manage Users menu appears.
2. From the Manage Users menu, choose Select from the list below.
3. Select the user whose profile you are editing or creating. The Manage User menu appears.
4. From the Manage User menu, select Manage User Profile. The Manage User Profile menu appears.
5. From the Manage User Profile menu, select Edit profile. The user profile for the selected user appears on the User Profile screen.
6. Add the following to the user profile:
SETMAIL service-name
7. Press F10 when the user profile is done. Press ESC to exit.
You can redirect mail intended for one user to another user's mailbox. For example, if a user will be out of the office for some time and you want someone else to check the user's mail, you can redirect his or her mail to another mailbox.
Be aware that the recipient of the redirected mail will receive all of the other user's mail. The recipient can distinguish regular mail from redirected mail by noting which StreetTalk name appears in the To, Cc, or Bcc fields of a message. If a message sent to a list or pattern is destined for both users, the recipient of the redirected mail receives only one copy of the message.
To redirect mail, modify the SETMAIL command in the user profile to include a recipient address, as shown below:
SETMAIL service-name[recipient-address]
where service-name is the StreetTalk name of the mail service where the mail is redirected and [recipient address] is the StreetTalk name of the user who receives the redirected mail. The recipient address can be a username, nickname, or list name. It must be enclosed in brackets.
Example of Redirecting Mail
Jeffrey Smith is a systems consultant who is out of the office for two weeks on business. In his absence, Jeffrey's secretary,
Thea, needs to check his mail. Jeffrey's administrator changes the SETMAIL command in Jeffrey's user profile to the following:
SETMAIL MS@USCHI001@servers[Thea Grey@Admin@WCTUS]
where MS@USCHI001@servers is the StreetTalk name of Thea's mail service and Thea Grey@Admin@WCTUS is her StreetTalk username.
When anyone sends mail to Jeffrey, the message gets redirected to Thea's mailbox. She checks the address fields of each message she receives to determine which messages are intended for Jeffrey.
Generating a Disk Usage Report
You can generate a disk usage report for a mail service. The report lists the number of mail messages in each user's mailbox and the amount of disk space consumed by those messages. To generate a disk usage report, you must be an administrator of the mail service.
Note: It can take considerable time to generate a disk usage report, especially if the mail service contains a number of users whose mailboxes contain many messages. To avoid affecting mail performance, generate a disk usage report during a low-usage period.
To Generate a Disk Usage Report Using StreetTalk Explorer
Begin this procedure from the StreetTalk Explorer with the StreetTalk name of the mail service displayed on the right pane.
1. Right-click the mail service name and select Properties on the shortcut menu.
or
Select Properties on the File menu. The Mail Service property sheet appears with the Summary page active.
2. Click the Disk Usage tab. The Disk Usage property page appears with the disk usage report data displayed.
Figure 2-24. Mail Service Property Sheet - Disk Usage Page
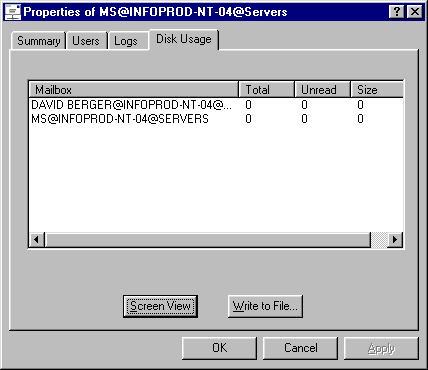
3. Do one of the following:
- Click Screen View to view the report on screen. Click OK.
- Click Write to File to access a Save As dialog box on which you can specify the location and filename to which you are saving the report. Click Save and OK.
- Click Cancel to exit.
To Generate a Disk Usage Report Using MMAIL
1. Type MMAIL at the command prompt and press ENTER. At the Select a Server menu, use the arrow keys to select the server on which the mail service resides.
or
Type MMAIL and the server name and press ENTER.
2. From the Manage Mail menu, select Generate Disk Usage Report. The Report Mail screen appears, prompting you to specify the output file for the report.
3. Type the filename to which you want the report written and press ENTER. You can enter a complete pathname.
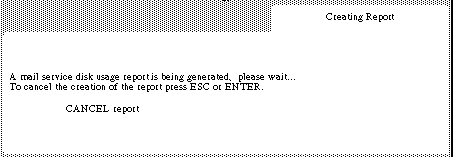
4. After you specify an output filename, the Creating Report screen appears. As the report is generated, a series of messages displays. To cancel the creation of the report, press ESC or ENTER.
Figure 2-25. Creating Report Screen
5. When the report is finished, the cursor returns to the function area of the Manage Mail menu. The report is complete.
6. Use an application that accepts an ASCII text file to view or print the report.
To Generate a Disk Usage Report Using MSERVICE
1. Type MSERVICE at the command prompt and press ENTER. The Manage Services Menu appears. Search for and select the appropriate mail service.
or
Type MSERVICE and the complete StreetTalk name of the mail service and press ENTER.
2. From the Manage a Service menu, select Control the Service. The Control a Service menu appears.
3. From the Control a Service menu, select Configure Service. The Manage Mail menu appears.
4. From the Manage Mail menu, select Generate Disk Usage Report. The Report Mail screen appears, prompting you to specify the output file for the report.
5. Type the filename to which you want the report written and press ENTER. You can enter a complete pathname.
6. After you specify an output filename, the Creating Report screen appears. As the report is generated, a series of messages displays. To cancel the creation of the report, press ESC or ENTER.
7. When the report is finished, the cursor returns to the function area of the Manage Mail menu. The report is complete.
8. Use an application that accepts an ASCII text file to view or print the report.
The disk usage report contains a heading that includes the mail service name, and the date and time the report was generated. The report lists the following information, per mailbox:
| StreetTalk name of each mailbox | |
| Total number of messages | |
| Number of unread messages | |
| Amount of disk space, in bytes, that the messages occupy |
Note: If the mail service contains a number of users whose mailboxes contain many messages, the mail service may not be able to obtain complete disk usage data in the time allotted. When this situation occurs, the disk usage report prints...INCOMPLETE... beside the message count. To avoid obtaining incomplete message counts, generate the disk usage report during a low-usage period.
Keep in mind that the number of messages in a mailbox may not correspond to the message counts listed in the report. Counts may not correspond for the following reasons:
The report does not indicate which messages are shared among mailboxes. If more than one mailbox contains the same message, the mail service maintains only one copy of the message and creates directory pointers (one for each recipient) to the message. The report does not differentiate between messages stored in the mailbox with deleted messages. Counts for the user mailbox include messages in the Wastebasket folder. The report does not differentiate between messages stored in the Resolve and Transfer queues with messages stored in a special folder. Counts for the mail service mailbox include messages in a separate working folder that the service uses to process mail messages.
Running Mail Using the PC Dial-in Option
You can run Intelligent Messaging from a remote workstation over a PC Dial-in link. When running mail during a dial-in session, you may experience slow performance if the mail application is loaded from the network. Loading the mail application from the network over a phone connection causes the slow performance.
To improve performance of mail over a PC Dial-in link, create a diskette that contains the files required to run Intelligent Messaging. You can store the files on the diskette or fixed disk of the remote workstation. In your user profile, include the environment variable that instructs Intelligent Messaging where to read the required message text files (.MSB files) and on-line help files (.HLP files). To run Intelligent Messaging from the remote workstation, start the mail application from the diskette or fixed disk rather than loading it from the network.
The following sections describe this procedure in detail.
To Create the Diskette for the Remote Workstation
1. Create a directory on the workstation to store the mail files. For example, create the directory A:\mail.
2. Create two subdirectories for message text files and on-line help files. For example, create the subdirectories A:\mail\messages and A:\mail\hlpfiles.
3. Copy the following files from the directory Z:\ to the directory you created for the mail files in step 1:
ADDRBOOK.EXE
XMLOGO.EXE
MAIL.EXE
XSTD.EXE
XMAIL.EXE
4. Copy the following files from the directory Z:\messages to the directory you created for the message text files in step 2:
ADDRBOOK.MSB
XMAIL.MSB
INTLDATA.BIN
XSTD.MSB
VMAIL.MSB
5. Copy the following files from the directory Z:\hlpfiles to the directory you created for the on-line help files in step 2:
ADDRADD.HLP
ADDRCMD.HLP
ADDRDEL.HLP
ADDREDIT.HLP
MAILSTNM.HLP
VMCATT.HLP
VMCBCC.HLP
VMCCC.HLP
VMCCERT.HLP
VMCCMD.HLP
VMCDATE.HLP
VMCDEFER.HLP
VMCEDITR.HLP
VMCERROR.HLP
VMCEXPIR.HLP
VMCFLDR.HLP
VMCFLDRC.HLP
VMCFLDRD.HLP
VMCFLDRO.HLP
VMCFLDRP.HLP
VMCFLDRR.HLP
VMCFROM.HLP
VMCMSGAN.HLP
VMCMSGDL.HLP
VMCMSGFI.HLP
VMCMSGFO.HLP
VMCMSGPR.HLP
VMCMSGRD.HLP
VMCMSGSN.HLP
VMCPRI.HLP
VMCSELAT.HLP
VMCSETTM.HLP
VMCSUBJ.HLP
VMCTO.HLP
You need to include the SET ENSEXE environment variable in your user profile. The SET ENSEXE command instructs Intelligent Messaging to read the .HLP and the .MSB files from the directory you created for the files instead of from the network.
For example, if you copied the .MSB files to the subdirectory A:\mail\messages and the .HLP files to the subdirectory A:\mail\hlpfiles, enter the following lines in your user profile:
IF connection=dialin
SET ENSEXE=A:\mail
ENDIF
The IF...ENDIF command is a conditional statement that executes only if the workstation is logged in to the network over a dial-in connection. For additional information on using IF...ENDIF conditional statements, refer to the Command Reference.
To run Intelligent Messaging and access STDA (with F2) or your personal address book (with F6), you must have approximately 400 KB of memory available in DOS low memory.
To Start Intelligent Messaging During a Dial-in Session
1. Set your current DOS directory to the directory you created for the mail files. This process allows DOS to locate the program on the diskette or fixed disk and load it. Otherwise, DOS automatically searches the network drives that are specified by the DOS PATH command on your user profile, and loads the program over the phone line.
For example, if you copied all the files to the directory A:\mail, enter:
A:
CD mail
2. Enter MAIL.
Once Intelligent Messaging is running, you can change your directory to a network directory. As you use mail, mail messages will transfer back and forth from the network to the workstation. Intelligent Messaging should run just as it does at the office; however, you should allow more time for data to transfer across the phone connection.
![]()
![]()
![]()