![]()
![]()
Chapter 8 - Using Advanced Features
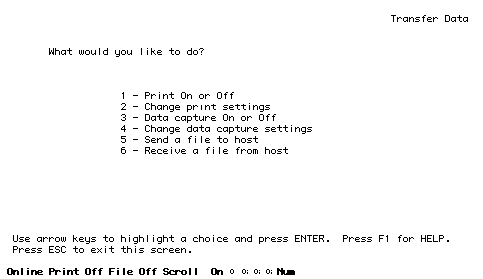
To transfer data between your workstation and the host, use the Transfer Data menu. To display the menu, choose Transfer Data from the Action Menu. The Transfer Data screen appears, as shown in the following illustration.
When you want to return to the Action Menu, press ESC.
The Transfer Data menu allows you to choose the following functions:
|
|
Print everything displayed on the terminal emulation screen on a network or local printer, change settings that affect the printout, and choose the workstation printer port to which you want to print. |
|
|
Capture everything displayed on the terminal emulation screen into a DOS file, and change settings that affect the contents of the file. |
|
|
Transfer files between your workstation and the host computer, optionally using the Kermit protocol. (In computer science, a protocol is a set of rules that defines how two computers communicate. Kermit is a protocol for transferring files between computers.) |
The sections that follow describe how to use print capture, data capture, and file transfer to and from the host computer.
To capture everything displayed on the terminal emulation screen to a network printer or local printer, follow these steps:
1. If you do not have a currently active session, start one now. (To turn print capture ON, you must have a currently active session; that is, the Status Line must display Online.)
2. Press the appropriate key (HOME or another key configured by your administrator) to bring up the Action Menu.
3. From the Action Menu, choose Transfer Data.
4. From the Transfer Data menu, choose Print On or Off.
After you turn print capture ON, everything displayed on the terminal emulation screen is captured, exactly as it appears, to a buffer. When the buffer is full, or when you turn print capture OFF, the contents of the buffer are sent to the printer. Print capture continues until you turn it OFF by choosing this option again or by ending the current session.
The current print capture status appears on the Status Line as Print On or Print Off. Each time you choose Print On or Off, the print capture status changes on the Status Line.
The printer you use can be directly attached to your workstation or connected to your Banyan network. To change either the printer to which you want to print or some settings that affect the printout, follow these steps:
1. Press the appropriate key (HOME or another key configured by your administrator) to bring up the Action Menu.
2. From the Action Menu, choose Transfer Data.
3. From the Transfer Data menu, choose Change Print Settings.
4. Change any settings you need to change. To change a setting, use the arrow keys to move the cursor. Press ENTER when your choice for each setting is highlighted. You can change the following settings:
Auto linefeed. If lines are printing over one another on the printer, choose YES. An extra linefeed or carriage return is added to the end of every line received from the host. If you want each line printed exactly as it is received from the host, choose NO, the default setting. If the current setting is YES and an extra line appears after each line of data, change the setting to NO.
Display control characters. If you want to retain control characters in the data received from the host, choose YES. If you want to remove control characters from the data received, choose NO. The default setting is NO.
Printer port. You can indicate the printer port by choosing LPT1, LPT2, or LPT3. LPT1 is the default setting. The printer corresponding to the port can be locally attached, or out on the network.
5. When you have finished making changes, press F10, or press ENTER at the last line. The new settings are now in effect. To cancel your changes and retain the previous settings, press ESC. In either case, you return to the Transfer Data menu.
Changes you make are in effect until you change them explicitly or load settings from a parameter file. See "Loading Parameter or Script Files" later in this chapter, for more information on parameter files.
To capture everything displayed on the terminal emulation screen into a DOS file, you must assign a name for the file first.
Assigning or Changing a Filename
To assign a filename to contain the captured data, follow these steps:
1. Press the appropriate key (HOME or another key configured by your administrator) to bring up the Action Menu.
2. From the Action Menu, choose Transfer Data.
3. From the Transfer Data menu, choose Change Data Capture Settings. The lower portion of the Change Data Capture Settings screen prompts for the filename in which to save the current interaction.
4. Enter a filename of up to 11 characters. (You can specify a name of up to 8 characters and a file extension of up to 3 characters.) You may specify a full pathname. If you do not want the file stored in the current directory, enter a pathname to indicate where the file should go. A pathname can be up to 46 characters. (See the end of this section for an example of entering filenames.)
If the filename you specify does not exist, it is created. If it already exists, the new information is added to the end of the existing file. If the file cannot be created, an error message appears.
Once you enter a filename, it is retained until you change it, delete it, or end the current session. To change the filename during a session, use the editing keys to space over the old filename or enter a new one.
5. When you have finished making changes, press F10 or press ENTER at the filename. The new settings are now in effect. To cancel your changes and retain the previous settings, press ESC. In either case, you return to the Transfer Data menu.
Changes you make are in effect until you change them explicitly or load settings from a parameter file.
Example Entering a Filename
You want to capture data to a file called MYFILE.TXT in your current directory, the REPORTS directory on drive C. To enter that filename, you could enter the filename, as follows:
MYFILE.TXT
You could also specify the filename by giving its complete pathname, as follows:
C:\REPORTS\MYFILE.TXT
To capture data to the same filename, but in a different directory, the MKTG directory on drive F, you would specify it, as follows:
F:\MKTG\MYFILE.TXT
Capturing the Data
To capture everything displayed on the terminal emulation screen into a DOS file, follow these steps:
1. If you have not already done so, assign a filename to the file that will contain the captured data. (See the previous section, "Assigning or Changing a Filename," for instructions on assigning a filename.)
2. If you do not have a currently active session, start one now. (To turn data capture ON, you must have a currently active session; that is, the Status Line must display Online.)
3. Press the appropriate key (HOME or another key configured by your administrator) to bring up the Action Menu.
4. From the Action Menu, choose Transfer Data.
5. From the Transfer Data menu, choose Data Capture On or Off.
After you turn data capture ON, everything displayed on the terminal emulation screen is captured, exactly as it appears, to a buffer. When the buffer is full, or when you turn data capture OFF, the contents of the buffer are written to the DOS file. Data capture continues until you turn it OFF by choosing this option again or by ending the current session.
The current data capture status appears on the Status Line as File On or File Off. Each time you choose Data Capture On or Off, the data capture status changes on the Status Line.
You can change the following settings:
Auto linefeed. If lines are overwriting in the file, choose YES. An extra linefeed or carriage return is added to the end of every line received from the host. If you want each line printed exactly as it is received from the host, choose NO, the default setting. If the current setting is YES and an extra line appears after each line of data, change the setting to NO.
Display control characters. If you want to retain control characters in the data received from the host, choose YES. If you want to remove control characters from the data received, choose NO. The default setting is NO.
To change one of these settings, use the arrow keys to highlight your choice, and press ENTER.
Sending a DOS File to the Host Computer
Before you send a DOS file to a host computer, you must set up a way to capture the data on the host. There are a number of ways to capture the data on the host. Here are two methods:
|
|
With an editor on the host. In this case, you can send any file containing data that can be displayed on the screen. To use this method, you must send the file with no protocol. Sending a file with no protocol is described in "Sending a File with No Protocol" later in this chapter. |
|
|
With the Kermit protocol. "Sending a File with the Kermit Protocol" later in this chapter describes using the Kermit protocol. |
Once you have set up a method of capturing data on the host, you can send the file. To send a DOS file to the host computer, follow these steps:
1. If you do not have a currently active session, start one now. (To send a file, you must have a currently active session; that is, the Status Line must display Online.)
2. Press the appropriate key (HOME or another key configured by your administrator) to bring up the Action Menu.
3. From the Action Menu, choose Transfer Data.
4. From the Transfer Data menu, choose Send a File to Host. The Send a File screen appears, as shown in the following illustration.

5. The upper portion of the Send a File screen prompts for the workstation filename to send to the host. Enter a filename of up to 11 characters or a pathname. (You can specify a filename of up to 8 characters and a file extension of up to 3 characters.) If the file you want to send is not in the current directory, enter a pathname to indicate where the file is located. A pathname can be up to 46 characters.
Once you enter a filename, it is retained until you change it or exit from the Send a File screen.
6. The lower portion of the Send a File screen contains options for modifying the file format while it is being transferred. Change any settings that need to be changed. You can change the following settings:
Expand tabs. If the host computer or application program handles tab characters differently from your workstation, choose YES. Tab characters in the data are converted to blanks when the file is sent.
If you do not want tab characters converted, choose NO. The default setting is NO.
Compress blank lines. If the host computer or application program interprets a blank line as the end of a file, choose YES. Each blank line within the data is converted to a single blank when the file is sent.
If you do not want blank lines converted, choose NO. The default setting is NO.
Convert to uppercase. If the host computer or application program requires upper-case files, choose YES. All characters in the file are converted to upper case when the file is sent.
If you do not want characters converted, choose NO. The default setting is NO.
Convert CR/LF to CR. If the host requires only a carriage return at the end of each line, choose YES. Each carriage return and linefeed pair at the end of a line is converted to a single carriage return when the file is sent. NO is the default setting.
If the host requires both a carriage return and a linefeed at the end of each line, choose NO. Since most host computers expect only a carriage return, this setting should usually be YES.
Protocol. The possible settings are NONE and KERMIT. If you want the data in the file sent to the host as if it were being typed at the keyboard, choose NONE. There is no error checking, and the file may pick up disturbances on the line transmitting the data. NONE is the default setting. This method of sending files is described in "Sending a File with No Protocol," which follows.
If you want to send the file to the host using the Kermit protocol, choose KERMIT. Data is verified as it is sent. This method of sending files is described in "Sending a File with the Kermit Protocol" later in this chapter.
7. Press F10 from anywhere on the Send a File screen, or press ENTER at the protocol type, to continue. If the DOS file you specify cannot be found or you have not specified a filename to send, you remain on the Send a File screen and an error message appears.
If you press ESC instead of F10 or ENTER, sending a file is canceled and you return to the Transfer Data menu. The new settings are canceled and the previous settings are retained.
Sending a File with No Protocol
To perform a simple transfer of data from a file on the workstation to an editor on the host, follow these steps:
1. Run the editor program on the host. Make sure that the editor is in insert mode, not command mode. (See your administrator or the documentation that accompanies the editor program you are using on the host for more details on running the editor program.)
2. Send the file from the workstation. Send the file without a protocol from the Send a File screen.
When you send a file with no protocol, you return directly to the terminal emulation screen. The information in the file appears on the screen while the file is transferred. When the file transfer is completed, you return to the Send a File screen. A message appears indicating that the transfer was accomplished.
If anything happens to prevent the data transfer from being completed, you return to the Send a File screen. An error message appears at the bottom of the screen indicating why the transfer failed. See your administrator for details.
Sending a File with the Kermit Protocol
To send the file using the Kermit protocol, you must first set up and run an appropriate Kermit program in server mode on the host. Your ATE service must include the Kermit file transfer option.
Note: The Kermit program must be a server version. Interactive versions of Kermit will not work with Banyan ATE software.
Usually, you enter in a command to run the Kermit program, specifying a switch to choose server mode. On some systems, the command kermit -s is used.
When you use the Kermit protocol, a screen prompts you for a name to assign to the file on the host. You can enter a filename of up to 46 characters long in a format consistent with that required by the host. Press ESC to return to the Send a File screen without sending a file. Press F10 or ENTER to continue and send the file.
During the transfer, you return directly to the terminal emulation screen. The information in the file appears on the screen while the file is transferred. When the file transfer is completed, you return to the Send a File screen. A message appears indicating that the transfer was accomplished.
If anything happens to prevent the data transfer from completing, you return to the Send a File screen. An error message appears at the bottom of the screen indicating the reason why the transfer failed.
You can display information about the transfer or control it by pressing special keys during the process. See "Receiving a File from the Host Computer," which follows, for more information.
For more information about using the Kermit protocol, see your administrator or the documentation for the Kermit program on the host.
Receiving a File from the Host Computer
To receive a file from the host, perform the following steps:
1. If you do not have a currently active session, start one now. (To receive a file, you must have a currently active session; that is, the Status Line must display Online.)
2. Make sure that an appropriate Kermit program is running in server mode on the host. Your ATE service must include the Kermit file transfer option.
3. Press the appropriate key (HOME or another key configured by your administrator) to bring up the Action Menu.
4. From the Action Menu, choose Transfer Data.
5. From the Transfer Data menu, choose Receive a File from Host.
6. The Receive a File screen appears. The upper portion of this screen prompts for the name of the file on the host to send to your workstation. Enter a filename of up to 46 characters in a format consistent with that required by the host.
Once you specify the name of a file for receiving, it is retained until you change it or exit the Receive a File screen.
7. The lower portion of the Receive a File screen contains options for modifying the file format while it is being transferred. Use the arrow keys to change any settings that need to be changed. You can change the following settings:
Auto linefeed. If lines are overwriting in the file, choose YES. An extra linefeed or carriage return will be added to the end of every line received from the host. If you want each line printed exactly as it is received from the host, choose NO, the default setting. If the current setting is YES and an extra line appears after each line of data, change the setting to NO.
Display control characters. If you want to retain control characters in the data received from the host, choose YES. To remove control characters from the data received, choose NO. The default setting is NO.
Protocol. The only setting is KERMIT.
8. To continue, press F10 from anywhere on the screen, or press ENTER at the protocol type. If you did not specify a host filename to send, you remain on the Receive a File screen and an error message appears.
To cancel your changes and retain the original settings, press ESC. Receiving a file is canceled and you return to the Transfer Data menu.
9. Next, you are prompted for a name for the file on your workstation. Enter a name for the file. The name can contain up to 8 characters with a file extension of up to 3 characters.
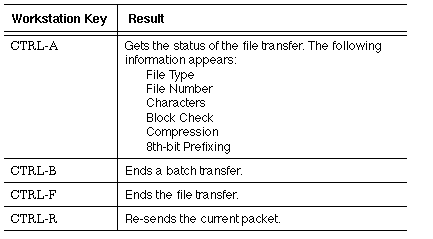
When you use the Kermit protocol through ATE menus to perform a file transfer (not a host-initiated file transfer), you can get the status of the file transfer and exercise control over it. To do so, use the special key combinations shown in Table 8-1. This information appears on the terminal emulation screen whenever you start a file transfer using the Kermit protocol.
If your administrator permits it, you can use Banyan menus to dial out to a host manually. See your administrator if you need to use this function. You should have access to a parameter file that provides proper settings to meet the requirements of the host computer and the hardware used to connect to it.
Note: If you are using a parameter file, load it before you attempt to dial out. See "Loading Parameter or Script Files" later in this chapter for instructions.
You can begin a manual dial-out session from the DOS command line or from the Action Menu. For more information on how to enter emulation for manual dial-out, see "Using the ASYNCH Command" in Chapter 6.
To begin a manual dial-out session from the Action Menu, follow these steps:
1. Press the appropriate key (HOME or another key configured by your administrator) to bring up the Action Menu.
2. From the Action Menu, choose End This Connection. You cannot dial out manually while you are on line with an active host session.
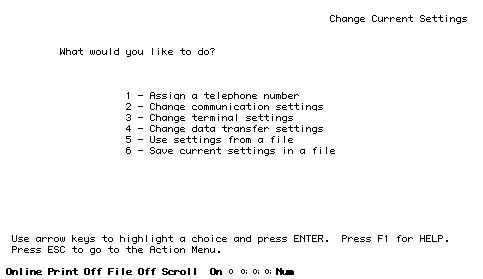
3. From the Action Menu, choose Change Current Settings. The Change Current Settings menu appears, as shown in the following illustration.
You can press ESC at any time to return to the Action Menu.
4. To specify a phone number for dial-out, follow these steps:
a. Choose Assign a Telephone Number. If you are unable to choose this menu option, check to make sure that there is no active session.
b. Enter the phone number you want to use. A telephone number can be up to 38 characters (spaces count as characters). Type a complete number in the order you would dial it manually. (See "Notes on Entering Telephone Numbers" later in this chapter for more information.)
c. Press ENTER to store the telephone number and return to the Change Current Settings menu.
5. Press ESC to return to the Action Menu.
6. Select Start or Resume This Connection. If lines are available and the remote host is also available, the ATE service can attempt to make a connection.
Difficulties in Dialing Out Manually
If you have difficulty making the connection, verify that your terminal settings are correct. ("Changing Communication Settings" in Chapter 9 describes communications settings. If you are not sure what your communications settings should be, ask your system administrator.)
To verify your settings, follow these instructions:
1. Press the appropriate key (HOME or another key configured by your administrator) to bring up the Action Menu.
2. From the Action Menu, choose Change Current Settings. The Change Current Settings menu appears.
3. Choose Change Communications Settings.
4. Verify the settings you see on the screen. The line speed should correspond to your modem's transmission speed. The parity, duplex setting, character size, stop bits, XON/XOFF setting, character delay, and line delay should correspond to the settings that the host requires.
For example, if you are connecting to a commercial information service, you might be told to use the following settings:
1200, None, Full, 8, 1
In this example, 1200 is the line speed, None is the parity, Full is the duplex setting, 8 is the character size, and 1 is the number of stop bits.
You might also be told whether XON/XOFF, character delay, or line delay are used. Verify that these settings are correct.5. If your settings are correct, press ESC to return to the Change Current Settings menu. If not, change the settings now.
If your terminal settings are not the cause of the problem, try again, and write down everything that happens. Then talk to your administrator.
Notes on Entering Telephone Numbers
Once you enter a telephone number, it is retained until you change it or delete it. To change the number, enter over the old number, or space over it and enter a new one.
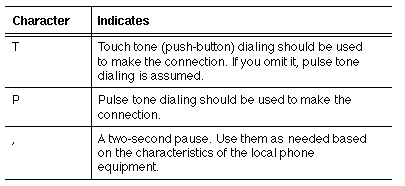
Valid characters include 0 through 9, and * and # for touch tone (push-button) phones. You can include dashes, spaces, and parentheses for readability; those characters have no effect on what is dialed. In addition, you can use the characters shown in Table 8-2.
If you are unsure whether your telephone system uses touch or pulse tone, contact the person who administers your telephone system, or call your local telephone office.
The following examples show how you might enter telephone numbers.
Example Use touch tone dialing, dial 9, pause, then dial number
The following telephone number string tells the ATE service to use touch tone dialing, dial 9, pause for two seconds, then dial 555-1212.
T 9, 555-1212
Example Use prefix to disable special features
In some phone systems, you might be instructed to dial a special prefix to disable certain features that would otherwise allow incoming calls to disrupt your connection. For example, on certain North American telephone systems, you might be told to dial *70 on a touch tone (push-button) system before initiating a modem call to disable incoming calls on the same line.
Put the special prefix before the telephone number. Use a comma to pause long enough so that the action can take place.
The following string tells the ATE service to disable incoming calls and then make the call shown in the previous example, use
T *70, 9, 555-1212
On a pulse tone system, the code to disable incoming calls might differ. For example, instead of using *70, you might be told to use 1170:
P 1170, 9, 555-1212
If you are unsure whether your telephone system uses touch or pulse tone, contact the person who administers your telephone system, or call your local telephone office.
Loading Parameter or Script Files
At any time while in emulation, you can load settings from a parameter file or execute a script file.
If you load a parameter file, you then can start or resume the emulation session using the settings from that file, change them, or save them in a file.
If you load a script file, any settings from that file go into effect when you start or resume a session. Any commands in the script file are executed.
To load a script or parameter file,
1. Press the appropriate key (HOME or another key configured by your administrator) to bring up the Action Menu.
2. From the Action Menu, choose Change Current Settings. The Change Current Settings menu appears.
3. Choose Use Settings From a File.
4. Enter the name of the DOS file that you want to load. You can specify a simple filename of up to 11 characters or a pathname of up to 63 characters. (See the filename example, "Assigning or Changing a Filename," earlier in this chapter.)
All settings go into effect as soon as you load the file.
For information about changing settings or saving them in a file, see your administrator or "Changing Communication Settings" in Chapter 9.
Using Third-Party Terminal Emulation Software
You can use DOS-based terminal emulation software from a third-party developer with the Banyan ATE service.
The third-party software handles the way your workstation behaves during your session with the host. It also provides a different status line from the one you see when Banyan ATE handles your host session. The Banyan ATE service establishes and terminates the session but does not influence how your workstation behaves during the session.
Currently, Banyan ATE software supports two types of third-party terminal emulation software:
|
|
Software that uses the IBM Interrupt 14 or the Ungermann Bass Interrupt 6B |
|
|
Software that uses BANV, the Banyan software interrupt |
For third-party software that uses Interrupt 14 or Interrupt 6B, you can establish sessions with the host in two ways:
|
|
By entering the HOSTS command or ASYNCH command with the appropriate switches. See "Using the ASYNCH Command" in Chapter 6 for more information. |
|
|
By entering the RASYNCH command with the appropriate switches and invoking the third-party program. See "Making Terminal Emulation Software Resident" in Chapter 6 for details. |
For third-party software that uses the BANV interrupt, you can establish sessions with the host in two ways:
|
|
By issuing the BASYNCH command and then issuing the command that runs the third-party software. BASYNCH loads approximately 45 KB of resident code. Use the RELASYNC command to unload BASYNCH. This is the recommended way of running the software. See "Commands for Third-Party Software" in Chapter 6 for more information on the BASYNCH command. |
|
|
By issuing the HOSTS command or ASYNCH command with the appropriate switches after issuing the BASYNCH command. This is not the recommended way of running the software. |
Using Commands with Third-Party Software
When issuing the HOSTS command or ASYNCH command with third-party software, the rules in Table 8-3 apply.
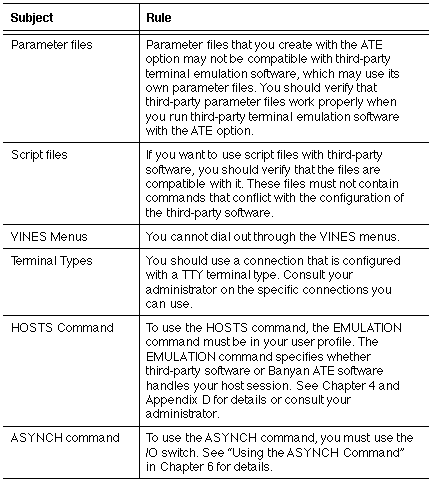
The EMULATION command determines whether the SET UP a dial-out connection menu choice is available on the Select a Connection menu. (The Select a Connection menu appears when you issue the HOSTS command.) The EMULATION command is described in "Setting Up Access Through User Profiles" in Chapter 5.
If the EMULATION command switch specifies third-party terminal emulation software, the SET UP a dial-out connection menu choice is not available. The Select a connection menu tells you whether you can run Banyan ATE or third-party software.
Using the Remote Server Console Connection
To establish a remote server console connection, follow these steps:
1. Use either the AYSNCH command or the HOSTS command to establish the connection. (See the example at the end of the section for more information.)
2. Once you are connected as a remote server console, a blank screen appears. You must press a key to refresh your screen, but since the key that you press acts on whatever screen is already up on the server, choose your key carefully. Try pressing ESC, then press ENTER. You should see a message, "Invalid Input. Try again." and then the screen will appear. (Ignore the error message.)
If nothing happens, the server console might be on the Service Monitor. Enter 1 (to refresh the screen on the Service Monitor). You should now see the Service Monitor screen. Now you can press 4 to exit the screen. The Operator Menu should now appear.
Note: If you have the Applications Toolkit option installed on the server, and the server is at the UNIX prompt, the terminal type will be set incorrectly if you leave remote server console access before you enter a menu display. To avoid this problem, make sure that you display a menu (any menu) using the remote server console before you leave the session. Remember that this applies only if the server is at the UNIX prompt when you access it using the remote server console feature.
The ATE software automatically sets the server console's terminal type to DEC VT100 for the duration of the remote server console session. The remote console session resets the terminal type correctly regardless of where the session is ended. In some cases, however, it is necessary to exit an active screen before the terminal type is reset. For example, if you choose Run Network Management from the Operator Menu and then exit the terminal emulation, the console's terminal type stays in VT100 mode. To reset the terminal type, exit the active screen at the console and the terminal type is reset automatically.
While using remote console, it is recommended that you return to the Operator Menu prior to exiting a session.
Example Connecting to a remote server console connection called RemoteConsole on the server UKLON115
The following sample command line uses the ASYNCH command to connect to a remote server console connection called RemoteConsole on the server UKLON115:
asynch /c:RemoteConsole /s:vt@UKLON115@Servers
The following sample command line uses the HOSTS command to reach a lists of connections for the same server:
hosts /a:vt@UKLON115@Servers
After you issue the HOSTS command, the Select a Connection menu appears. Select the remote console connection.
Server Console During Remote Server Console Access
The workstation acting as a remote server console duplicates the functions of a server console in every way. When you use the remote server console feature, your terminal becomes the server console. Any commands you enter, any screens you display on the remote server console simultaneously appear on the server console. The remote server console and the server console share one screen.
The remote server console feature requires that you choose VT100 as the terminal type. You must use VT100 as the terminal type for both the remote server console and the server console.
If the server console does not normally use VT100 as the terminal type, the screen display on the server console can appear garbled. This does not cause any problems for you at your workstation, but anyone looking at the server console while it is acting as a remote server console will see a garbled screen.
After you exit the remote server console connection, the server console might be left in an unusual state: the colors may be different, the text may appear in reverse video when it should not, and wavy lines may appear on the screen. To return the server console to its normal state, run any menu-driven utility, such as the Network and Systems Management utility (NSM).
Tips for Using the Remote Server Console Feature
This section gives tips for using the remote server console feature, an explanation of some errors you might receive while attempting to use the remote server console feature, and instructions for using the remote server console feature to shut down server services.
To make sure that a remote server console user does not inadvertently execute a command left at the server console, make it a practice not to leave the server console in a state in which pressing ENTER at a remote server console will execute a command that you do not want executed.
For example, if you are at a menu on the server console and choice number 4 will shut down the system, do not leave a "4" at the menu prompt and walk away from the console. Someone using the remote server console might press ENTER to get a response. That action will execute your command and shut down the server.
Do not use the remote server console feature while someone else is actively using the server console. If you are using the remote server console and someone else is using the server console, your commands can conflict.
Be careful about using the remote server console feature to shut down the server. Remember that if you shut the services down from the remote server console (see "Shutting Down the Server or Services" later in this section), you lose your connection and, with it, the ability to issue any more commands until the server is brought back up.
Use ARLs to restrict who can use the remote server console. Remember that the remote server console feature is most appropriate for networks where a limited number of people use this feature, or where it is possible to control who can gain access to the actual server console. This way you can minimize the possibility of someone issuing commands from the server console at the same time someone is using the remote server console feature.
Possible Error Messages
Only one remote server console for each ATE service can be active at one time. If you try to connect a second remote server console, you will receive the following error message:
All of the connections are in use.
You will not be able to use the connection. Even if you configure two remote server consoles for the same service, you can use only one at a time.
Shutting Down the Server or Services
With the remote server console feature, you can actually shut down the server or the services running on the server. From the Operator Menu, choose 4, Shut Down Server Software. The following menu appears:
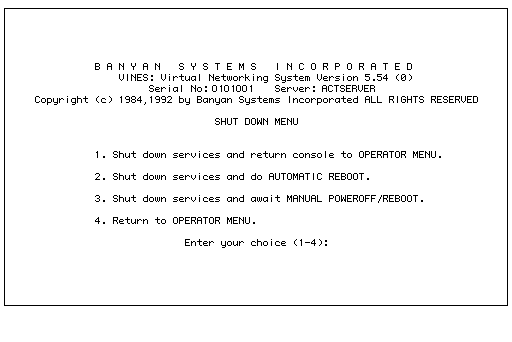
To shut down the services, but leave the server itself running, choose 1, Shut down services and return console to OPERATOR MENU.
To shut down the services and the server, choose either 2, Shut down services and perform AUTOMATIC REBOOT, or 3, Shut down services and await MANUAL REBOOT.
Once you shut down the services, you lose your connection. If you chose either menu choice 1 (Shut down services and return console to OPERATOR MENU) or 3 (Shut down services and await MANUAL REBOOT), and you want to restart the server, you must physically go to the server and restart it. If you choose 2, Shut down services and perform AUTOMATIC REBOOT, the server automatically reboots.
![]()
![]()
![]()