![]()
![]()
Chapter 5 - Managing ATE Services
This chapter describes how to make the ATE service available to users, how to solve common problems, and other daily service management tasks.
Making the ATE Service Available to Users
There are several approaches you can take, including the following:
|
|
Setting up access through user profiles |
|
|
Providing access through menus |
|
|
Providing access from the DOS command line |
As you choose your approach, keep these factors in mind:
|
|
When a user chooses a method for connecting to a host, the system attempts to find an available line. If there is none, the user must try again later. |
|
|
If some of the settings in a connection or parameter file are incorrect, the user may have difficulty using the service. See "Service Management Tasks" later in this chapter for more information. |
|
|
Once users are in terminal emulation, they can load settings from a parameter file or execute a script file. Then they can start or resume the terminal emulation session using those settings, change them, or save them in a file. See Chapter 9 and Chapter 10 for more information on these files. |
Setting Up Access Through User Profiles
In a user's profile, you can include ATE commands. These commands specify:
|
|
A default ATE service. |
|
|
A default directory path to search for parameter files. |
|
|
Whether the user will run Banyan ATE software or third-party terminal emulation software that uses the IBM Interrupt 14, the Ungermann-Bass Interrupt 6B, or the BANV interrupt. |
You set up a default asynchronous terminal service in user profiles so that users can select connection names associated with that service from ATE menus.
Users can create their own parameter files, but you can simplify things by providing them with standard parameter files. You can set up a default search path for parameter or script files so that users can select them from ATE menus. The menus show the files in that path and the files in the current directory that have the extension .ATP. Note that this path is completely separate from the DOS search path.
You add settings to individual profiles, or to the Sample Profile for all users of a group, by using the SETASYNCH command. The command accepts two parameters: the StreetTalk name of an ATE service and an optional search path for parameter files.
For example:
setasynch atelocal@finance@corporate /p:e:atefiles;e:
By default, the user accesses the atelocal@finance@corporate service. All files in the directory atefiles or the root directory of drive E with the extension .ATP appear on the user menus.
A user who runs third-party terminal emulation software that uses Interrupt 14, Interrupt 6B, or the BANV interrupt can establish a session with a host through the ATE service.
You can set up users who run third-party terminal emulation software that supports Interrupt 14 or Interrupt 6B to access the host in three ways:
|
|
By adding the EMULATION command to the user's profile. The user can then use the HOSTS command to access the host. |
|
|
By using the ASYNCH command with the /O switch. See "Providing Access from the DOS Command Line" later in this chapter. |
|
|
By typing the RASYNCH command with some extra switches and invoking the third-party program. See "Making Terminal Emulation Software Resident" later in this chapter. |
For users who run third-party terminal emulation software that supports the BANV interrupt, you should set up access to the host by issuing the BASYNCH command from DOS or the user's profile and invoking the third-party software. The POSTLOGIN profile command lets you issue BASYNCH from the user's profile. Make sure that the third-party software is properly configured. See the third-party documentation for more information.
Note: If you want to use the EMULATION command and the HOSTS command in conjunction with third-party terminal emulation software that supports the BANV interrupt, issue the BASYNCH command from the DOS command line first. If you do not issue the BASYNCH command first, when you issue either the EMULATION command or the HOST command, the software will load RASYNCH. RASYNCH does not support the BANV interrupt.
The EMULATION command specifies whether Banyan ATE workstation software or third-party terminal emulation software handles the interaction between the user and the host. The syntax of the EMULATION command is as follows:
EMULATION [TASYNCH] [pathname]
TASYNCH specifies Banyan ATE software and pathname specifies the pathname of the executable file associated with the DOS command that invokes the third-party software. Typically, this file has a .COM or .EXE extension. Do not specify this extension. You must specify the full pathname of the executable file unless the file's directory is included in the user's search path, as specified by the DOS PATH command. For example:
emulation f:\reflect\r2
specifies that the user will run the ReflectionTM 2 terminal emulation program to handle the user's interaction with the host instead of Banyan ATE software.
If the user's PATH command includes F:REFLECT, you can specify the EMULATION command as follows:
emulation r2
To specify that Banyan ATE software handles the user's interaction with the host, you change the EMULATION command in the user's profile as follows:
emulation tasynch
TASYNCH is the default setting for the EMULATION command.
Remember that you should add the EMULATION command to the user's profile only if the user wants to run HOSTS with third-party terminal emulation software.
For more information on the EMULATION and TASYNCH commands, see Appendix C.
Providing Access Through Menus
When accessing the service from Banyan menus, users choose a connection or parameter file from the Select a Connection menu.
To view that menu, a user can type the HOSTS command from DOS or perform the following steps:
1. Enter VINES at the DOS prompt.
2. Choose Communications with Other Computers.
With the HOSTS command, a user can specify a service name, or accept the default of the service set up in the user profile.
If you do not configure a service with connection names, no connection names are displayed on the Select a Connection menu. In this case, users must choose a dial-out parameter file, set up and use their own dial-out parameter files, or dial out manually. At least one dial-out line must be assigned at the server console.
Users of third-party terminal emulation software cannot manually dial out through the menus. They should use connections that are configured with TTY as the terminal type.
Providing Access from the DOS Command Line
For advanced users who want to skip the menus or set up their own parameter files, the ATE option provides a DOS command line interface to asynchronous terminal emulation. The ASYNCH command provides this feature to users. The ASYNCH command is described in more detail in Chapter 6 and in Appendix C. This section gives an overview of how the command can be used.
The ASYNCH command accepts optional switches that describe what the user wants and executes differently based on the parameters given with the /C, /E, /O, and /S switches.
For example, the /S switch allows the user to specify the StreetTalk name of an ATE service.
The general syntax of the ASYNCH command is as follows:
ASYNCH [/C:connection-name /F:parmfile /S:service-name /E:terminaltype /O:pathname]
The connection-name specifies a connection name, parmfile specifies a parameter file, service-name specifies the StreetTalk name of an ATE service, and terminaltype specifies a terminal type.
The /O switch should be used with third-party terminal emulation software that uses Interrupt 14 or Interrupt 6B only.
The pathname specifies the pathname of the executable file associated with the DOS command that invokes the third-party software. You do not have to specify the full pathname if the directory in which the executable file resides is in your DOS search path. Do not specify the .COM or .EXE extension of this file.
If you use the ASYNCH command with third-party terminal emulation software that uses Interrupt 14 or Interrupt 6B, you must use the /C switch and the /S switch with the /O switch unless you issue the RASYNCH command with the /C and /S switches first.
If you use the ASYNCH command with third-party terminal emulation software that uses the BANV interrupt, you must issue the BASYNCH command before the ASYNCH command. However, using the BASYNCH command with the ASYNCH command is not recommended.
If you use the /C switch with the /O switch, the connection that you specify should be configured with a terminal type of TTY. If you use the /E switch with the /O switch, the /E switch is ignored. (See Chapter 6 for more information on using the /E switch.)
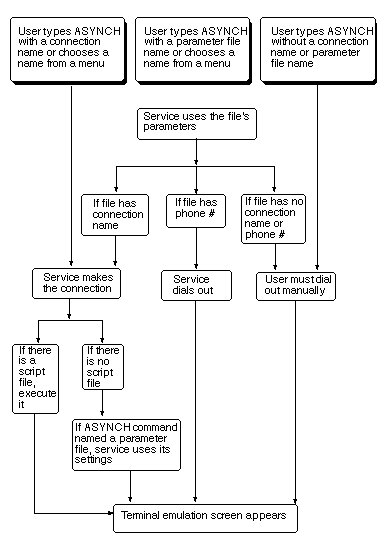
A flowchart (Figure 5-1) illustrates how the different elements of the service work together.
How the Elements of the ATE Service Work Together
Figure 5-1 shows how the menus, the ASYNCH command, connections, script files, and parameter files work together. The three boxes at the top of the figure show the actions that a user performs. The rest of the figure shows the actions of the ATE service.
Note the following information as you examine the figure:
|
|
There must be a service name specified either in the user profile or with the ASYNCH command. |
|
|
The terminal type is determined by the last element to specify one, whether from the command line, a connection, a parameter file, a script file, or a terminal emulation screen. |
Making Terminal Emulation Software Resident
The RASYNCH command lets users make the terminal emulation software resident in the workstation. This lets users exit from terminal emulation, perform a few immediate tasks in DOS, and then return to terminal emulation.
It also lets users who have third-party software that runs under DOS communicate with ATE through the BANV interrupt, Interrupt 14, or Interrupt 6B.
In these cases, you want users to exit from terminal emulation and return to DOS while maintaining their connection to the host. To do so, you use the RASYNCH command from DOS.
Make sure that the RASYNCH command is typed from DOS before the user enters either Banyan ATE or third-party emulation. Then, the user can exit from terminal emulation without breaking the connection and later return to that same connection.
If the Banyan ATE software handles the user's session with the host, the user exits from terminal emulation and maintains the connection by using the Action Menu while in terminal emulation.
To re-enter terminal emulation, the user simply enters the ASYNCH command at the DOS command line. The user returns to terminal emulation in the same host session as the one suspended earlier.
Note: Most third-party terminal emulation software packages provide capabilities, such as hotkeys, to exit from terminal emulation and return to DOS while maintaining your connection to the host. See the third-party documentation for details.
To release RASYNCH from memory, the user enters the RELASYNC command at the DOS command line.
Users who run third-party terminal emulation software that uses Interrupt 14 or Interrupt 6B specify two switches, /C and /S, with the RASYNCH command. These switches specify a connection to the host computer that the third-party software uses to establish a user session.
The syntax of the RASYNCH command when used with third-party software that supports Interrupt 14 or Interrupt 6B is as follows:
RASYNCH /C:connection-name /S:service-name
The connection-name is the name of the connection for establishing the session with the host computer. The service-name is the StreetTalk name of the ATE service associated with the connection.
Make sure that the connection specified in the RASYNCH command was configured with the TTY terminal type. (In most cases, TTY is the terminal type you should use for third-party applications. See Chapter 1 for an explanation of terminal types.)
The following example shows the sequence of commands that a user issues from DOS to load RASYNCH, run the Reflection 2 terminal emulation program, and establish a session with a host computer.
rasynch /c:thevax /s:vax@ate@corp
r2
For third-party terminal emulation software that uses the BANV interrupt, the user types BASYNCH from DOS to make terminal emulation software resident. To release BASYNCH from memory, the user enters RELASYNC at the DOS command line.
Once you have created the ATE service and configured it, there are a few management tasks that you may need to perform occasionally. This section describes these tasks.
To manage the service, you must be an administrator of the appropriate group or server and run the MSERVICE or OPERATE command. If the service appears on the screen, choose it. Otherwise, search for it until it appears, then choose it. The sections that follow provide general information on the management tasks listed above.
For details on performing these tasks, except generating a log report, see the guide to managing services that shipped with your software. For details on generating a log report, users can refer to the guide on operating a server that shipped with the software.
Starting and Stopping the ATE Service
To make the service available to users, you must start it. To make changes to the service, you may have to stop it. These changes can be:
|
|
Reassigning asynchronous direct and dial-out lines or X.25 lines at the server console |
|
|
Making cabling changes for a direct connection to a host computer |
|
|
Making changes to dial-out hardware |
You do not, however, have to stop the service before configuring it or cycle the service (stop it and restart it) for changes to take effect.
Be sure to notify users before you stop the service. Anyone using the service is disconnected immediately. Use MSERVICE to start and stop the service.
Changing the Service Description
To insert a new one-line description for the service, follow these steps:
1. Run MSERVICE.
2. From the Manage Services menu, choose the ATE service. The Manage a Service menu appears.
3. From the Manage a Service menu, choose CHANGE Service Description.
4. Enter a new one-line service description.
Viewing the ATE Service Status
To see if the service is running, follow these steps:
1. Run MSERVICE.
2. From the Manage Services menu, choose the ATE service. The Manage a Service menu appears.
The service status displays on the resulting screen. You can also view service status at the server console. See Banyan Server Operations Guide for information on viewing service status from the console.
To see which users are using the service, follow these steps:
1. Run MSERVICE.
2. From the Manage Services menu, choose the ATE service. The Manage a Service menu appears.
3. From the Manage a Service menu, choose CONTROL the service. The Control a Service menu appears.
4. From the Control a Service menu, choose Look at service users.
To move the ATE service from one server to another, follow these steps:
1. Run MSERVICE.
2. From the Manage Services menu, choose the ATE service. The Manage a Service menu appears.
3. From the Manage a Service menu, choose RELOCATE Service Data.
When you relocate the ATE service to the target server, make sure the line information in the service's configuration corresponds to the line assignments on the target server. If it does not, the service cannot be used until you either make the appropriate changes to the service configuration through MSERVICE or reassign the lines at the server console.
To produce a log report on ATE service activity, follow these steps:
1. Run MSERVICE.
2. From the Manage Services menu, choose the ATE service. The Manage a Service menu appears.
3. From the Manage a Service menu, choose CONTROL the service. The Control a Service menu appears.
4. From the Control a Service menu, choose GENERATE Log Report.
If you are an administrator of the group to which the service belongs, you can delete the service. But all information related to the service is lost.
To delete a service, follow these steps:
1. Make sure the service is stopped. (See "Starting and Stopping the ATE Service" earlier in this chapter.)
2. Run MSERVICE.
3. From the Manage Services menu, choose the ATE service. The Manage a Service menu appears.
4. From the Manage a Service menu, choose DELETE service. When asked to confirm the delete, choose YES.
If you need to delete connections or information related to them, do not delete the service. Instead, change the service configuration as described in "Changing the Service Configuration," which follows.
Changing the Service Configuration
To change the ATE service configuration, you must access the Configure Asynchronous Connections menu, shown in the following illustration.
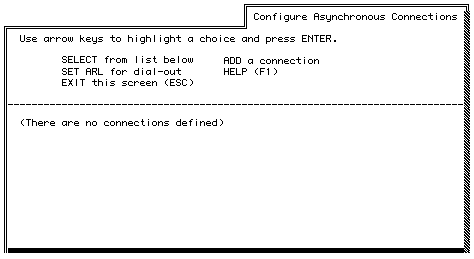
There are two ways to access this menu: with the MASYNCH command or from MSERVICE.
To access this menu from the MASYNCH command, enter this command from DOS:
MASYNCH /S:service-name
The service-name is the StreetTalk name of the service.
To access this menu from MSERVICE, perform the following steps:
1. Run MSERVICE.
2. From the Manage Services menu, choose the ATE service. The Manage a Service menu appears.
3. From the Manage a Service menu, choose CONTROL the service. The Control a Service menu appears.
4. From the Control a Service menu, choose, CONFIGURE service.
You can change the configuration of the service at any time. The changes you can make are:
|
|
Specifying a new access rights list for dial-out |
|
|
Adding a new connection |
|
|
Modifying an existing connection |
The following sections explain how to make changes to the service configuration.
To change the access rights list for dial-out, follow this procedure:
1. From the Configure Asynchronous Connections menu, choose SET ARL for dial-out.
2. Type in the StreetTalk name, list, or pattern you want to use. Press ENTER. For more information, refer to "Setting Access Rights for Dial-out" in Chapter 4.
To add more connections to the service, choose ADD a connection from the Configure Asynchronous Connections menu. Follow the detailed instructions in "Overview" in Chapter 4.
You may need to modify a connection for a variety of reasons. These include:
|
|
You want to restrict user access to the host. |
|
|
Phone numbers for the host computer have changed. |
|
|
The number of direct lines has changed. |
|
|
Line number assignments at the server console have changed. |
To modify a connection, follow these steps:
1. From the Configure Asynchronous Connections menu, choose the connection. The Modify a Connection menu appears.
2. From this menu, you can change the description of the connection, delete it, change its access rights, or change the lines or phone numbers it uses. For X.29 connections, the "Change lines/parameters" menu choice appears instead of the "Change lines/phone numbers" menu choice.
A sample Modify a Connection menu for connections that use direct lines and dial-out lines is shown in the following illustration.
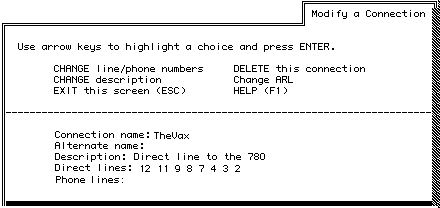
The menu for server development connections lets you change the description of the connection, delete it, and change its access rights.
The sections that follow explain how to perform all the tasks involved in modifying a connection.
Changing the Description
To change the connection's description, choose CHANGE description from the Modify a Connection menu. Enter the new description. You then return to the Modify a Connection menu.
Deleting the Connection
To delete the connection, choose DELETE this connection from the Modify a Connection menu. You are prompted to confirm the deletion.
If you confirm the deletion, all the information associated with the connection is removed from the service. You then return to the Modify a Connection menu.
Changing the Connection's Access Rights
To change the connection's access rights, follow these steps:
1. From the Modify a Connection menu, select Change ARL.
2. Specify the StreetTalk name, list, or pattern that identifies the users to whom you want to give access. Press ENTER.
For more information, see "Specifying Access to Connections" in Chapter 4.
Changing the Lines and Phone Numbers
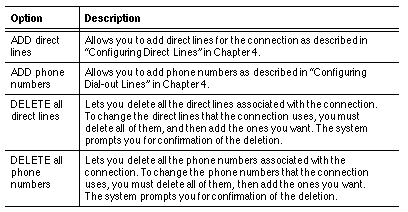
To add or delete direct lines or phone numbers, from the Modify a Connection menu, choose CHANGE lines/phone numbers. The following menu appears.
The choices on the Change Lines/Phone Numbers menu are described in Table 5-1.
After you make changes, you return to the Modify a Connection menu. Check the display to make sure that the connection is configured the way you want it.
If you choose the EXIT function after making changes, a confirmation screen appears. To save all of your additions and deletions, choose YES. To cancel your changes, choose NO. In either case, you return to the Configure Asynchronous Connections menu.
Changing the X.25 Line and X.29 Parameters
To change the X.25 line, the DTE address, facilities, call user data, or PAD parameters, from the Modify a Connection menu, choose Change Line/Parameters. The Specify Parameters screen appears. See "X.29 PAD Connections" in Chapter 4 for details.
![]()
![]()
![]()