Installing an OS/2 Workstation Using NDIS
This section describes how to install NDIS on an OS/2 2.x workstation with VINES 5.5x. The discussion assumes that the workstation has not been installed in a VINES network before.
The following hardware and software is required for this installation:

Your workstation must have a LAN card installed. You should write down the following information about your LAN card: - I/O port address
- Hardware interrupt used by the LAN card
- Any memory addresses required by the LAN card

A MAC driver for your LAN card. This driver may come on a diskette supplied by the manufacturer of the LAN card or it may be part of the documentation. 
A PROTOCOL.INI fragment for your LAN card. This comes on the same diskette as the MAC driver. 
VINES 5.5x or a later version running on your network. 
A VCLIENT diskette. This can be either a VCLIENT COMBO diskette or a VCLIENT Master and Driver Diskette. You can also make a VCLIENT diskette by running VCLIENT from an existing OS/2 workstation. See Managing Workstations for more information. 
OS/2 2.x or greater running on your workstation. 
IBM LAPS diskette provided by Banyan Systems. This diskette is not required if you installed IBM's Extended Services.
Before you install the first OS/2 workstation, complete these tasks:
1. Load the OS/2 2.x operating system. Your workstations require at least 6 MB of RAM. The recommended amount is 8 MB or more.
2. Install IBM's Extended Services software. If you do not have the Extended Services option for OS/2, follow the steps for installing the IBM LAPS diskette described in the following section.
3. Make backup copies of the VCLIENT and IBM LAPS diskettes. Use the OS/2 XCOPY command.
Installing Files from the IBM LAPS Diskette
If IBM Extended Services communications software is not installed on your workstation, load the necessary files from the Banyan-supplied IBM LAPS diskette. Otherwise, skip to "Installing VINES from the VCLIENT Diskette," which follows.
Note: You can run LOADNDIS from either drive A or drive B. This procedure assumes that you run LOADNDIS from drive A and are loading all software into a subdirectory of the root.
Follow these steps:
1. Insert the IBM LAPS diskette into drive A.
2. Use the LOADNDIS command to copy the files from your source drive (A:) to the destination drive (C:).
3. From an OS/2 command prompt, enter:
a:\loadndis a: c:
Press ENTER. This loads the files from the source drive (A:) to the destination drive (C:) and places them in the proper directories.
As the files are copied to the appropriate IBMCOM directories, the filenames appear on the screen.
4. Remove the diskette when the copy completes.
5. Insert the diskette that contains the MAC driver for your LAN card into drive A.
6. Enter the following commands at the OS/2 prompt:
copy a:\drivername c:\IBMCOM\MACS
copy a:\PROTOCOL.INI c:\IBMCOM
where drivername is the name of your MAC driver.
The next section describes how to install the VINES OS/2 client software from the VCLIENT diskette.
Installing VINES from the VCLIENT Diskette
Before you install the VCLIENT diskette, back up existing CONFIG.SYS and PROTOCOL.INI files to a diskette. Installing OS/2 client software on an OS/2 2.x workstation differs slightly from the installation described in Managing Workstations. For example, NDIS support files and named pipe support files are automatically installed.
To install software from the VINES VCLIENT diskette, follow these steps:
1. Insert the backup copy of the VINES VCLIENT diskette in drive A.
2. At an OS/2 command prompt, enter the following command:
a:\vclient
Press ENTER. The VINES Installation screen appears.
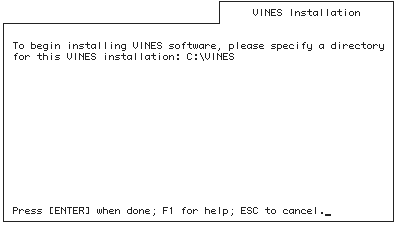
3. Press ENTER to select the default directory, c:\VINES.
To choose any other directory, enter the drive letter and directory name and press ENTER.
Note: If you enable the dual-boot option, you must create separate VINES directories, one for each operating system.
The Confirm VINES Installation screen appears.
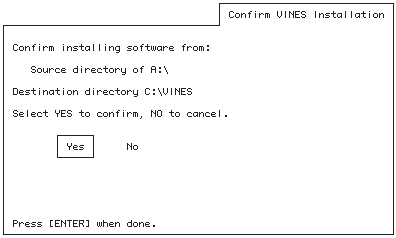
4. Choose YES and press ENTER.
VCLIENT checks that the destination drive contains enough space for the selected files. As VCLIENT copies the selected software, a "copying files" message appears and VCLIENT lists each file. When all the files are copied, the Update CONFIG.SYS screen appears.
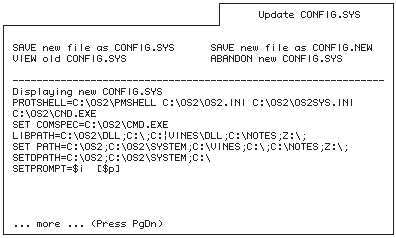
VCLIENT adds the following lines to CONFIG.SYS:
- c:\VINES\DLL to the LIBPATH environment variable
- z:\ to the PATH environment variable
The following lines to the end of the file:
SET VINESDIR=c:\VINES
IFS=c:\VINES\VINES2.IFS
DEVICE=c:\vines\bancomm2.sys /sockets=60
/SPP_CONNECTIONS=60 /KBYTES_COMMBUFFERS=96
DEVICE=c:\VINES\VBAN.SYS /INT=63
DEVICE=c:\VINES\inns.sys
ifs=c:\VINES\VINESNP2.IFS
DEVICE=c:\vines\drivers\bn_ndis\ndisban2.sys
rem End of VINES SOFTWARE INFORMATION5. Choose Save new file as CONFIG.SYS and press ENTER.
6. Using a text editor, add the following lines to CONFIG.SYS after the SET VINESDIR=c:\VINES statement:
rem
rem IBMCOM (LAPS) NDIS MAC and Protocol Device
rem Drivers
rem
SET MESSAGES=C:\IBMCOM
DEVICE=C:\IBMCOM\LANMSGDD.OS2 /i:C:\IBMCOM
DEVICE=C:\IBMCOM\PROTMAN.OS2 /i:C:\IBMCOM
DEVICE=C:\IBMCOM\MACS\ELNKII.OS2The last line loads the NDIS MAC driver for the 3Com EtherLinkII card. You can load other drivers by replacing ELNKII.OS2 with the name of that driver.
7. Add the C:\IBMCOM directory to the DPATH statement. This allows the LANMSGDD.OS2 device to find the PRO.MSG file at boot time.
8. Add C:\IBMCOM\DLL to the LIBPATH statement.
9. Shut down the OS/2 operating system and reboot.
You should now be able to log into the network. Follow these steps:
1. Go to the OS/2 command prompt.
2. Change the current directory to C:\VINES.
3. Enter BAN at the prompt. The VINES Login screen appears.
If your NDIS software does not initialize properly, make sure that the appropriate software is installed in the right locations. Figure 3-4 shows the location of the files required to load NDIS on an OS/2 workstation. File names are in bold letters.
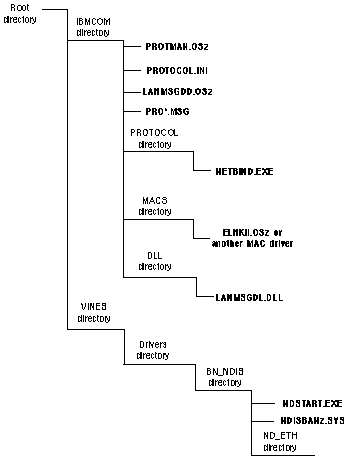
Basic Troubleshooting for OS/2 NDIS Support
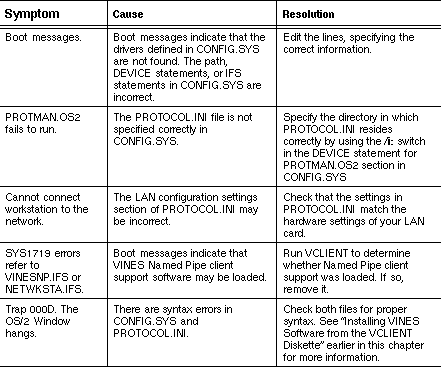
Table 3-1 describes some problems that can occur and their solutions.
