![]()
![]()
Chapter 5 - Using VINES File Commands
Introduction to Using VINES File Commands
This chapter describes the three VINES commands for managing directories and files in a network that includes DOS, Windows, and OS/2, and Macintosh workstations:

VDIR VCOPY VRENAME
These three commands let you display and manipulate both short (DOS) and long (Macintosh) file names. Each command has a command-line syntax and a menu-driven interface that you can use at DOS, Windows, and OS/2 workstations. This chapter describes the command-line syntax and menu interface for each command in detail.
Macintosh
These commands cannot currently be run from Macintosh workstations.
Like the DOS DIR command, the VDIR command displays the short DOS names of files in one or more specified directories. In addition, the VDIR command displays any associated long file names created by Macintosh users.
This command also lists the size, date, and time stamp information associated with each file or directory.
To use the VDIR command to see the names of the subdirectories and files on a directory, you must have the access rights listed in Table 5-1.

The VDIR command only works on VINES file volumes. For files on a workstation's local drive, the VDIR command cannot add what the native file system does not provide. For example, if your workstation runs DOS, the VDIR command only displays DOS file names for a local drive directory listing. You do not see any associated long Macintosh file names.
The command syntax of the VDIR command is:
VDIR [DOS-pathnames] [/VIEW:file-system] [/HELP] [/SIZE] [/TIME:ttype] [/PAUSE] [/MENU]
In all cases, you can enter only the letters that make the switch unique (/V:, /H, /S, /T:, /P, /M). The switches are described in more detail in the next sections.
When you specify VDIR without switches, the command displays all names of all the files and subdirectories in the current directory. It does not display any other information about the files. For example, to display DOS and Macintosh names for the files in the current directory, enter VDIR without switches.
VDIR displays the long Macintosh names of hidden and system files, but only if you explicitly specify the DOS pathname of these files.
Table 5-2 briefly describes the VDIR command parameters.

The following sections explain the VDIR command parameters in more detail.
DOS-pathnames
This parameter refers to one or more DOS pathnames you specify to display information. You must separate multiple pathnames with blank spaces. You can specify wildcard characters (* or ?) in the file part of the pathname, but not in the directory part.
Table 5-3 shows you the different ways you use this parameter.

/HELP
This switch displays VDIR syntax and a definition of each switch. If you make a syntax error when entering commands, help information appears automatically.
/VIEW:file-system
This switch lets you specify which file system names you display. Enter VDIR [DOS-pathnames] /V:file-system, where file-system can be any of the following arguments and can be used in any combination.
Table 5-4 shows how you can use the arguments to this switch.

The D argument refers to both DOS and OS/2 operating systems running the FAT file system.
/SIZE
This switch displays the size of files in kilobytes (KB). For Macintosh files, the resource and data fork information is displayed as a sum in the size column (as at a Macintosh workstation).
/TIME:ttype
This switch displays a date and time associated with each file. The entry, ttype, is any of the following arguments and can be used multiple times. Table 5-5 shows how you can use the arguments for this switch.

Depending on the country code specified in your workstation's CONFIG.SYS file, the VDIR command uses that country's format for date and time. For example, if the country code is set to 033 (France), the date has the DD-MM-YY format and the time is displayed using a 24-hour clock.
Not all file systems provide all of the above time stamp information. The DOS file system provides only the date and time last modified. The Macintosh file system provides the date and time the file was created, as well as the date and time the file was last modified.
VDIR provides all of the above time stamp information, because the VINES File System (VFS) maintains this information. VDIR provides this information on network drives only.
/PAUSE
This switch displays one screen of information and pauses. Press any key to display the next screen. If you omit /P, VDIR displays the specified directory listing in its entirety and the top-most listings may be lost to view.
/MENU
This switch displays a screen menu to let you choose among the switches described above without having to remember the correct syntax. The screen menu lets you select and de-select switches before displaying the list of files and directories. In addition, you can scroll through the list of files and directories displayed. Use the /M switch without any others, since you specify the other switches later using the menu.
You cannot display the contents of multiple paths using this switch.
This section describes three ways to use the VDIR command:
Without switches With the size and date/time switches With the /MENU switch to display the menu
Using VDIR Without Switches
If you enter VDIR without any switches, VDIR displays all the names of the files and subdirectories in the current directory, as shown in Figure 5-1.

Figure 5-1 illustrates the display format for VDIR, listing the two file system names in this order: DOS and Macintosh. Any files created under OS/2 appear in the DOS field, because both operating systems use the FAT file system. The OS/2 High Performance File System (HPFS) is not supported on VINES network drives.
Using VDIR with Switches
Use VDIR switches to request additional information. Figure 5-2 illustrates how the system displays the information. The added information appears in the DOS line

In Figure 5-2, the /S switch displays the size of the file in bytes, and the /T:m switch displays the date and time the file was last modified.
When you enter VDIR with the /M switch, the VDIR Command menu appears. Figure 5-3 shows the VDIR Command menu.

To display the contents of the current directory, press F10. To view on-line help at any time, press F1. The default directory is the current directory (indicated by a period).
At the top of the screen are two options: CHANGE pathname and SELECT options. The CHANGE pathname option lets you change the path name, including the network drive.
To Use the VDIR Menu
1. At the system prompt, enter VDIR /M. The VDIR Command menu appears.
2. Choose CHANGE pathname. The cursor moves to the Paths field and a new function key template appears at the bottom of the VDIR Command menu. Table 5-6 describes the new function key options.

3. Either:
- Enter a new path name, including a network drive letter, in the Paths field. Press F10. You can enter multiple path names. Go to step 6.
- Press F5. The Select Pathname screen appears. Go to step 4.
4. Use the arrow keys to move through the directory structure and choose a directory or file. You can choose one, several, or all the subdirectories and files:
- To choose directories or files individually, highlight the name and press ENTER.
- To choose all the subdirectories and files in the current directory, press F2.
5. When you finish making your selections, press F10. The VDIR Command menu appears and the path names you selected appear in the Paths field.
6. After selecting the files:
- Choose SELECT options to set switches. Move the cursor to the desired switch and press ENTER. An asterisk (*) appears next to the enabled switch. The ENTER key toggles the selection of a switch on and off. You can set more than one switch. Press F10 to display the directory listing. The directory listing appears.
- Press F10 to display the directory listing. The directory listing appears.
7. Press ESC. The VDIR Command menu appears.
The VCOPY command copies files and directories, optionally including subdirectories, empty subdirectories, and ARLs. This command automatically copies OS/2 Extended Attributes and Macintosh resource and data forks associated with the specified files. It also copies or updates the associated Macintosh desktop database information. The DOS COPY command does not copy Extended Attributes, resource forks, or the Macintosh desktop database information. To preserve this information, use this command instead of DOS COPY when copying directories and files created and stored on VFS file volumes.
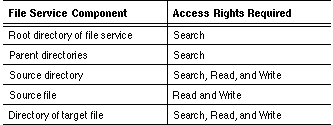
To use the VCOPY command, you must have the access rights listed in Table 5-7.

Caution: If you start to copy a large number of directories and files, you cannot abort the copy without rebooting. Only those files that had been copied before the reboot are copied.
The command syntax of the VCOPY command is:
VCOPY source-pathname [destination-pathname] [/A] [/E] [/O] [/P] [/S] [/HELP]
If you do not specify any switches, the system displays the VCOPY Command menu. Table 5-8 explains how to use the switches at the command line.

When you specify a destination pathname, VCOPY first checks if the DOS file name is a duplicate. If not, VCOPY creates the new file under the specified directory.
If you specify a destination DOS file name that already exists in the target directory, VCOPY returns a message:
FILE EXISTS, DO YOU WANT TO OVERWRITE? Y/N?
If you enter Y, VCOPY overwrites the existing file with the source file contents. The destination file's long names become those of the source. VCOPY informs you that the file is overwritten and displays the existing names of the destination file.
This section describes how to use VCOPY to:
Copy a file to an existing directory Copy a file to a new directory Copy a directory with switches Copy a directory to the root or another file volume Use the VCOPY Command menu
Copying Files with VCOPY
The first example shows how to use VCOPY to copy a file to an existing directory while renaming the file. The second example shows how to copy a file to a new directory while retaining the same file name.
In both examples, you can override the confirmation prompt by entering a backslash (\) at the end of the target pathname. For example, if you type \newuser\ as the destination, VCOPY automatically creates a directory called newuser and copies the file to this directory. If you type \newuser\my_file\ as the destination, VCOPY creates a directory called newuser and a subdirectory under newuser called my_file.
Example To Copy a File to an Existing Directory
1. Enter vcopy f:\user\old_file.exe h:\public\new_file.exe.
The following message appears:
Does new_file.exe specify a directory (D) or a file name (F) on the target?
2. Enter F. VCOPY copies the file old_file.exe in the f:\user directory and names the copy new_file.exe in the h:\public directory.
Example To Copy a File to a New Directory
1. Enter vcopy f:\user\my_file.exe \newuser.
The following message appears:
Does NEW specify a directory (D) or a file name (F) on the target?
2. Enter D to create the new directory. VCOPY copies the file my_file.exe to the newuser directory that it has created. The copy keeps the same file name.
If you enter F, VCOPY does not create a new directory; instead, it copies the file my_file.exe to the file called newuser within the user directory.
Copying Directories with VCOPY
The first example shows how to use VCOPY switches to copy a directory. The second example shows how to copy a directory to the root of another file volume.
Example To Copy a Directory Using Switches
Enter vcopy f:\user\applica*.* h:\public\*.* /e /p /s.
VCOPY copies everything within the f:\user directory matching applica*.*, including files, directories, and empty subdirectories, to the h:\public directory and prompts you before copying each file.
Example To Copy a Directory to the Root of Another File Volume
To copy the directory \mydir to the root directory of another VINES file volume, enter:
vcopy s:\mydir p: /s.
VCOPY copies all files and subdirectories in the directory s:\mydir directory and places the destination files in the root of the file volume assigned to drive p (p:\). VCOPY does not create the directory mydir in the root of the other file volume.
Enter the VCOPY command without any switches to display the VCOPY Command menu. Figure 5-4 shows the VCOPY Command menu.

The following options appear at the top of the screen:
CHANGE source - Lets you to enter and change the source file or directory. CHANGE destination - Lets you to enter and change the destination file or directory. SELECT options - Lets you to select copy options.
To choose an option, press the right arrow key or the space bar.
Note: You must first enter a source file or directory before you enter a destination file or directory.
To Use the VCOPY Command Menu
1. From a PC on the network, enter VCOPY at the system prompt. The VCOPY Command menu appears.
2. Choose CHANGE source. The cursor moves to the bottom half of the screen and a new function key template appears at the bottom of the menu. Table 5-9 describes these keys.

3. Select a source pathname by either:
- Entering the pathname and pressing F10.
- Pressing F5 and choosing a pathname from the Select Pathname screen. Use the arrow keys to highlight the pathname and press ENTER.
The VCOPY Command menu displays the source pathname you choose in the Source field. CHANGE destination is highlighted.
4. Press ENTER. Choose a destination pathname by either:
- Entering the pathname and pressing F10.
- Pressing F5 and choosing a pathname from the Select Pathname screen. Use the arrow keys to highlight the pathname and press ENTER.
The VCOPY Command menu displays the destination pathname you selected in the Destination field. SELECT options is highlighted.
5. After selecting the source and destination:
- Choose SELECT options to set switches. Move the cursor to the desired switch and press ENTER. An asterisk (*) appears next to the enabled switch. The ENTER key toggles the selection of a switch on and off. You can set more than one switch. Press F10 to execute VCOPY. A message appears confirming the copy.
- Press F10 to execute VCOPY. A message appears confirming the copy.
6. Press ESC to return to the system prompt.
The VRENAME command lets you rename files and directories, and control the names of the files and directories in file system views other than the DOS and OS/2 view. Thus, if your workstation is running DOS or OS/2, you can use VRENAME to rename a file or directory in the Macintosh file system view.
To use the VRENAME command, you must have the access rights listed in Table 5-10.
File and directory names in one file system have related names in other file system views. Changing the name of a file affects all the related names. For example, changing the name of a file created in DOS changes its related Macintosh file name. Likewise, if a Macintosh user changes the name of a file, the related DOS short name changes as well.
There are three command syntaxes for the VRENAME command.
If you want to use the VRENAME Command menu, enter the VRENAME command without any switches: VRENAME
If you are renaming a file or directory using its DOS name, use this command syntax: VRENAME DOS-pathname new-name /VIEW: file-system
If you are renaming a file or directory using its name in a file system view other than DOS, use this command syntax: VRENAME DOS-directory\ old-name new-name /VIEW:<file-system> [/HELP]
Table 5-11 describes the switches that make up the three command syntaxes.

This section illustrates how to use the VRENAME command to rename files from the DOS and Macintosh views and how to use the VRENAME Command menu to rename files.
When renaming files, you should choose a file system view before you choose source and destination files. To change the file system view, press F4 to toggle between the DOS (and OS/2) and Macintosh file system view. The UNIX file system view is reserved for VINES toolkit users.
Example To Rename a File from the DOS View
Enter vrename f:\user\light1.exe f:\user\light2.exe
The VRENAME command changes the DOS filename light1.exe in the f:\user directory to light2.exe in the same directory. Because no file system view was specified, the command defaults to the DOS file system view. The next example shows how to specify a different file system view from a DOS workstation.
Example To Rename a File from the Macintosh View
Enter vrename applica "applications folder" /V:M
The VRENAME command changes the Macintosh file name applica in the current directory to applications folder. The DOS name of the file changes from APPLICA to !APPLICA.TIO.
Example To Rename a File from the VRENAME Command Menu
1. Enter VRENAME. The VRENAME Command menu appears. The menu displays the current volume and directory. The default file system view is DOS.
2. Choose CHANGE path. The cursor moves to the bottom half of the screen and a new function key template appears at the bottom of the menu. Table 5-12 describes these keys.

3. Select a pathname by either:
- Entering the pathname and pressing F10.
- Pressing F5 and selecting a pathname from the Select Pathname screen. Use the arrow keys to highlight the pathname and press ENTER.
The cursor moves to Enter SOURCE at the top of the screen.
Note: If you selected a path and a file, the cursor moves to Enter DESTINATION at the top of the screen. Go to step 6 to continue.
4. Press ENTER. The cursor moves to the Selected File or Directory field.
5. Enter the name of the file or directory you want to rename and press ENTER. The cursor moves to Enter DESTINATION at the top of the screen.
6. Press ENTER. The cursor moves to the Selected File or Directory field.
7. Enter the new file or directory name and press ENTER. The file or directory is renamed.
8. Press ESC to return to the system prompt.
![]()
![]()
![]()