![]()
![]()
Chapter 2 - Managing Internetwork Security
This chapter describes how to restrict internetwork access between Banyan servers on different networks. For information about how to connect Banyan servers on different networks, refer to the Banyan TCP/IP Guide, StreetTalk for Windows NT Installation Guide, or the VINES SS/SNA Guide .
Restricting Internetwork Access
You can use Banyan server-to-server communications software to connect two Banyan networks. By default, when you connect a server in your network to a server on another network, the two networks are merged. When two networks are merged, the flow of information between the two networks is unrestricted. However, you can secure servers to restrict the amount and type of information they exchange with servers on other networks. Although you are not required to secure all servers in your Banyan network, you may want to protect servers that store sensitive data.
Types of Server-to-Server Connections
Server-to-server communications connect servers on different networks in two ways:

Directly across serial lines Indirectly across intermediate networks
Native VINES servers and StreetTalk for Windows NT servers support different types of server-to-server connections. Native VINES servers can establish server-to-server connections over various types of serial lines (HDLC, block asynchronous, or X.25), or across intermediate TCP/IP or SNA networks. StreetTalk for Windows NT servers can establish server-to-server communications only over TCP/IP lines or across intermediate TCP/IP networks. Establishing connections requires installation of the appropriate server-to-server option.
Banyan networks linked by a server-to-server connection form an internetwork. A server that connects one Banyan network with another is called an internetwork gateway. When interconnecting Banyan networks, you can configure these internetwork gateways to control how much information the networks exchange.
On each server in your network that acts as an internetwork gateway, you can create an internetwork access list. Whenever a link between a gateway in your network and a gateway in another network becomes active, the lists on both servers determine how the networks exchange information.
An internetwork access list specifies:
The remote servers that have access to your server The level of access each remote server has The password that your server and any remote servers must exchange before access is granted
You are not required to set up an internetwork access list. Set up an internetwork access list only if your security requirements warrant it.
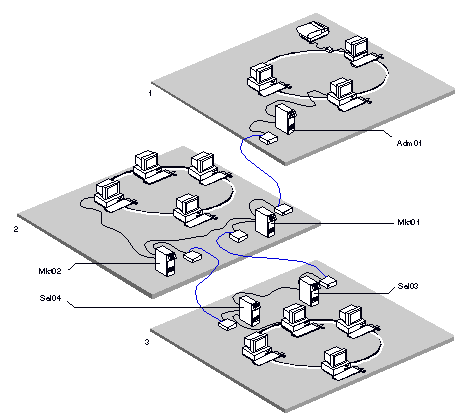
Figure 2-1 shows an internetwork consisting of three networks that are connected by server-to-server lines, and the internetwork gateways that provide access to each network. Internetwork access lists are set up on gateway servers in each network as follows:
NETWORK1 - The list on server Adm01 controls the exchange of information between NETWORK1 and NETWORK2.
NETWORK2 - The list on server Mkt01 controls the exchange of information between NETWORK2 and the rest of the internetwork (NETWORK1 and NETWORK3). The list on server Mkt02 controls the exchange of information between NETWORK2 and NETWORK3 only.
NETWORK3 - The lists on Sal03 and Sal04 control the exchange of information between NETWORK3 and NETWORK2.
Each access list contains the names of the remote gateways that can connect directly to a server. For example, the list for Mkt01 can contain the names of the two gateways directly connected to it - Sal03 and Adm01.
In place of the name of a gateway server, you can specify a wildcard entry. This default entry applies to all internetwork gateways that are not explicitly named. For example, the access list for Mkt01 could contain the default entry in place of the individual entries for Sal03 and Adm01.
For each entry on the access list you specify a password and a level of access that determine how the two networks communicate. Refer to "List Entries" later in this chapter for more information about configuring list entries.
To ensure proper information exchange between networks, coordinate your internetwork access list with those on the servers to which your network connects. If you have several servers that connect to the same network (such as Mkt01 and Mkt02), make sure that each internetwork access list provides the same level of information.
Two kinds of entries can appear in a list:
Individual Server Entries - Consists of an individual server name and various security settings (described later in this section).
Default Entry - Lets you use a wildcard (*) in place of an individual server name. The wildcard lets you set up access between your server and multiple remote servers with a single entry. You do not have to specify each remote server individually.
For the purpose of this discussion, the term your server refers to any server that you are authorized to operate.
The security settings specified in an individual server entry controls the exchange of information between that server's network and another network. The security settings specified in the default entry controls the exchange of information between that server and remote servers and networks..
Using a default entry requires some extra consideration on your part. For more information, see the section, "Using the Default Entry," later in this chapter.
When you add an entry to the list, you need to assign the following settings:
Serial Number Internet Password Level of Access
Each entry in the list has the following format:

The server entries in this list must match server entries in the lists of other servers with which your server communicates. The sections that follow contain additional Information about planning and specifying entries in an internetwork access list.
Serial Number
All servers have unique serial numbers that are assigned by Banyan Systems. The serial number guarantees that a server is identified uniquely in any network.
You do not have to specify serial numbers when you create an internetwork access list. However, it is a good idea to specify the serial number for individual server entries in your internetwork access list for two reasons:
A server is always uniquely identified by the combination of its name and serial number. The name alone cannot guarantee uniqueness. The server's name may be incorrectly specified.
For example, the administrator of server Mkt01 in Figure 2-1 could specify the serial number for server Adm01 as follows:
Similarly, the administrator of server Adm01 could specify the serial number for server Mkt01 as follows:
You can specify either a specific serial number, a wildcard, or nothing at all. In most cases, wildcards are specified for individual server entries only. The wildcard specifies that any serial number the server receives is valid and has the same effect as specifying nothing at all.
Be sure you enter the serial number correctly. If you enter the serial number incorrectly, your server will not be able to access the specified server.
To Find the Serial Number of a Server
From the command prompt of a Banyan client workstation, enter:
SHOWREVS servername
The serial number of the server appears along with other information about the revisions of the Banyan software running on the server.
You can also check the serial number from the local server.
From a StreetTalk for Windows NT Server
1. Open the StreetTalk for Windows NT Program Group, and double-click StreetTalk Server Configuration.
2. Double-click Network. The server's serial number appears at the top of the Network Communications dialog box.
From a Native VINES Server
From the server console, view the Operator Menu. The serial number of the server appears beside the server name.
Internet Password
If you specify an internet password for entries on the access list, each time the servers attempt to establish a connection they must exchange the password. The initial connection that is established allows only the two VINES Security services to communicate. Each side authenticates that the other has the correct password, using a protocol that does not reveal the password and that is immune to replay attacks. When both sides have authenticated each other, the connection is established at the appropriate security level.
To successfully establish a connection, the administrators of both servers must have stored the same password (if any) in their respective internetwork access lists.
The internet password is optional. You can use a specific password, such as DOORBELL, a wildcard, or no password. Using a wildcard is not recommended if you want to maintain tight security; it is the same as specifying no password at all.
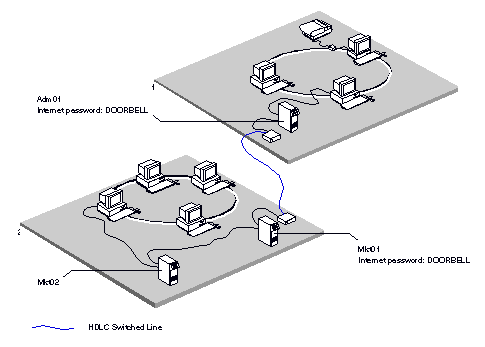
Figure 2-2 shows how the servers Mkt01 and Adm01 use the internet password DOORBELL to establish a connection between their networks over a server-to-server line.
To establish a connection, Adm01 and Mkt01 must recognize DOORBELL as the internet password.
The administrator of Mkt01 specifies DOORBELL as follows:

Similarly, the administrator of Adm01 specifies DOORBELL as follows:

Remember that individual entries for servers are not always needed. Adm01 could verify DOORBELL if the administrator used a default entry as the individual server entry for Mkt01 and specified DOORBELL as the password as follows:

You can use a wildcard as the internet password. For example, the administrator of Mkt01 specifies the wildcard for the internet password as follows:

Likewise, the administrator of Adm01 should specify the wildcard or no password at all for the internet password.

The level of access determines the kinds of information that can travel between servers on different networks. You can specify three access levels for internetwork communication.
Unrestricted Access
Unrestricted access means that the two networks are merged. Users on one network can interact with resources on the other network, just as they do on a LAN, restricted only by the access rights associated with those resources. Network mail moves freely between the two networks. The StreetTalk naming information on the two networks merges.
Restricted Access
Restricted access means that the two networks exchange only force-routed mail messages. Although the servers exchange low-level routing information, they do not exchange StreetTalk information.
Secure Access
Secure access means that the networks cannot exchange information. No traffic travels between your server and servers in other networks.
Assigning Access
Administrators should assign the same levels of access to servers that communicate. If two servers make a connection and their access levels do not match, the more restrictive access level on either server is put into effect. For example, if Mkt01's administrator specifies that Adm01 has Restricted access, but the Adm01 administrator specifies that Mkt01 has no access (secure), then the servers will have no access to each other.
Caution: StreetTalk information takes 96 hours to age out. If you move two servers that have been on the same LAN and on the same day reconnect them by a restricted serial link, you will not really have a restricted link until four days later. The two servers will have each other's StreetTalk information until then.
Note: The level of access you specify for a server applies to all information that can reach that server. Consider carefully how you set up levels of access when servers are part of multiple networks.
Example Unrestricted Access
When communications between servers Mkt01 and Adm01 in Figure 2-1 are unrestricted, their networks merge. NETWORK1 has access to NETWORK2, and NETWORK2 has access to NETWORK1. Merging networks lets the following systems exchange information:
Mkt01 and all the servers and workstations on the Adm01 side of the connection. Adm01 and all the servers and workstations on the Mkt01 side of the connection.
The administrator of Mkt01 specifies unrestricted access as follows:

Similarly, the administrator of Adm01 specifies unrestricted access as follows:
Example Restricted Access
If communications between servers Mkt01 and Adm01 in Figure 2-1 were restricted, only force-routed mail messages would pass between NETWORK1 and NETWORK2.
The administrator of Mkt01 specifies restricted access as follows:
Similarly, the administrator of Adm01 specifies restricted access as follows:

Example Secure Access
If access between servers Mkt01 and Adm01 in Figure 2-2 is secure, no information could pass between NETWORK1 and NETWORK2.
The administrator of Mkt01 specifies secure access as follows:

Similarly, the administrator of Adm01 specifies secure access as follows

Use the default wildcard entry only when you have more than 20 servers that require access to your server. To grant access to more than 20 remote servers, you must use the default entry. For example, if you want to grant 32 servers access to your server, you have to specify 12 servers by using the default entry. To use the maximum number of individual entries and settings, assign Entries 1 through 19 to individual servers. Entry 20 is the default entry, and its settings determine the security for the remaining 12 servers because all servers specified by the default entry share the same security settings.
You can specify only one default entry in an internetwork access list. The remote servers that the default entry specifies must assign the same settings in their internetwork access lists to your server.
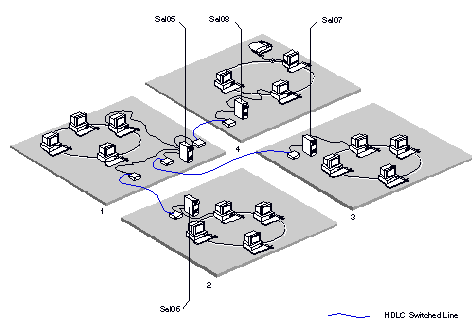
Figure 2-3 shows several servers that use the default entry in their lists to control access to each other.
Example Assigning Security Settings with the Default Entry
NETWORK1 needs to exchange mail with NETWORK2, NETWORK3, and NETWORK4. You assign the following common security settings to the three servers that act as internetwork gateways to those networks in the Sal05 list:
Internet Password - *. Sal05 accepts the wildcard or no password from Sal06, Sal07, and Sal08.
Access Level - Restricted. Only mail traffic can travel between NETWORK1, NETWORK2, NETWORK3, and NETWORK4.
To configure the appropriate access, you assign the following settings:
Depending on their security needs, the administrators of the other servers can assign the same settings specifically to Sal05 or use the default entry. For example, because mail exchange from other networks is not a concern for Sal06, the administrator of Sal06 also uses the default entry as follows:

To prevent access from networks other than those on Sal05's list, the administrators of Sal07 and Sal08 specify Sal05 individually:

Before you specify the servers that can access your server through a server-to-server connection, complete these four planning tasks:
Determine the appropriate level of security for your network. Coordinate access levels and passwords with administrators of remote servers. Decide the order of entries for the internetwork access list. Complete the Internetwork Access Worksheet. These tasks are described in the sections that follow.
Determining Levels of Security
Security requirements vary from network to network. Some networks require a high degree of security, others do not. In general, there are three levels of security:
High Medium Low In a network that requires a high degree of security, you want to give access to only those servers that absolutely require it. You may also want to limit traffic to and from your network to force-routed mail only.
High Security Guidelines
If your network requires a high degree of security, use the following guidelines to restrict access:
If possible, specify each server individually. Use the default entry only when the number of servers you need to specify exceeds 20. A password assigned to a default entry can be used by any server to dial in to your server. If the administrator of an unauthorized server learns the password, the administrator can gain access to your server.
Using the default entry is not recommended if your network requires a high degree of security. However, if you must use the default entry to accommodate more than 20 servers, assign Restricted access to that entry. Then, if the administrator of an unauthorized server learns the password and assigns the password to your server, the unauthorized server can only exchange force-routed mail with servers in your network.
Medium Security Guidelines
In a network that requires a medium degree of security, specify unrestricted access only for servers that absolutely require it. Restrict access for other servers to allow the exchange of mail only.
Use the default entry only when the number of servers you are specifying exceeds 20. If you must use the default entry, assign the default entry Restricted access.
Low Security Guidelines
In a network that requires a low degree of security, you can grant Unrestricted access to most servers. You need not assign the default entry Restricted access only.
For low security networks, you and the administrators of other servers may want to create very simple configurations.
If you do not have to take any security precautions, do not create a list. In this case, any server that dials in to your server has Unrestricted access.
Example Low Security Configuration
To assign a common password, GREETINGS, and the Unrestricted access level to the default entry in the respective lists, you and the other network administrators would specify the following access list entry:

Coordinating Levels of Access and Passwords
You must know the topology of your network and coordinate security needs with the administrators of other servers so that security settings do not conflict. When you add, modify, or delete security settings on an internetwork access list for your server, the changes affect the ability of other servers and their networks to access your server, as well as the ability of your server to access the other servers and their networks. Be sure to coordinate any changes with other network administrators.
Before making changes to the access list on your server, determine what servers on other networks are connected to your server. Contact the appropriate administrators and begin coordinating your planning activities. With the help of these administrators, obtain and record the names of the remote servers and determine the appropriate security settings.
When planning your list, keep in mind the following information:
To communicate, two servers must use the same password, or both servers must use no password. Two servers that communicate should specify the same level of access. For example, if you specify that a remote server, FINANCE, has Restricted access to your server, then the administrator of FINANCE should specify that your server has Restricted access to FINANCE.
If two servers attempt to communicate and their access levels do not match, the most secure access level is in effect.
For example, if FINANCE has Restricted access to your server but your server has Unrestricted access to FINANCE, Restricted access is in effect between the servers.
Deciding the Order of Entries
The entries in an internetwork access list are order dependent. When your server and a remote server attempt to establish a connection, your server searches its list to find the first entry that matches the remote server. Your server uses this entry to establish a connection with the remote server.
If your list contains only individual server entries, the entries can appear in any order. However, if the list contains both individual server entries and the default entry, the default entry should come last because it overrides any entries that come after it in the list.
When you enter different passwords for the default entry and for the individual servers, your server uses the default entry password when trying to connect with any other server. Because the individual servers listed after the default entry expect a different password, the connections to these servers are rejected.
Example Placing the Default Entry
Your server uses the list below to establish connections with remote servers:

When your server attempts to establish a connection with Act01, it finds the first matching entry for Act01. Your server then knows that the password, GMORGEN, must be used to establish a connection between itself and Act01 and access is Unrestricted. To establish a connection between your server and Fin02, the password is BONJOUR and access is Restricted. To establish a connection between your server and any other server, the password is PRONTO and access is Restricted.
In the example below, the default entry is specified first:

Here, the default entry overrides the individual entries for Act01 and Fin02. When your server tries to establish a connection with Act01, it uses the password PRONTO. The connection is rejected because Act01 expects the password GMORGEN. The same problem occurs when your server and Fin02 attempt to establish a connection. Putting the default entry last would allow your server to connect to Act01 and Fin02.
Completing the Worksheet
Record the information that you gather on servers, passwords, and access levels on the Internetwork Access Worksheet, shown in Figure 2-4. A blank Internetwork Access Worksheet is also in Worksheets.
To complete the worksheet, specify the following information in the spaces provided:
Remote Servers - Write down the name of each remote server that will have access to your server, including those specified by the default entry.
Serial Number - Optionally, record the serial number of each remote server that will access your server. The serial number guarantees that the server will be uniquely identified in the network.
Internet Password - Memorize (or, if necessary, write down) the internet password that will be used to establish connections between your server and a specific remote server. If you do not specify a password, the default, a wildcard (*), remains in effect. The wildcard indicates that no password will be used.
Access Level - Enter the level of access that you want to assign to the remote server or servers that you plan to specify. The level of access can be Secure (S), Restricted (R), or Unrestricted (U).

Sample Server-to-Server Connections
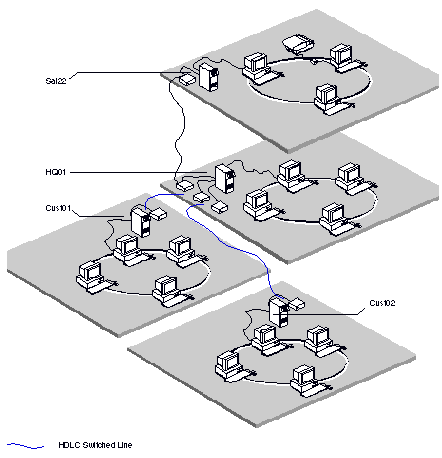
This section details how to set up the internetwork access lists for four servers that communicate over server-to-server connections, using the example below. These servers are shown in Figure 2-5.
Example Server-to-Server Connections with Medium Security
In Figure 2-5, Unrestricted access is required for communications between the server HQ01 and the server at a sales office, Sal22. Headquarters also needs to communicate with two servers at customer sites, Cust1 and Cust2, but on a restricted basis only. The administrator for each server assumes that a medium degree of security should be maintained and has set up security accordingly.
The administrator of HQ01 added the following entries in its internetwork access list:

In the list above, Sal22 and HQ01 must use the password QUOTA to establish connections with each other. All kinds of traffic can travel between their networks. The administrator entered the serial number for Sal22 to ensure that no other server can masquerade as Sal22.
The default entry (*) indicates that both Cust1 and Cust2 use the password LETSTALK to communicate with Headquarters. It also indicates that only mail can travel between the customer sites and Headquarters.
The administrator for Sal22 enters the following information in the internetwork access list for Sal22:
The administrators for Cust1 and Cust2 must enter the following information in their respective internetwork access lists:
Even though Sal22 has Unrestricted access to Headquarters, only mail can travel from the Sal22 network to the networks in which Cust1 and Cust2 reside. Likewise, the networks in which Cust1 and Cust2 reside can send only mail to the Sal22 network.
Creating an Internetwork Access List
You use one of the following Banyan management tools to create an internetwork access list:
StreetTalk Explorer (for StreetTalk for Windows NT or native VINES servers) OPERATE (for native VINES servers only) Note: StreetTalk Explorer allows you to create an internetwork access list.
To Create an Internetwork Access List Using StreetTalk Explorer
1. RunStreetTalk Explorer, select the server to manage, and select Properties.
2. Select the Internetwork access tab.
3. In the Server section, add servers to the security list by doing one of the following:
- Select Default (*) radio button to set up access between your server and all servers on the network. There can be only one default entry per list.
- Select the Server radio button and select names from the dropdown list. You can specify up to 20 entries.
4. If you are specifying servers by name, specify the serial number of each individual server. This step is optional but specifying the serial number with the server name guarantees that the servcer is uniquely identified. Be sure you enter the serial number correctly. If you enter the serial number incorrectly, your server will not be able to access the specified server.
5. Specify the internet password that your server uses to communicate with other servers. If you do not specify a password, the default wildcard password (*) remains in effect. The wildcard indicates that no password is to be used.
6. In the Access rights section, specify the appropriate level of access for this server entry. You can select one of the following types of access:
- Unrestricted
- Restricted
- Secure
7. Click Add. The server entry appears in the Security list window.
8. Verify that the information is correct, and click Apply or OK to put the entry into effect.
To Create an Internetwork Access List Using OPERATE
1. From the Command prompt, enter
OPERATE servername
where servername refers to the name of the native VINES server you want to manage. The Operate a Server menu appears.
2. Select Restrict Access. The Restrict Access menu appears.
3. Select Restrict Internetwork Access. The Restrict Internetwork Access menu appears. This menu lists all the entries in the internetwork access list for your server.
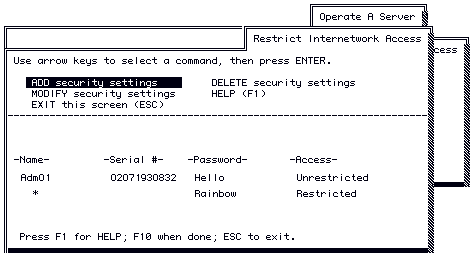
4. Select Add Security Settings from the Restrict Internetwork Access menu.
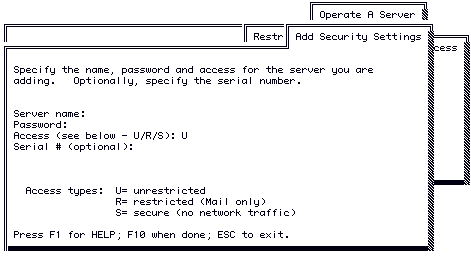
5. Enter the following information, and then press ENTER.
- Server Name
- Password
- Access
- Serial Number
The Restrict Internetwork Access menu appears. The new entry appears on that menu.
Modifying an Internetwork Access List
You may have to modify an internetwork access list in the following situations:
To change the access level that controls traffic between your server and an individual remote server or multiple servers specified by a default entry. For example, you may suddenly need unrestricted access to multiple servers you have specified with a default entry and have assigned restricted access.
To change the password when unauthorized servers are accessing your server. You should change the password periodically. Modifying security settings can adversely affect communications with other servers. Before you modify your list, inform the administrators of the affected servers of the changes you intend to make. They must make the same changes.
You use one of the following Banyan management tools to modify an internetwork access list:
StreetTalk Explorer (for StreetTalk for Windows NT or native VINES servers) OPERATE (for native VINES servers only)
To Modify an Internetwork Access List
Using StreetTalk Explorer
1. Run StreetTalk Explorer, select the server to manage, and select Properties.
2. Select the Internetwork access tab.
3. From the Security list window, select the entry to modify.
4. Modify the information for this entry as needed. The Modify button is activated.
5. Click Modify.
6. Verify that the information is correct, and click OK or Apply to put the changes into effect.
Using OPERATE
1. Select MODIFY Security Settings from the Restrict Internetwork Access menu.
If the list has more than one server, use the arrow keys to select a server.
2. Press ENTER to display the Modify Security Settings screen.
3. Enter your changes in the fields on this screen as needed.
Press ENTER after fields you do not modify; the original settings are kept.
4. To return to the Restrict Internetwork Access menu, press ENTER after the Serial # field.
Removing Entries from an Internetwork Access List
Always coordinate the removal of entries on a server's access list with the administrators of other servers and networks.
You use one of the following Banyan management tools to remove entries from an internetwork access list:
StreetTalk Explorer (for StreetTalk for Windows NT or VINES servers) OPERATE (for native VINES servers only)
To Remove Entries from an Internetwork Access List
Using StreetTalk Explorer
1. Run StreetTalk Explorer, select the server to manage, and select Properties.
2. Select the Internetwork access tab.
3. From the Security list Window, select the entry to remove.
4. Click Remove.
5. Click OK or Apply to put the change into effect.
Using OPERATE
1. Select DELETE Security Settings from the Restrict Internetwork Access menu.
2. When the cursor moves to the lower part of the menu, select the entry on the Restrict Internetwork Access menu that contains the settings you want to delete. The entry is deleted.
Note: The OPERATE program does not prompt you to confirm the deletion.
![]()
![]()
![]()