![]()
![]()
Chapter 5 - Managing Organizations and Groups
The first StreetTalk resource that you create when you install your network is an organization. You create this resource during the installation procedure for your first server. See your server installation guide for more information.
The purpose of an organization is to associate groups. An organization differs from a group in that an organization exists only logically, while a group is maintained on a server.
Organizations on the First Server
When the first VINES or StreetTalk for Windows NT server on a network starts up, the Banyan network software creates the organization Servers as the default.
In StreetTalk, servers are resources. StreetTalk needs to have an organization in which to put them. For this reason, the server name also becomes the first group name. Every organization must have at least one group.
Default Organization
Users' own organization is the default if only the item name and group name is specified. If a user logs in as Angie@Finance@WCTCA, the default organization for that VINES session is WCTCA. StreetTalk automatically appends that organization whenever you specify just the item and group name.
Create only the organizations that you need. A small company may need only one organization; larger companies may need more. Even for a larger company, one organization name that corresponds to the company name may be sufficient. A multinational corporation can use organization names to distinguish among its branches in different countries. See the example in the next section.
Avoid generic names like "headquarters," "administration," or "regional branch."
Use organization names that refer specifically to your company. This approach helps you maintain unique item and group names within them. You want unique names in the event that you connect your network to another network in the future.
Example Corporate Example
WCT limits StreetTalk names to a maximum of 31 characters, including the two @ signs.
Each WCT office has its own StreetTalk organization name based on the company abbreviation (WCT) plus a two letter country code as defined by the International Standards Organization (ISO).
The company has the following organization names:
Country Name Argentina WCTAR Australia WCTAU Belgium WCTBE Canada WCTCA Germany WCTDE Japan WCTNI Spain WCTES United States WCTUS
The total number of characters in item and group names is 24. Group names are abbreviated if necessary. For example, the StreetTalk name of the Payroll department in Sydney, Australia is Pay@WCTAU. Each office translates the group names into its own language and abbreviates them if necessary. All abbreviations uniquely identify each department.
Specify the first organization (other than Servers) during the start-up of the first Banyan server.
Rules for Adding Organizations
When you add an organization, you must specify an organization name. Use organization names that refer specifically to your company. Avoid generic names like "headquarters," "administration," or "regional branch." This helps you maintain unique organization names and item names within them. Unique names are important in the event that you connect your network to another network in the future.
Your StreetTalk name must be on certain AdminLists before you can add an organization. The specific lists that you are on determine which management functions you can perform. See Chapter 9 for more information on managing lists.
To add an organization, you must use a Banyan management tool (StreetTalk Explorer or MORG).
From StreetTalk Explorer:
1. Select File, New, Organization from the File menu or click the New Organization icon.
2. Enter the name of the new organization, the name of the first group you want to add to the organization, and the server on which you want the first group of the new organization to reside. Use the arrow keys to select a server if you do not know its name.
3. Click Finish.
See Introduction to StreetTalk Explorer for a description of StreetTalk Explorer.
From the System Prompt:
1. At the command line, enter MANAGE. The System Management menu appears.
For a short cut, enter MORG at the command line.
2. Select Organizations. The Manage Organizations menu appears. From this menu, you can add new organizations.
3. Select ADD an organization.
4. Enter the name of the new organization.
5. Enter the name of the first group you want to add to the organization. Go to step 7 if you have only one server on your network.
6. You are prompted to select the server on which you want the first group of the new organization to reside. Use the arrow keys to select a server.
7. Select YES at the next screen to add the new organization and group to the network.
Note: Try to select a server that is physically close to the people who will use the group. Selecting a server that is accessible only across a WAN link may result in slower system response time.
Your StreetTalk name must be on certain AdminLists before you can delete an organization. The specific lists that you are on determine which management functions you can perform. See Chapter 9 for more information.
You cannot delete any organization whose groups contain services. First stop the services and then delete them one by one. For information on stopping services, refer to Managing VINES Services or Introduction to StreetTalk Explorer.
Since there are often large volumes of user data associated with services, first delete the services, then the organization itself.
To delete an organization that contains many groups, delete the groups within the organization one at a time. When you delete the last group, the organization is automatically deleted.
Caution: Deleting an organization deletes all groups, users, and lists in the organization, as well as the organization itself. Since groups within an organization are not limited to a single server, the operation may have far-reaching effects on a network.
If you delete an organization, the entire organization must be on line. If parts of the organization are not on line, the organization will not be completely deleted.
You can delete an organization as a unit, or you can delete individual groups within an organization. For information on deleting individual groups within an organization, see "Deleting Groups" later in this chapter.
Procedure
From StreetTalk Explorer:
1. Right-click the organization in the left pane and select Delete from the shortcut menu.
2. You are prompted to confirm the action, which deletes the group, and its users, and lists. Click OK.
You must be an administrator of every group that is deleted.
See Introduction to StreetTalk Explorer for a description of StreetTalk Explorer.
From the System Prompt:
1. Enter MANAGE and select Organizations. The Manage Organizations menu appears.
Note: For a short cut, enter MORG at the command line.
2. Choose SELECT from list below to select an organization. The Manage or Delete Organization menu appears.
3. Select DELETE this organization. You are prompted to confirm the action.
4. Select YES to delete the organization from the network, including all its groups, users, and lists.
You cannot delete the organization as a unit if any of its groups contain services. To delete such an organization, you must first delete the services, then the organization itself.
Example Deleting an Organization
If you attempt to delete the organization WCTBE, which contains the file service FSGroupFiles@Sales@WCTBE, StreetTalk will not allow you to do it. You must stop FSGroupFiles and delete the service before deleting the organization.
You should assign users and services to groups in a way that is understandable and that corresponds to the way users work and interact. Users in groups should have something in common with one another.
Sometimes a group in your company may have to be divided into several StreetTalk groups. For example, if the Finance group has 100 employees, you can divide them into groups named Accounts-Pay, Accounts-Rec, and Compensation.
A StreetTalk group can contain members of several different departments within your corporate structure. For example, assume that a corporate Public Relations group has 10 users and the Marketing group has 20 users. The two corporate groups work together often, so you can combine them into one StreetTalk group of 30 users and call the group Marketing-PR.
Select group names that describe why items are grouped together.
Regardless of the group names that you select, consider making group names unique even if the groups are in different organizations. While unique names do not affect StreetTalk's search for the names, uniqueness does clarify the structure of your organization for users. For example, if your company has two engineering groups, naming both "engineering" may confuse users, even if the groups are in different organizations.
You can make a group name unique by including part of its departmental, or organizational name. For example, if your company has two personnel departments and two organizations, with branches in Canada and the United States, name one group HR-CANADA and the other HR-USA.
In a multi-national network, group names that are language-specific may make them unique. For example, the following StreetTalk users are in the finance department of the WCT corporation but work in different organizations:
Ricardo Flores@Finanzas@WCTES (Spain)
Diane Baillargeon@Finances@WCTCA (Canada)
Wilhelm Meier@Finanzen@WCTDE (Germany)
Example Group Names
The World Commodities Trading company uses groups to differentiate functional areas within its organizations. Inside the organization WCTUS, you find groups and services such as Chicago Sales@WCTUS and Print Service 1@Chicago Sales@WCTUS. Such logical associations give administrators and users a clearer understanding of the network and its resources.
When the first VINES or StreetTalk for Windows NT server starts up, StreetTalk automatically creates the servername@Servers group.
The variable servername is the server name entered during start-up. StreetTalk uses this name to create servername@Servers.
For example, if Finance3 is the server name, then Finance3@Servers becomes the name of the group.
The servername@Servers group contains various services and an AdminList. The AdminList identifies people who can add and delete organizations and add other servers to the network.
As servers are added to the network, StreetTalk creates a unique servername@Servers group for each new server.
The name of the first group is specified during the start-up of the first server.
Any time someone types an item name by itself, StreetTalk automatically appends a group name to it. This group is called the default group.
When a user logs in to the Banyan network, the default group is set to a group configured with the PCCONFIG program and stored in the PCCONFIG.DB file on the user's workstation. For example, after a user logs in as Fernandez@Finanzas@WCTES, the default group for that VINES session becomes Finanzas@WTCES if the administrator configured Finanzas@WTCES as a default group. StreetTalk automatically appends that group to any item name the user specifies without a group name.
The default group lets users quickly access resources in their own group. Whenever a network resource is managed, the system displays the StreetTalk names that correspond to that type of resource. For example, the first set of names displayed for any item you are managing are those found in your default group.
Default Group for Administrators
StreetTalk provides a special default group facility for administrators. When you add or manage a group, that group temporarily becomes your default group. This default remains in effect until you add or select another group or until you exit the Banyan management program and return to the system prompt. When you return to the system prompt, the default group reverts to the one in your login name.
When a server is initialized you must enter a first group name and a name for the server. The group appears in the second position of the StreetTalk names of users and services. The group name can be up to 15 characters long. Do not use PC multinational 8-bit characters in the first group's name.
Note that the StreetTalk service maintains the groups and the StreetTalk information associated with them that you add to the service's server. This has implications for locating groups.
Your first task is to select a group name.
Performance Guidelines
The way you group items can affect network performance for both users and services because groups are maintained only on one server and services belong to groups. In addition, the StreetTalk service maintains the groups and the StreetTalk information associated with them that you add to the service's server.
Consider the following guidelines when you select the group to which a user should belong:

If possible, each user should belong to a group that is maintained on a server with a direct LAN connection to the user's workstation. This approach yields better performance, especially for logins. User profile information, processed at login, is kept on the server that maintains the user's group. In smaller networks with few users and groups, try to put users in the same group as the services they use most often. In larger networks with many groups that are very large, you may have to put related groups and users on more than one server and let more than one StreetTalk service manage them. As groups and organizations are added to the network in this way, the memory needs of each StreetTalk service in the network increases and can adversely affect the performance of a server. In general, a server can have a maximum of 50 groups including shadow groups, but that number varies depending on the services you run, how much attribute information the group maintains, the amount of system memory, type of hardware supported, and how intensively users access the system.
If you cannot group all users and services together on the same server, try to create a scheme that makes your network both responsive and easy to use.
If memory usage becomes a concern, it is possible to monitor the amount of memory that StreetTalk requires for organization and group entries. For more information, see Monitoring and Optimizing Servers.
Try to assign users and services to groups in a way that corresponds to the way users work and interact. Users of a group should have something in common with one another. For example, put users from the same department, as well as their file volumes and printers, in the same group.
Before you create groups, understand the way that users and network resources, such as file servers, file volumes, and print queues, are currently organized in the network. Select group names that describe why items are grouped together.
The following rules apply to adding a group to an organization:
The maximum number of groups supported for a server running StreetTalk for Windows NT or the 6.0 or later revision of native VINES is 50. This number includes any shadowed groups located on that server. (StreetTalk for Windows NT 7.5 and greater support shadowing.) You must add an organization to the network before you can add groups to that organization. If you try to add a group to a nonexistent organization, StreetTalk requires you to add the new organization first. On multi-Banyan-server networks, the groups in a given organization can reside on various servers. In this case, you must specify a server name when you add a group. The StreetTalk database on the specified server contains the names of all groups on that server as well as all items within that group. When you add a group, you must specify a group name. Each organization on the network usually contains several groups. Use a name for each group that clearly indicates the group's function in your company. Your StreetTalk name must be on certain AdminLists before you can add a group. The specific lists to which you belong determine the management functions you can perform. See Chapter 9 for more information.
To Add a Group
From StreetTalk Explorer:
1. From the File menu, select New, Group or click the New Group icon.
2. Enter the name of the new group in the New Group dialog box. Include an organization name, unless you want to use the default organization.
Examples of group names are:
Quality Assurance@WCTUS
Sales@WCTES3. Specify the name of the Banyan server where you want to maintain the StreetTalk database for the group.
4. Click Finish.
See Introduction to StreetTalk Explorer for a description of StreetTalk Explorer.
When the group is created, StreetTalk automatically creates an AdminList for the group. Initially, your name is the only entry in this AdminList. Select the Lists folder of the Groups window to review the members of the group.
From the System Prompt:
1. Enter MGROUP at the command line.
2. Select ADD a group. The Add A Group screen appears.
3. Enter the name of the new group. Include an organization name, unless you want to use the default organization. Examples of group names are:
Quality Assurance@WCTUS
Sales@WCTES4. On multi-Banyan-server networks, the Select A Server menu appears after you enter a group name. Specify the name of the Banyan server on which you want to maintain the StreetTalk database for the group.
5. You are prompted to confirm the add operation. Press Y to confirm or N to cancel.
When the group is created, StreetTalk automatically creates an AdminList for the group. Initially, your name is the only entry in this AdminList.
The following rules apply to deleting groups:
Your StreetTalk name must be on certain AdminLists before you can delete a group. The specific lists to which you belong determine the management functions you can perform. You cannot delete any group that contains network services unless you first delete the services. Stop the services and delete each one individually. For more information on stopping services, refer to Managing VINES Services or Introduction to StreetTalk Explorer.
Caution: Deleting a group deletes all users, lists, and nicknames in the group, including the group AdminList. If an organization contains only one group, deleting that group deletes the organization as well. In addition, deleting a group also deletes its shadow groups. If you delete a group that has a shadow, delete the shadow before you delete the group.
From StreetTalk Explorer:
1. In the right pane, right-click the group and select Delete from the shortcut menu, or select the group and select File, Delete.
2. You are prompted to confirm the action, which deletes the group, its users, and its lists.
From the System Prompt:
1. Enter MGROUP at the command line.
2. Choose SELECT from list below to select a group from the displayed list, or use the SEARCH function to look elsewhere for the group that you want. The Manage Or Delete A Group menu appears.
3. Select DELETE this group.
4. You are prompted to confirm the delete operation. Press Y to confirm or N to cancel.
The following rules and procedures apply to managing items in a group. You must:
Add a group to the StreetTalk database before you can add any items to that group. Select items to manage based on item type - lists, nicknames, users, or services.
From StreetTalk Explorer:
1. In the right pane, right-click the group you want to manage.
2. Select Properties. The Summary properties sheet displays.
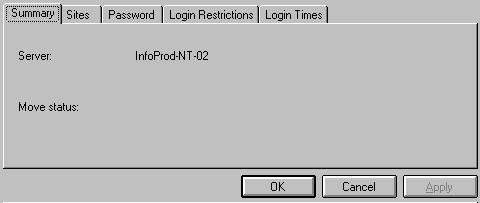
StreetTalk displays the items you can manage for the group you selected.
Logins - Chapter 8.
Sites - Shadowing described in this chapter.
Passwords - Chapter 6.
3. Select the kind of item you want, and then refer to the chapter that corresponds to your selection.
See Introduction to StreetTalk Explorer for more information on StreetTalk Explorer.
From the System Prompt:
1. At the Manage Groups menu, choose SELECT from list below to select a group, or use the SEARCH function to locate the group you want. The Manage Or Delete A Group menu appears.
2. Select MANAGE this group. StreetTalk displays the items you can manage for the group you selected.
3. Select the kind of item you want, and then refer to the book or chapter that corresponds to your selection:
Services - See Managing VINES Services.
Users - Chapter 6.
Lists - Chapter 9.
Nicknames - Chapter 4.
You can manage user security for the group. For more information on user security, see Chapter 8.
Master and shadow are the names given to the StreetTalk group-level information on a user's home server, and the StreetTalk group-level information on an alternate login server, respectively. Master denotes the original group-level StreetTalk login information. Shadow denotes the copied version of this information. Single Guaranteed Login (SGL) depends upon the existence of at least one alternate login server, or shadow, in order to allow logging in when a user's home server, or master, becomes inaccessible.
A shadow is read-only. Administrative operations, such as adding, deleting, or modifying names and attributes for the shadow group as well as for that group's nicknames, lists or services, cannot be done. Such operations can only be performed on a master group. However, any user functions, such as accessing and using applications or system files, or reading mail, can be done on a shadow (as long as the applications or files reside on a server other than that of the inaccessible master).
Operations performed against a master are automatically propagated to its shadows so that a shadow becomes an identical copy of its master. In addition, you have the ability to force an update at a shadow if you see that it is not up to date with the master.
The StreetTalk directory is updated automatically at set intervals. In this way, all StreetTalk databases are kept current on any master and shadow groups in the network.
Automatic directory updating informs all StreetTalk services about the master and shadows for all groups in the network.
Note: Shadowing groups is supported only on a server running VINES 6.0 or greater or StreetTalk for Windows NT 7.5 or greater.
You can configure the order of precedence for shadow groups; that is, which shadowed group is called on first and which second, to obtain information about a particular StreetTalk group when the master is unavailable.
Note: To change the precedence order of shadow groups, you must delete both shadow groups and re-add them in the new order.
You can also configure a shadow so that you can graduate it to master status in the event that the master is disabled. However, you can only graduate the shadow to master status when the master is no longer available. Before you graduate the shadow to a master, make sure that the master's server is permanently disabled or that the master group is removed from the disabled server if you decide to bring the server back online. Always delete or rename the master group to avoid creating duplicate groups and introducing inconsistent data to the network.
Caution: Once you graduate a shadow to a master, be prepared to make the graduated shadow the permanent master. Do not bring the original master back online, as it will introduce inconsistent data views (for example, passwords) depending on which of the two groups responded to the login first. Delete or rename the old master.
Groups in the organization named Servers cannot be shadowed.
To add a shadow group, the server from which you want to add it must be running VINES 6.0 or later or StreetTalk for Windows NT 7.5 or later, and you must be a member of that server's AdminList.
From StreetTalk Explorer:
1. Right-click the group you want to shadow and select Properties from the shortcut menu.
2. Click the Sites tab.

The fields on the Sites tab indicate:
Replica -- Whether this group is a master or a shadow, and the order of precedence for the shadow (1 or 2).
Server -- Name of the server on which the group is maintained.
Status -- Whether the server is available (AVAIL) or not available (N/A).
Updates Pending -- The number of changes on that server that have been queued for update.
Last Update -- Date of the last update.
3. In the Add Shadow box:
- Select the name of the server you want this shadow group to reside on.
- Select 1 or 2 in the Shadow box to indicate the order of precedence for this shadow group.
The message Creation of Shadow # (n) on server (n) has been initiated is displayed.
4. To see that the shadow group has been successfully added, click OK.
From the System Prompt:
1. Type MGROUP at the command line. The Manage Groups screen appears.
2. Select the group you want to shadow and press ENTER.
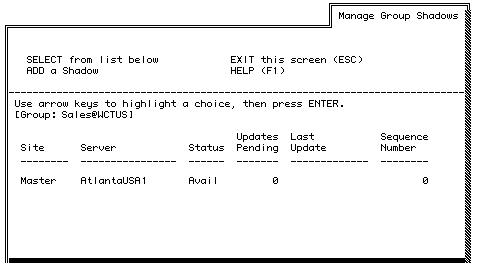
3. Select the Manage Shadows for group option. The Manage Group Shadows screen appears.
The fields on the Manage Group Shadows screen indicate:
Site -- Whether this group is a master or a shadow, and the order of precedence for the shadow (1 or 2).
Server -- Name of the server on which the group is maintained.
Status -- Whether the server is available or not available (N/A).
Updates Pending -- The number of changes on that server that have been queued for update.
Last Update -- Date of the last update.
Sequence Number -- Indicates how current the shadow groups are in comparison to the master. A sequence number which is less than the master's sequence number indicates that this shadow group's updates are not current with the master group.
4. Select Add a Shadow.
5. Type 1 or 2 to indicate the order of precedence for this shadow group.
6. Select the name of the server on which you want this shadow group to reside.
7. The message Creation of Shadow # (n) on server (n) has been initiated is displayed.
Note: To see that the shadow group has been successfully added, press ESC. Then select the Manage Group Shadows screen and press ENTER.
By comparing the values in the Updates Pending field and the Last Update field, you can determine if a shadow needs updating. Compare the Last Update field of the shadow group with the date of the master group's Last Update field. If there is a discrepancy, you might want to update one or both shadows. However, keep in mind that a discrepancy between the last update in a master and shadow group is usually caused by a network connectivity problem between the two servers. In this case, a forced update will be delayed, just as an automatic update will be delayed.
Note: A shadow may not be updated for up to 3 minutes.
To Update One Shadow Group
From StreetTalk Explorer :
1. Select a shadow from the Sites folder.
2. Select the Master server and select Update. The message Shadow successfully updated is displayed. (It may not be immediate, depending on the size of the group.) The Pending, Last Update, and Sequence Number fields for the master and newly updated shadow should now all match.
From the System Prompt:
1. Select a Shadow from the Site field.
2. Select Force Update from Master.
3. When you are asked to confirm the update, select Yes. The message Shadow successfully updated is displayed. (It may not be immediate, depending on the size of the group.) The Pending, Last Update, and Sequence Number fields for the master and newly updated shadow should now all match.
To Update Both Shadows
From StreetTalk Explorer:
1. Select the Master from the Sites folder.
2. Select Update. The message Shadow successfully updated is displayed. The Updates Pending, Last Update and Sequence Number fields for the master and newly updated shadows should now match.
From the System Prompt:
1. Select the master from the Sites field.
2. Select Force Update all Shadows. The message Shadow successfully updated is displayed. The Updates Pending, Last Update and Sequence Number fields for the master and newly updated shadows should now match.
To Graduate a Group Shadow To Master
From StreetTalk Explorer:
1. Disconnect the server maintaining the master from the network.
2. From the Sites folder, select the Shadow that you want to graduate to a Master.
3. Click Graduate to Master.
From the System Prompt:
1. Select the shadow you want to graduate from the Sites field.
2. When you receive the confirmation screen, select Yes.
Caution: Once you graduate a shadow group to a master group, be prepared to make the graduated shadow the permanent master. Do not bring the original master back online, as it will introduce inconsistent data views (for example, passwords) depending on which of the two groups responded to the login first. Delete or rename the old master.
To Delete a Shadow Group
Note: If you delete a master group, delete its shadow. Always delete a shadow group before you delete the master group.
From StreetTalk Explorer:
1. Select a Shadow from the Sites field.
2. Click Delete this Shadow.
3. The message Shadow successfully deleted is displayed.
From the System Prompt:
1. Select a Shadow from the Sites field.
2. Select Delete this Shadow.
3. When you receive the confirmation screen, select Yes.
4. The message Shadow successfully deleted is deleted.
This section describes how to move groups from one Banyan server to another Banyan server in your network.
As an administrator, you may need to move groups between servers for reasons of network efficiency or geography. StreetTalk provides two methods for moving groups:
Moving Groups over the Network - Use this method when the server where the group exists and the target server are both on the network.
Moving Groups on Media - Use this method when no network links exist between the server where the group exists and the target server, or where the servers are connected by costly WAN links.
Note: When you intend to move a master group, you must first delete its shadows.
Moving StreetTalk Groups over the Network
When moving groups between two Banyan servers over network links, keep the following in mind:
You cannot move groups between servers with RISC and non-RISC architectures. Be aware that when you move a group from a server running VINES 6.0 or later or StreetTalk for Windows NT 7.5 or later, and the group has shadows, you can move the group only to another VINES 6.0 or later server or to a StreetTalk for Windows NT 7.5 or later server. Before you move the group, you must first delete the shadows.
From StreetTalk Explorer:
1. Select the group to be moved from the right pane.
2. Select Move from the File menu. The Move Group dialog box appears.
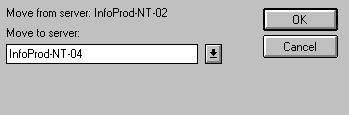
3. Select the server from the Move to Server drop-down list.
4. Click OK.
From the System Prompt:
1. Enter MGROUP. The Manage Groups menu appears.
2. Choose SELECT from list below to select a group, or use the SEARCH function to locate the group that you want. The Manage Or Delete A Group menu appears.
3. Select MOVE this group to another server. The Move A Group screen appears.
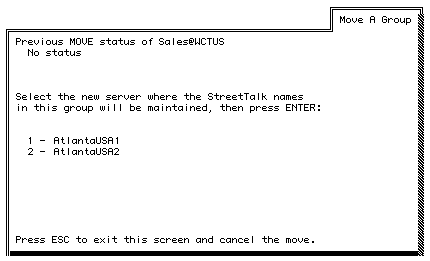
4. Select the Banyan server to which you want the group moved and press ENTER.
Depending on the size of the group and network activity, some time may elapse before the group is moved from one server to another. While the group is being moved, the status field shows an in-progress message.
If the move was successful the status field indicates the group was moved and where it was moved to. Unsuccessful moves generate an error message.
Note: If the server from which you are moving a group goes out of service during a move, the status field still indicates that the group is being moved. When the server comes back up, re-initiate the procedure and move the group.
Moving a group from one Banyan server using media to another involves two tasks:
1. Moving the group from the source server onto tape or diskettes.
2. Restoring the group from tape or diskettes to the target server.
You can move a group from one Banyan server to any other Banyan server, provided that the tape drives on the two servers are compatible or that each has a compatible diskette drive.
Restrictions on moving of groups between servers running different revisions of VINES and StreetTalk for Windows NT are shown in Table 5-1.
| Groups on Servers Running... | Can Be Moved to Servers Running... | Cannot Be Moved to Servers Running... |
|
VINES 5.5 or 6.x StreetTalk for Windows NT |
VINES 5.5, 6.x, StreetTalk for Windows NT | VINES 5.00, 4.x |
| VINES 5.00 |
VINES 4.11, 5.00, 5.5, 6.x StreetTalk for Windows NT |
|
| VINES 4.11 |
VINES 4.11, 5.00, 5.5, 6.x StreetTalk for Windows NT |
|
When you move a group to tape or diskette, the StreetTalk information associated with that group is removed automatically from that server. Service data, such as file service data is not moved.
Caution: Before you move a group to tape or diskettes, be aware of the consequences. Moving a group to tape or diskettes deletes the group from the source server. The group and all of its items are removed from the network, with the following results:
Service data remains on the network but may remain inaccessible to users until the group is successfully moved from the tape to the target server. Users in the group cannot log in. Users who were logged in when the group is moved to tape stay logged in, but cannot log in again if they log out. Banyan recommends that users in the group log out before the group is moved. Users who belong to lists maintained in other groups remain members of those lists when the group is moved to tape.
If possible, move the group to tape at night, on weekends, or whenever use of the network is minimal. Stop all services in the group before moving it. Notify users in the network that services will be unavailable until the group is moved to the target server.
Moving groups to media is performed at the server console. Shut down server software before you move the group to or from tape or diskettes.
To Move a Group to Tape or Diskette
The following procedures apply to native VINES servers only.
From the System Prompt:
1. Make the native VINES server unavailable to users by shutting down server software. See the Banyan Server Operations Guide for more information.
2. Either insert a tape into the tape drive or insert diskettes into the disk drive.
3. At the Operator Menu on the server console, select Backup/Restore. The Backup/Restore Menu appears.
4. Select Move StreetTalk Group. The Move StreetTalk Group menu appears.
5. Select Move Group to Device.
If you are moving the group to a tape drive connected to the server, the word "tape" appears in the device field. If no tape drive is connected, the word "diskette" appears, indicating that the move is to diskette.
The Enter Group Name screen appears.
6. Specify the full StreetTalk name of the group you want to move.
Press ENTER to move the group to tape or diskette. The system responds with a message similar to:
Checking that the group Sales@WCTUS exists...
If the group does not exist, you return to the Backup/Restore menu. Create the group and start again. If that group does exist on the server, the Continue Operation screen appears. Use the arrow keys to highlight a choice and press ENTER.
7. Insert your backup in to the drive and select CONTINUE. A screen appears indicating that the group is being backed up. As the group is moved to tape or diskette, the drive light remains lit.
If the display indicates that the space on a tape or diskette is exhausted, follow these steps:
- Remove the tape or diskette.
- Label the tape or diskette with the server name, date, the words "StreetTalk Group:[groupname]," and the number of the tape or diskette in the sequence. It is important that you include the sequence number.
- Insert the next tape or diskette in the drive, and select PROCEED to continue the backup.
- Repeat the above three steps as many times as necessary. When the backup is complete, this message appears:
Backup completed
- Label the last tape or diskette in the drive as the final one in the set, and store the backup properly.
Moving the group to tape or diskettes deletes the group from the StreetTalk database on the server. The group and all its items are off the network. The server notifies you when the group is completely moved to tape or diskettes. The server returns you to the Move StreetTalk Group menu.
If you want to put the group back on the server, use the Move Group from Tape function. See "To Restore a Group," which follows.
After you remove the tape from the tape drive, write the name of the StreetTalk group on the tape label. Make sure that the tape is write-protected.
Caution: Do not use the tape or diskettes for any purpose - especially not backup - until the group is restored to the target server. If you back up data onto the tape, the data overwrites the StreetTalk group data.
To Restore a Group
The following procedure applies to native VINES servers only.
From the System Prompt:
1. Before you restore a group from tape or diskettes to the target server, use MGROUP to make sure that a duplicate group does not exist on the target server, or anywhere else in the network. If it does, either delete that group from the network or do not restore the group from tape or diskette.
2. Make the target server unavailable to users by shutting down server software. See the Banyan Server Operations Guide for more information.
3. Insert the tape or the first diskette that contains the group into the drive.
4. At the Operator Menu on the server console, select Backup/Restore. The Backup/Restore Menu appears.
5. Select Move StreetTalk Group. The Move StreetTalk Group menu appears.
6. Select Move Group from Tape or Move Group from Diskette, depending on which media you use.
7. At the next screen, specify the full StreetTalk name of the group you want to move. Press ENTER to move the group from tape to the server.
8. At the prompt, insert a tape or diskette if you have not already done so.
9. If a duplicate group exists on the target server, the server indicates that the group will be overwritten by the group on the tape or diskettes. You can continue with the move or cancel. If you continue, that portion of the group contained on the media is moved to the server.
10. When all of the data has been read from the media and there is no more space on a tape or diskette, follow these steps:
- Remove the tape or diskette.
- Follow the sequence of labels established when you moved the group to media, inserting the next tape or diskette in the drive. Select PROCEED to continue the backup.
- Repeat the above two steps as many times as necessary.
11. Restart the service.
The server notifies you when the group is completely moved to the target server. You return to the Move StreetTalk Group menu.
After you move the group to the target server, restart any services in the group. Notify users in the network that the services are available. Notify users in the group that they can log in.
![]()
![]()
![]()