Chapter 6 - Assigning Options to Lines
You configure serial communications options by assigning the options to lines. This chapter describes how to do the following:

Use the Serial Communications menu and the Manage Serial Lines menu 
Assign, reassign, and de-assign serial lines including HDLC, FT1, Asynchronous Server-to-Server, PC Dial-in, X.25, 3270/SNA, Asynchronous Terminal Emulation, UNIX/TTY, VG/CIM, and ISDN lines 
Supply your own script file 
Use hunt groups 
Choose compression 
Troubleshoot
Using the Serial Communications Menu
The Serial Communications menu provides access to the menus that allow you to assign lines, de-assign lines, clear X.25 virtual circuits, show the status of all lines, manage remote sites, and reload communications processors.
This chapter provides details on the Manage Serial Lines menu. For information on the other menu choices on the Serial Communications menu, see Chapter 7.
To Reach the Serial Communications Menu
1. At the Operator Menu, choose Manage Communications. The Manage Communications menu appears.
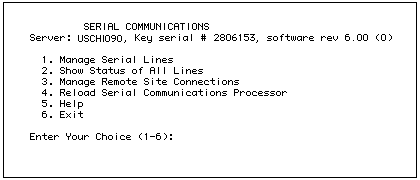
2. Choose Serial Communications. The Serial Communications menu, shown in Figure 6-1, appears.
From the Manage Serial Lines menu, you can:

See what options are currently allowed 
Determine the total number of communications lines on a server 
See the status of all lines 
See the type of option used by each line 
Choose the option you want to manage
To Access the Manage Serial Lines Menu
1. At the Operator Menu, choose Manage Communications. The Manage Communications menu appears.
2. Choose Serial Communications. The Serial Communications menu appears.
3. Chose Manage Serial Lines. The Manage Serial Lines menu, shown in Figure 6-2, appears.0
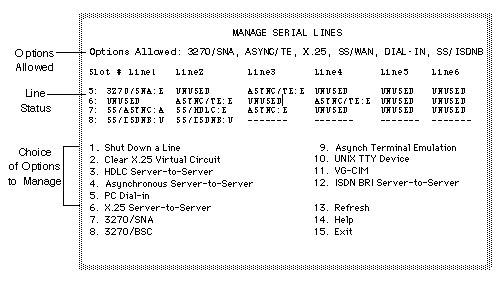
Information on the Manage Serial Lines Menu
The Manage Serial Lines menu displays the following information:
Options Allowed - Lists the options installed on your server. These are the only options you can use when assigning a line, regardless of what appears in the choices of options to manage. In the preceding screen example, the server can assign lines for 3270/SNA, ASYNC/TE, X.25, SS/ASYNC, SS/HDLC, DIAL-IN and SS/ISDNB. See Table 6-1 for meanings of the option identifiers.
Note: Options Allowed also lists VG-CIM and UNIX-TTY, which are not actually separately purchased options, but are assigned in the same manner as options are.
Slot # - Lists the numbers of the slots that have been configured using the Add Cards/Change Card Configuration menu described in "Configuring LAN and WAN Cards" in Chapter 3. In the preceding screen example, the server has cards in Slots 5, 6, 7 and 8.
Line - For each slot, lists which lines are assigned to specific options and which lines are unused. This field can show the name of a protocol, the word UNUSED, or a set of dashes. In Figure 6-3, Line 1 in Slot 5 is assigned to the 3270/SNA option.
Line Status - Displays the status for each assigned line on a card. In Figure 6-3, Line 1 in Slot 5 (3270/SNA) has a status of E. See "Line Status" later in this chapter for more information on these status fields.
Figure 6-3 shows status lines for cards in slots 5, 6, 7, and 8.
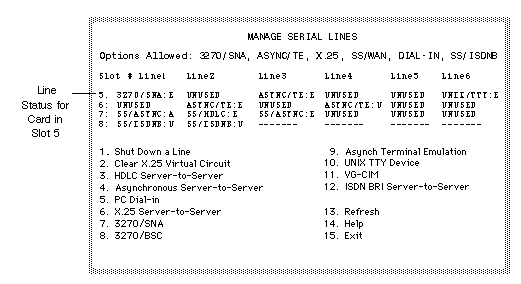
The top of the Manage Serial Lines menu displays one status line for each communications card in the server, identified by the slot number in which the card is installed. Next to the slot number, the menu displays the option status identifier for all of the lines on that card.
For each line on a card, the status for that line is marked with one of three settings:

An option identifier, which is the name of the protocol associated with the line (for example, SS/ISDNB, X.25, and so on). 
The label UNUSED. An UNUSED line is available for assignment. 
A set of dashes, which means that those lines do not exist on that card.
Figure 6-4 shows examples of all three.
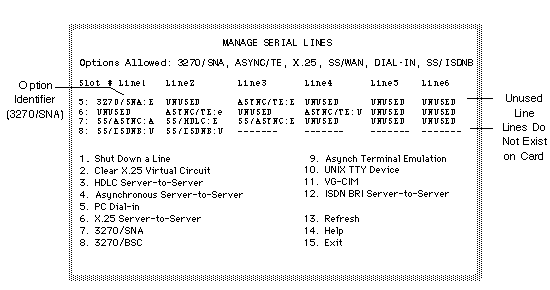
Table 6-1 lists the option identifiers that appear when you assign a line to a specific option. Option # refers to the number next to the option on the Manage Serial Lines menu.
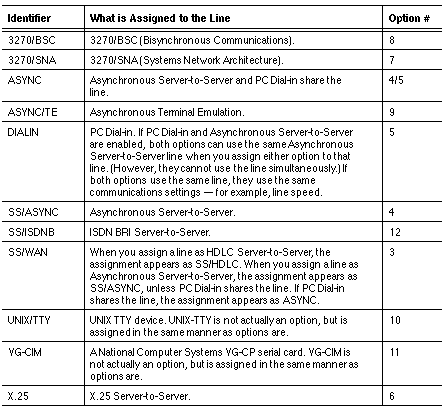
Line Status Identifier
A letter indicating the status of the line follows the option identifier, separated by a colon. For example, line 3 in slot 7 (see Figure 6-3) appears as follows:
SS/ASYNC:E
Table 6-2 describes the three line status identifiers.
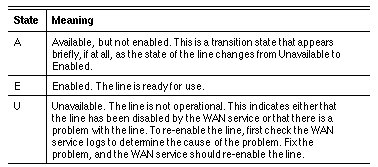
Example Status Values for Serial Lines
Figure 6-4 gives an example of option identifiers, line status, and line status identifiers.
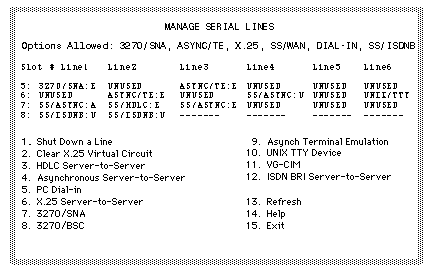
Figure 6-4 displays the following information:

In Slot 5, Line 1 is assigned to the 3270/SNA option. This line is enabled (ready for use). Line 2, Line 4, Line 5, and Line 6 are all unused. Line 3 is assigned to the Asynchronous Terminal Emulation option and is enabled. 
In Slot 6, Line 1, Line 3, and Line 5 are unused. Line 2 is assigned to the Asynchronous Terminal Emulation option and is enabled. Line 4 is assigned to the Asynchronous Server-to-Server option, but the line is either shut down deliberately or is not functioning. Line 6 is configured as a UNIX TTY device. 
In Slot 7, Line 4, Line 5, and Line 6 are unused. Line 1 shows the Asynchronous Server-to-Server line in a transition state (A) as the line goes from unavailable to enabled. Line 2 is assigned to the HDLC Server-to-Server option and is enabled. 
In Slot 8, Line 1 and 2 are assigned to the ISDN BRI option and are either shut down deliberately or are not functioning. Lines 3 through 6 do not exist.
Reassigning or De-assigning Lines
If a line is currently reserved for one protocol and you want to assign it to a different protocol, you must shut down the line first. To shut down a line, follow the instructions in "Shutting Down a Line" in Chapter 7.
To de-assign a line (for example, if you made a mistake during configuration or if the line is no longer used), shut down the line.
The following sections describe how to assign a line. Look for the instructions for the option you are using. For example, if you are looking for information on assigning an Asynchronous Terminal Emulation line, see "Assigning Asynchronous Terminal Emulation Lines" later in this chapter.
As soon as you install the card and run any hardware configuration programs required on your system, you can use VINES to install and configure an ISDN card. Choose the Add Cards/Change Cards Configuration menu from the System Maintenance menu to install and configure the card.
To run ISDN cards over NI1 lines, you may be required to specify one or two Service Profile Identification (SPID) numbers. A SPID number is usually a sequence of numerical characters. You will also need an NI1 unit for each ISDN line. For information about the NI1 unit, see the documentation that accompanies the card.
Determining the SPID and Telephone Numbers
The telephone company can tell you exactly what your SPID numbers must be.
Use the following diagram to determine your requirements for SPID numbers and telephone numbers, as well as the code files that you should use. You will need this information to respond to system prompts when you install the ISDN card.
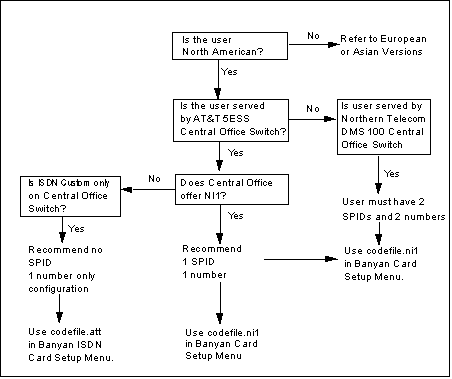
You will also need an NI1 unit for each ISDN line. Refer to the documentation for the ISDN card for information about configuring the ISDN line.
1. From the Operator Menu, select System Maintenance.
2. From the System Maintenance menu, select Configure/Diagnose Server.
3. From the Banyan Server Configuration menu, select Add Cards/Change Card Configuration.
4. From the Add/Change Card menu, select ADD a card.
5. Select the SCII ISDN BRI card by paging down to it and pressing ENTER. You return to the Add/Change Card menu
6. Select CHANGE card settings, and then select the card you want. The Change Card Settings menu appears.
7. Follow the directions on your screen to enter the card settings. You will need to page down to the next screen to enter the SPID numbers.
8. Press F10 to save your changes and return to the Add/Change Card Screen.
9. Select SAVE configuration and exit. The system builds the device driver.
10. Reboot the server.
Assigning HDLC Synchronous Lines
Choose HDLC Server-to-Server from the Manage Serial Lines menu to establish a synchronous connection between two servers using the HDLC protocols. You must have the WAN Server-to-Server option installed on the two servers.
To Assign an HDLC Server-to-Server Line
1. At the Operator Menu, choose Manage Communications. The Manage Communications menu appears.
2. Choose Serial Communications. The Serial Communications menu appears.
3. Choose Manage Serial Lines. The Manage Serial Lines menu appears.
4. Choose HDLC Server-to-Server.
When prompted, enter the following information:
Slot Number - Specify the number of the slot containing the card connected to the line that you want to assign.
Enter Line Number (1-6) - Enter the number of the line connected to the card.
The Assign Synchronous (HDLC) Line menu appears.
Prompts for Assigning the Line
When prompted, choose or enter the following information on the Assign Synchronous (HDLC) Line menu. Not all prompts appear; some depend on how you answered previous prompts. For example, the prompt regarding the PEP protocol does not appear unless you entered Y when asked if the modem is a Telebit modem.
Line speeds include... Enter your choice... - Choose the DTE speed of the communications equipment connected to this line. For auto-dial modems, choose the highest DTE speed the modem supports. Note that a different selection of speeds occurs if you are assigning one of the high speed lines (line 1 or 2) than if you are assigning lines 3 through 6. If you choose Fractional T1 speeds, see "Assigning FT1 Lines" later in this chapter.
Is this a leased (dedicated) line (y/n)? - Enter Y if you use a leased line or N if you do not.
Is there an auto-dialing modem on this line (y/n)? - Enter Y or N.
Is the modem a Telebit T2500 (y/n)? - Enter Y or N.
Do you wish to use the PEP protocol (y/n)? - Enter Y to enable PEP or N if you prefer to use the default V.32 protocol. If the remote modem is a Telebit modem that also supports PEP (Packetized Ensemble Protocol), enter Y. If the remote modem is a Telebit modem but not a T2500, use PEP to get the best performance. Answering Y sets a flag in the configuration service, which the server-side modem script must test for. ASY_LSTN.SCT, one of the default server-side modem scripts that is supplied with your networking software, tests this variable. If you use your own server-side modem script, make sure the script tests for this variable if you plan to use PEP.
If you are using a Hayes Ultra® modem, answer N.
Note: Answering N does not turn the PEP protocol off. It simply moves the PEP negotiation to the end of the connect processing in the modem script. This will allow other protocols to be negotiated first, skipping the PEP processing if another protocol is negotiated successfully.
Do you wish to supply your own listen script file (y/n)? - Enter Y if you want to provide you own script file to listen for incoming connections. Otherwise, enter N. See "Supplying Your Own Script File," which follows, for more information on supplying your own script file.
File Service: - Enter the name of the VINES file service where the script file is located.
Note: Make sure that the WAN service has Read access to the script file.
Script File: - Enter the complete pathname of the script file, beginning with a directory separator (a slash or backslash). The pathname must start from the root of the file service or from the root of the server drive if you are using the UNIX file system. See "Supplying Your Own Script File," which follows, for details.
Will this line serve as DCE (y/n)? - Enter Y to assign this line as DCE, or N to assign this line as DTE. The server at one end of the connection must be assigned as DCE (the called site) and the other as DTE (the calling site). If the other server is already assigned, choose the opposite assignment. For example, if the other server has been assigned as DCE, enter N here. For switched (leased) lines, it is recommended that the called site play the DTE role and the calling site plays the DCE role. If an auto-dial modem is used at the calling site, it will automatically play the DTE role. For more information on DCE, see the Link Access Procedure defined for HDLC in the CCITT X.25 Recommendation.
Do you want this line to be in the hunt group (y/n) - Enter Y to assign this line to the hunt group, or N if you do not want to assign this line to the hunt group. The hunt group is a group of lines of a particular protocol. If the assigned line is busy, the service will try each line in the group until it finds a line available for dialing out. For more information on hunt groups, see "Hunt Groups" later in this chapter.
Do you want this line to accept assigned connections (y/n)? - Enter Y if you want to be able to assign connections to this line using the Manage Remote Sites menu. Enter N if you want to reserve this line for the hunt group only.
Note: If you enter N when asked if the line is to be part of the hunt group and N to the question about accepting assigned connections, the line can be used for incoming calls only. This allows you to reserve particular lines for incoming calls.
When the line is successfully assigned as SS/HDLC, a message appears on the screen and you return to the Manage Serial Lines menu.
For a leased line, the connection is established when you assign the line on both servers. For information on establishing the connection on a switched line, see "Managing Remote Site Connections" in Chapter 7.
Supplying Your Own Script File
The Banyan networking software comes with default scripts for listening for incoming calls and for making outgoing calls. You can modify these script files or create your own. If you create your own, you must indicate the name of the file and where it is stored.
You can store script files using the UNIX file system on your server's hard drive or using the VINES file service.
If you store script files using the UNIX file system on your server's hard drive, you indicate the name of the file and where it is stored using UNIX conventions. If you store script files using the VINES file service, you indicate the name of the file and where it is stored using DOS conventions. Either way, you must make sure that the WAN service has read access to the script file.
When you assign a line, the WAN service tries to access the file immediately. It copies the file into /disk1/banyan/wan/usrsct. If the file is not available when you assign the line, you will receive an error and the line assignment will fail.
Note: If you store script files using the UNIX file system on your server's hard drive, it is recommended that you store them in /disk1/banyan/wan/usrsct. That way, if you need to change a script, the WAN service will pick up the changed file.
If you change a script file, there are two ways to install the new script file:

Place the new file in /disk1/banyan/wan/usrsct. 
Delete and re-assign the line.
If you do not have access to UNIX or if you are giving the script file a new name, you must use the second method (delete and re-assign the line).
Supplying a Pathname for the File
The complete pathname of the script file can contain up to 100 characters. Though all of the supplied modem scripts end in .SCT, you do not have to end your script filenames in .SCT.
The pathname must begin with a directory separator:

If you stored the file on a VINES file service, use a backslash (\) for a directory separator. 
If you stored the file on the UNIX file system on your server's hard drive, use a slash (/) as the directory separator.
Enter the pathname in relation to the root of the VINES file service or the root of the UNIX file system.
Example File Stored on a VINES File Service
If you store a file called AUTO144.SCT in a directory called PCDSCT on GeneralFiles@IS@USCHI010, enter the following at the File Service prompt:
GeneralFiles@IS@USCHI010
At the Script File prompt, enter the complete pathname as follows:
\PCDSCT\AUTO144.SCT
Example File Stored Using the UNIX File System on Your Server's Hard Drive
If you store a file called auto144.sct in /disk1/banyan/wan/usrsct, at the File Service prompt, leave the field blank and press ENTER.
At the Script File prompt, enter the complete pathname as follows:
/disk1/banyan/wan/usrsct/auto144.sct
FT1 lines connected to ICA/HS, ICA/RM, or ICAplus cards must be assigned as HDLC server-to-server connections. You must have the WAN Server-to-Server option installed on the server.
Note: Only lines 1 and 2 of the ICA/HS, ICA/RM, or ICAplus cards support FT1. You cannot assign lines 3 through 6 to FT1; the software will not prompt you for FT1 information.
1. At the Operator Menu, choose Manage Communications. The Manage Communications menu appears.
2. Choose Serial Communications. The Serial Communications menu appears.
3. Choose Manage Serial Lines. The Manage Serial Lines menu appears.
4. Choose HDLC Server-to-Server.
When prompted, enter the following information:
Slot Number - Specify the number of the slot containing the card connected to the line that you want to assign.
Enter Line Number (1-6) - Enter the number of the line connected to the card. For an FT1 line, you must use either line 1 or 2.
The Assign Synchronous (HDLC) Line menu appears.
Prompts for Assigning the Line
When prompted, choose or enter the following information. Not all prompts appear; some depend on how you answered previous prompts.
Line speeds include... Enter your choice... - If the line supports more than one DS0, choose Fractional T1 speeds. If the line supports only one DS0, choose the line speed of the communications equipment connected to this line. For an FT1 line with only one DS0, choose either 56 Kbps or 64 Kbps. For an FT1 line with more than one DS0, choose Fractional T1.
Do you want the line speeds in 64 Kbps increments (y/n)? - Choose according to the criteria in "Choosing Speed Increments" later in this chapter.
Is this a leased (dedicated) line (y/n)? - Enter Y if you use a leased line or N if you do not.
Will this line serve as DCE (y/n)? - Enter Y to assign this line as DCE, or N to assign this line as DTE. The server at one end of the connection must be assigned as DCE (the called site) and the other as DTE (the calling site). If the other server is already assigned, choose the opposite assignment. For example, if the other server has been assigned as DCE, enter N here. For switched (leased) lines, it is recommended that the called site play the DTE role and the calling site plays the DCE role. If an auto-dial modem is used at the calling site, it will automatically play the DTE role. For more information on DCE, see "DCE and DTE Assignment" in Chapter 5 or see the Link Access Procedure defined for HDLC in the CCITT X.25 Recommendation.
Note: If you assign the role incorrectly (DCE, for example, when it should be DTE), the line will not come up.
The Assign Synchronous (HDLC) Line menu appears. Depending on what you chose for an increment, a different set of speeds will appear. The speed you choose depends on the number of DS0s that the line supports.
When the line is assigned as SS/HDLC, you return to the Manage Serial Lines menu.
Choosing Speed Increments
Choose either 56Kbps or 64Kbps increments based on the following criteria:

Specify 56 Kbps if your CSU/DSU does not support B8ZS or AMI with inverted HDLC. 
Specify 64 Kbps if your CSU/DSU supports B8ZS or AMI with inverted HDLC. In most cases, you specify 64 Kbps. If in doubt, check with your service provider.
Choosing the Correct Speed
For 64Kbps increments, use the following formula to choose the correct speed:
Speed = Number of DS0s * 64.
For 56 Kbps, use the following formula to choose the correct speed:
Speed = Number of DS0s * 56.
Assigning Asynchronous Server-to-Server Lines
To establish a connection between two servers that use asynchronous protocols, you must assign the line as an Asynchronous Server-to-Server line. You must have the WAN Server-to-Server option installed on the two servers.
To Assign an Asynchronous Server-to-Server Line
1. If there is a modem attached to the line, make sure the modem is powered on.
2. At the Operator Menu, choose Manage Communications. The Manage Communications menu appears.
3. Choose Serial Communications. The Serial Communications menu appears.
4. Choose Manage Serial Lines. The Manage Serial Lines menu appears.
5. Choose Asynchronous Server-to-Server.
When prompted, enter the following information:
Slot Number - Specify the number of the slot containing the card connected to the line that you want to assign.
Enter Line Number (1-6) - Enter the number of the line connected to the card.
The Assign Asynchronous (Dial-In) Line menu appears.
Prompts for Assigning the Line
When prompted, choose or enter the following information on the Assign Asynchronous (Dial-In) Line menu. Not all prompts appear; some depend on how you answered previous prompts. For example, the prompt regarding the PEP protocol does not appear unless you entered Y when asked if the modem is a Telebit modem.
Line speeds include... Enter your choice... - Choose the DTE speed of the communications equipment connected to this line. For auto-dial modems, choose the highest DTE speed the modem supports. Note that a different selection of speeds occur if you are assigning one of the high speed lines (line 1 or 2) than if you are assigning lines 3 through 6.
Do you wish to change the retransmission timeout value, default is 3 seconds (y/n)? - If you enter N, you accept the default value. If you enter Y, you can enter a new value from the displayed range. For information on the retransmission timer and its effect on timeouts, see "Retransmission Timer," which follows.
Do you want to enable Banyan's software compression on this line (y/n)? - Enter Y to enable compression on the server, N to disable it. Do not enable server software compression if the attached modem also offers compression. Doing so reduces throughput. Software compression works only if it is enabled at both ends of the connection; if you choose software compression here, you must also choose software compression at the other server (Asynchronous Server-to-Server option) or when you configure SETDIAL.DB or write the connection script for the user (PC Dial-in option). For more information on compression, see "Data Compression," which follows.
Is there an auto-dial modem on this line (y/n)? - Enter Y or N.
Do you wish to supply your own listen script file (y/n)? - Enter Y if you want to provide you own script file to listen for incoming connections. Otherwise, enter N.
Note: Make sure that the WAN service has Read access to the script file.
File Service: - Enter the name of the VINES file service where the script file is located.
Script File: - Enter the complete pathname of the script file, beginning with a directory separator (a slash or backslash). The pathname must start from the root of the file service or from the root of the server drive if you are using the UNIX file system. See "Supplying Your Own Script File" earlier in this chapter for details.
Should a connection be signaled by a transition of CD and CTS (y/n)? - Enter Y or N. CD stands for Carrier Detect. CTS stands for Clear to Send. Most manual-dial modems make a transition from low to high of the CD and CTS signals when they connect to another modem. If the modem does not use this method of signalling, the ICA software assumes that a transition from low to high of the CD and CTS signals indicates that a connection exists. Consult your modem's documentation for information on signalling.
Is the modem a Telebit T2500 (y/n)? - Enter Y or N.
Do you wish to use the PEP protocol (y/n)? - Enter Y to enable PEP or N if you prefer to use the default V.32 protocol. If the remote modem is a Telebit modem that also supports PEP (Packetized Ensemble Protocol), enter Y. If the remote modem is a Telebit modem but not a T2500, use PEP to get the best performance. Answering Y sets a flag in the configuration service, which the server-side modem script must test for. ASY_LSTN.SCT, one of the default server-side modem scripts that is supplied with your networking software, tests this variable. If you use your own server-side modem script, make sure the script tests for this variable if you plan to use PEP.
Do you wish to allow the line to be used for dialin, too, if possible (y/n)? - This prompt appears only if you have the PC Dial-in option. Enter Y to allow it, N to disallow it. Entering Y means the line can be used by both the Asynchronous Server-to-Server and the PC Dial-in options. The modem must support line speeds appropriate to both dial-in users and server-to-server connections. Entering N means the line will be used by only the Asynchronous Server-to-Server option.
Do you want this line to be in the hunt group (y/n) - The hunt group is a group of lines of a particular protocol used when dialing out. If the assigned line is busy, the service tries each line in the group until it finds a line available for dialing out. Enter Y to assign this line to the hunt group. Otherwise, enter N. For more information on hunt groups, see "Hunt Groups" later in this chapter.
Do you want this line to accept assigned connections (y/n)? - Enter Y if you want to be able to assign connections to this line using the Manage Remote Sites menu. Enter N if you want to reserve this line for the hunt group only.
Note: To reserve the line for incoming calls only, enter N when asked if the line is to be part of the hunt group and N when asked if you want the line to accept assigned connections.
The line is assigned as ASYNC or SS/ASYNC, and you return to the Manage Serial Lines menu.
This line is now available to receive calls from a workstation user or from another server. To place a call to another server, see "Managing Remote Site Connections" in Chapter 7.
The server uses a default retransmission timer, which you can adjust for special circumstances. The retransmission timer sets the length of time that the dial-in server will wait for a packet acknowledgment from the workstation before resending (retransmitting) a packet.
If you keep the retransmission timer set to the default, the Banyan networking software will calculate the timer according to the modem's carrier speed.
If you change the retransmission timer to a value other than the default, the Banyan networking software uses the value you specify, regardless of connection speeds.
If the connection to the server is not direct, but routes through an intermediate packet switch, this can slow down the return of the workstation's acknowledgment. You should increase the server's retransmission timer by approximately two seconds to account for the extra delay.
Note: Do not increase the retransmission timer if the workstation has a direct telephone line connection to the dial-in server. You should not decrease this timer for any reason.
The effects that changing this timer can have on performance are:

If the retransmission timer is too short, you may not leave enough time for the workstation's packet acknowledgments to reach the server. If so, the server will resend packets that it otherwise would not resend. This causes more traffic on the line and more work for workstation and server, as both sides must now process the resent packets and extra acknowledgments. 
If the retransmission timer is too long, the workstation, the server, the modems, and the line may be sitting idle when they could be working. In addition, when the workstation fails to receive a packet correctly, the server takes a longer time to resend the packet.
In either case, timing problems become more noticeable when the transmission quality of the line is poor.
Note: If you share the line between the PC Dial-in option and the Asynchronous Server-to-Server option, the retransmission timer setting you specify when you assign the line to the PC Dial-in option will also be used for an Asynchronous Server-to-Server connection.
Data compression, often referred to simply as compression, is the process of squeezing data into smaller units. You are probably familiar with data compression utilities that help you save space on hard disks. Compression can also be used when transmitting data. Reducing the amount of data that travels over the line increases line performance, which can reduce transmission times. When transmission times are shorter, the likelihood of an error also decreases.
The Banyan networking software offers compression at the server, referred to as software compression. Many modems, however, also offer their own built-in compression. Since the compression that the modem offers is specifically designed for that modem, it is likely to be more efficient. Using the compression at the modem instead of on the server reduces the overhead at the server.
Software compression works only if it is enabled at both ends of the connection. For Asynchronous Server-to-Server connections, this means that both servers must enable software compression.
For PC Dial-in connections, the modem scripting variable compress_flg overrides the SETDIAL compression setting for the workstation. In other words, if the value of the SETDIAL Data Compression field is ON (use Banyan software compression), but the value of the modem scripting variable compress_flg is set to 0 (do not use Banyan software compression), Banyan software compression will be turned off at the workstation, which means Banyan software compression will not take place.
If you disable software compression at the server when you assign a line to the PC Dial-in option, software compression will not be available for any PC Dial-in users. PC Dial-in users dialing in on modems without hardware compression will not be able to use any compression. However, if you enable software compression at the server, you make it available for those users who do not have hardware compression.
The important thing is not to compress twice. In other words, do not choose both server software and modem hardware compression. Choosing compression twice actually reduces throughput.
The hunt group is a group of lines of the same protocol type used when dialing out. If the assigned line is busy, the service tries each line in the group until it finds a line available for dialing out.
To use a hunt group, configure a remote site without specifying a specific line for the site. For information on configuring remote sites, see "Managing Remote Site Connections" in Chapter 7.
Assigning X.25 Server-to-Server Lines
Choose X.25 Server-to-Server from the Manage Serial Lines menu to establish a connection between two servers, a server and host, or a server and workstation over serial lines using X.25 protocols. You must have the X.25 Server-to-Server option installed on the server on which you configure lines. The X.25 option can be configured for both server-to-server and server-to-host communications over leased or switched lines and PDNs.
For servers with the X.29 option, X.29 asynchronous terminal emulation sessions to a host use X.25 virtual circuits. Workstations can also dial in over PDNs or ISDN networks using virtual circuits. Note that if the X.25 line does not use a PDN and you want the line to support X.29 asynchronous terminal emulation or workstation sessions, you must assign the line as if it were a line to a PDN.
For details on X.29 communications, see the Banyan Asynchronous Terminal Emulation Guide and the VINES X.25 Guide.
For information on the X.29 PC Dial-in option, see the VINES X.29 Dial-in Guide.
For more information on configuring the X.25 option, see the VINES X.25 Guide.
Choose 3270/SNA from the Manage Serial Lines menu to establish a serial connection between a Banyan network and a host computer system that supports 3270/SNA communications. You must have the 3270/SNA option installed on the server.
1. At the Operator Menu, choose Manage Communications. The Manage Communications menu appears.
2. Choose Serial Communications. The Serial Communications menu appears.
3. Choose Manage Serial Lines. The Manage Serial Lines menu appears.
4. Choose 3270/SNA.
When prompted, enter the following information:
Slot Number - Specify the number of the slot containing the card connected to the line that you want to assign.
Enter Line Number (1-6) - Enter the number of the line connected to the card.
When you are returned to the Manage Serial Lines menu, the line is assigned as 3270/SNA. It is now reserved for a VINES 3270/SNA service. For details on using this service, see the VINES 3270/SNA Option Guide.
Assigning Asynchronous Terminal Emulation Lines
Choose Asynchronous Terminal Emulation from the Manage Serial Lines menu to establish a serial connection to use the Banyan Asynchronous Terminal Emulation Service. It allows you to emulate asynchronous terminals connected to mainframe hosts from workstations on a Banyan network. You must have the Asynchronous Terminal Emulation option installed on the server.
To Assign Asynchronous Terminal Emulation Lines
1. If there is a modem attached to the line, make sure the modem is powered on.
2. At the Operator Menu, choose Manage Communications. The Manage Communications menu appears.
3. Choose Serial Communications. The Serial Communications menu appears.
4. Choose Manage Serial Lines. The Manage Serial Lines menu appears.
5. Choose Async Terminal Emulation.
When prompted, enter the following information:
Slot Number - Specify the number of the slot containing the card connected to the line that you want to assign.
Enter Line Number (1-6) - Enter the number of the line connected to the card.
The Assign Asynchronous Terminal Line menu appears.
Prompts for Assigning the Line
When prompted, choose or enter the following information on the Assign Asynchronous Terminal Line menu. Not all prompts appear; some depend on how you answered previous prompts. For example, the prompt regarding the PEP protocol does not appear unless you entered Y when asked if the modem is a Telebit modem.
Line speeds include... Enter your choice... - Choose the DTE speed of the communications equipment connected to this line. For auto-dial modems, choose the highest DTE speed the modem supports. Note that a different selection of speeds occur if you are assigning one of the high speed lines (line 1 or 2) than if you are assigning lines 3 through 6.
Does the modem support any other line speeds (y/n)? - For manual-dial modems, enter N because such modems support only one speed. For auto-dial modems, enter Y to specify another speed. You can specify a maximum of 5 speeds. (Specifying multiple speeds allows the terminal emulation service to choose the speed it needs.)
Is there an auto-dialing modem on this line (y/n)? - Enter Y or N.
Is the modem a Telebit T2500 (y/n)? - Enter Y or N.
Do you wish to use the Telebit Packetized Ensemble Protocol (PEP) protocol (y/n)? Do you wish to use the PEP protocol (y/n)? - Enter Y to enable PEP or N if you prefer to use the default V.32 protocol. If the remote modem is a Telebit modem that also supports PEP (Packetized Ensemble Protocol), enter Y. If the remote modem is a Telebit modem but not a T2500, use PEP to get the best performance. Answering Y sets a flag in the configuration service, which the server-side modem script must then test for. ASY_LSTN.SCT, one of the default server-side modem scripts that is supplied with your networking software, tests this variable. If you use your own server-side modem script, make sure the script tests for this variable if you plan to use PEP.
When the line is assigned as ASYNC/TE, you are returned to the Manage Serial Lines menu. The line is now available to the VINES Asynchronous Terminal Emulation service. For more information, see the Banyan Asynchronous Terminal Emulation Guide.
Choose UNIX TTY Device from the Manage Serial Lines menu to assign a line for UNIX input and output. This function connects an asynchronous terminal or a printer to the server.
1. At the Operator Menu, choose Manage Communications. The Manage Communications menu appears.
2. Choose Serial Communications. The Serial Communications menu appears.
3. Choose Manage Serial Lines. The Manage Serial Lines menu appears.
4. Choose Async UNIX/TTY Device.
When prompted, enter the following information:
Slot Number - Specify the number of the slot containing the card connected to the line that you want to assign.
Enter Line Number (1-6) - Enter the number of the line connected to the card.
The line is now assigned for UNIX/TTY.
Choose VG-CIM from the Manage Serial Lines menu to assign a line for a National Computer Systems VG-CPTM serial card. This card is supported on all Banyan ISA and EISA server platforms, but it is not supported on Banyan clients. For more information on assigning lines for these cards, see National Computer Systems VG-CP documentation.
If you receive an error after assigning a line, check the WAN service log for information about the error. Some common errors (for example, wrong script filename) appear in the service log.
When assigning a different script filename, verify the following:

The WAN service has write access to the script file. 
The filename is correct.
For other problems with script files, see the Modem Scripting Guide which gives complete instructions on writing, debugging, and troubleshooting script files.
If you have problems getting hunt groups to work, check the following:

Did you assign lines to the hunt group? (For remote site connections, see "To Add a Remote Site Name for Synchronous, Asynchronous, and ISDN Connections" in Chapter 7.) 
Did you answer N to the prompt that asks you if you want to assign a specific slot and line number for the connection? 
Are the lines in the correct protocol? (Remember that a hunt group cannot contain lines from different protocols; a hunt group is created for each protocol type.)