![]()
![]()
Chapter 4 - Configuring the Banyan Client for Windows 95
The Banyan Client is tightly integrated with Microsoft's Windows 95 Setup engine. With Windows 95, you install and configure client software, including the Banyan Client, through the Network applet in the Windows 95 Control Panel. When you double-click the Network icon, the Network Configuration dialog box appears. This dialog box shows all the clients and protocols installed on your workstation, as well as all installed network adapters.
The Banyan Client for Windows 95 consists of a client portion and a protocol portion. This chapter describes how to configure both the client and the protocol portions of the Banyan Client.
This chapter is covers:
The following sections cover setting up common login, managing usernames and passwords when you use common login, and changing the timeout for the Login Status dialog box.
Common Login lets a user log in to all clients on a Windows 95 workstation from a central login screen. Common Login for the Banyan Client is automatically enabled during installation. If Common Login is not enabled, the user must run the Banyan login program to access the Banyan network.
If you use Common Login, it is very important that you keep your Banyan password and your Windows password synchronized. If the two passwords are different, you will not be able to log in.
The Banyan logout application is disabled when you log in with Common Login enabled. A message box appears, instructing you to log out by shutting down Windows 95. This prevents you from being logged back in unexpectedly with certain applications that make system login attempts, such as IP Configuration (WINIPCFG.EXE). If you have logged in through Common Login, then a second user cannot log you out and log on without shutting down Windows 95.
To Enable Common Login
1. Right-click on the Network Neighborhood icon on your Windows 95 desktop. A context menu appears.
2. Select Properties. The Network property sheet appears.
3. Select Banyan VINES Client for Windows 95.
4. Click Properties. The Banyan VINES Client for Windows 95 property sheets appear.
5. Click on the General tab.

6. Select the Use Common Login checkbox to enable Common Login.
The following sections detail some restrictions to usernames and passwords if you use Common Login.
Length of Usernames
If you activate common login, the length of the username you can enter is limited by the length of the maximum username on the network with the shortest maximum.
Example
Suppose you had the following networks:
| Network | Maximum Length of Username |
| Banyan | 63 characters |
| A | 25 characters |
| B | 45 characters |
In the above scenario, the maximum-length username that would allow you to log in to all networks is 25 characters. In this case, if your StreetTalk name is more than 25 characters, you must have a nickname and enter that nickname (without appending a group and organization) during login.
Passwords Synchronization for Common Login
If the Microsoft client is the primary login provider and the Banyan password is different than the Windows password, you are unable to login to the Banyan network.
To avoid this situation, do one of the following:
|
|
Do not use the Microsoft client. |
|
|
Select the Banyan Client as the primary logon provider. |
|
|
Make sure that the Banyan, Microsoft network, and Windows passwords are identical. Do not change one without changing the others. |
For Windows 95 workstations, include the postlogin command with the /win95 switch in a user's profile to execute batch or executable files when a user logs in from a Windows 95 workstation.
For more information on the postlogin command, see the Command Reference.
As of Banyan Enterprise Client for Windows 95 Release 7.32(0), the AUTOLOGN.EXE file is no longer available on the Z: drive. Without the AUTOLOGN.EXE file, users are prevented from enabling automatic login on their workstations. This removes the risk of an unauthorized user gaining network access by starting a workstation where automatic login is enabled.
When you enable automatic login for your workstation, you are automatically logged in to the workstation upon startup and are not prompted for your username and password. To use automatic login, the workstation must have Common Login enabled and the Banyan Client must be the primary login provider.
To Enable Automatic Login
1. Run AUTOLOGN.EXE from a workstation. You can either copy AUTOLOGN.EXE to the workstation and run it locally or run it from the network.
2. Select the Use Automatic Login checkbox.
3. Enter the user's StreetTalk name in the Username field.
4. Enter the user's password in the Password field.
5. Click OK.
Setting a Timeout for the Login Status Box
The Login Status dialog box appears after you log in. By default, the dialog box automatically disappears from the screen after 6 seconds. You can change the time interval or disable the Login Status Timeout. If this box is not checked, you must press ENTER or click Close to close this dialog box.
To Change the Timeout for the Login Status Dialog Box
1. Right-click on the Network Neighborhood icon on your Windows 95 desktop. A context menu appears.
2. Select Properties. The Network property sheet appears.
3. Select Banyan VINES Client for Windows 95.
4. Click Properties. The Banyan VINES Client for Windows 95 property sheets appear.
5. Click the General tab.
6. Select the Use Timeout checkbox to turn the Timeout option on.
7. Change the number of seconds for the Timeout.
The Login Group Lists let you specify up to three StreetTalk groups that the login program appends to your username if you do not enter a complete StreetTalk username.
For example, if your StreetTalk name is Mary Smith@Sales@WCTUS and you enter Sales@WCTUS in your Login Group Search List, you only need to enter Mary Smith when you log in to the network. If your StreetTalk nickname is MaryS, you need only enter MaryS.
To Enter Login Group Lists
1. Right-click on the Network Neighborhood icon on your Windows 95 desktop. A context menu appears.
2. Select Properties. The Network property sheet appears.
3. Select Banyan VINES Client for Windows 95.
4. Click Properties. The Banyan VINES Client for Windows 95 property sheets appear.
5. Click the Login Group tab.

6. Enter up to three Login Groups. Enter the groups in this format: group@organization.
System policies can be implemented with Banyan Enterprise Client for Windows 95 Release 7.32(0) and greater. System policies let you increase control over the computers across your Banyan network. You can restrict what users can access from the desktop, customize parts of the desktop, and configure network settings. For example, you could prevent all users from accessing Network Settings in their Control Panel. With Banyan Enterprise Client for Windows 95, policies can be saved to a network file service, or written to a StreetTalk attribute.
A policy file contains two sections, user policies and computer policies (corresponding to the registry keys HKEY_USERS and HKEY_LOCAL_MACHINE). If user- or computer- specific policy instructions are not found in the policy file, the default user or computer policy is used.
User policies let you customize users' desktops and restrict certain desktop capabilities. For example, you could set policies to specify desktop color schemes and restrict the use of Microsoft DOS-based applications. User policies can be default or user-specific. For user policies, the workstation must have user profiles enabled in the password settings of the control panel. If user profiles is not enabled, the user policies section in the policy file is ignored. To ensure that user policies are enabled, turn on user profiles in the computer policy in the Windows 95 template.
Computer policies let you prevent users from modifying the hardware and environment settings for their operating systems. They can also be used to restrict access to network features. Computer-specific policies are processed according to the computer name in the network properties.
To create a system policy for your Banyan network, you must install the System Policy Editor from the Windows 95 CD-ROM. The Windows 95 Policy Editor includes a default policy template. Since system policies are based on the contents of the Registry, they cannot be edited with a text editor. Refer to the Windows 95 Resource Kit for a more detailed description of system policies, and instructions on creating a system policy.
Administrators can store policy information in user or group attributes, on a file service, or in the attribute of another StreetTalk object, as specified by a WIN95 policy statement in the user's StreetTalk profile.
When a user logs into the Banyan network, the Banyan Enterprise Client for Windows 95 checks for a user policy attribute. If found, the pathname to the policy file is passed to Windows 95 and the policy is processed. If a user attribute is not found, the client checks for a group attribute. If no policy is found, no pathname is passed to Windows 95. If the policy file is found on a file service, the UNC path is returned to Windows 95. If the policy is found in an attribute, the Banyan Enterprise Client for Windows 95 writes the policy to a local file and returns the pathname to Windows 95.
Once Windows 95 receives the pathname, it downloads the policies and copies the information into the Registry.
Windows 95 allows you to set user policies for specific names in a policy file. Windows 95 does not accept policies for that user unless the name matches the user name entered during login. A Banyan network user often has more than one login name (nicknames, full names, etc.) Administrators must create a default user policy and write it to the user's StreetTalk attribute <18:380100>.
Windows 95 has no knowledge of StreetTalk groups. To provide a group policy, a Banyan network administrator must write the policy file containing default user and computer policies to StreetTalk group attribute <18:380100>.
Managing Users and StreetTalk describes how to write a file that contains a value to an attribute.
StreetTalk user profile statements can be used to override user and group attributes. These profile statements supply a direct UNC path, or the name of another StreetTalk object, to get the policy. If the UNC path or StreetTalk object is not available, no policy path is passed to Windows 95, and the user is logged on with the user and computer policies already on the workstation. This may introduce some degree of risk. Suppose an administrator with unrestricted policies was the last to use a particular workstation. If a user (whose policy restricts his access to certain areas) logs into that workstation and his policy information is not available, he is logged on with the administrator policy already on the workstation.
Policies stored in the username and group attributes do not pose this risk. If a user is able to log in, the StreetTalk service for the user is available, and the user and group attributes are also available.
The user profile statements are as follows:
!WIN95POLICY \\StreetTalk\File Service@Eng@Acme\policies\acme_eng.pol
!WIN95POLICY "Standard Policy@Admin@Acme"
The last !WIN95POLICY statement processed will be the effective policy. If the policy statement specifies a UNC path, that path is returned to Windows 95. For a StreetTalk object policy statement, the StreetTalk attribute's contents are written to a local path, and the pathname is returned to Windows 95.
Configuring VINES Files Options
The following sections cover mapping VINES Files to an alternate drive, setting the hop count, and setting VCONFIG.DAT.
Usually, Banyan maps VINES Files to drive Z. However, other installed networks may already use drive Z. Using the Drive Mapping option, you can specify an alternate drive letter to map to VINES Files.
To Map VINES Files to an Alternate Drive
1. Right-click on the Network Neighborhood icon on your Windows 95 desktop. A context menu appears.
2. Select Properties. The Network property sheet appears.
3. Select Banyan VINES Client for Windows 95.
4. Click Properties. The Banyan VINES Client for Windows 95 property sheets appear.
5. Click the Drive Mapping tab.

6. In the VINES File drive field, enter the letter of the drive you want to map to VINES Files.
Note: If you have VINES Files mapped to a drive other than Z, the M* applications (MUSER, MSERVICE, and so on) report that they cannot find XSTD.MSG when you press F2. You can encounter similar problems with other Z drive applications that look for VINES Files as drive Z.
You can alter the number of hops that the client uses when searching for a Z drive server. When you start your workstation, it sends out a broadcast to find a server with a compatible version of VINES Files. By default, workstations broadcast to all servers that are 0 or 1 hop away. A hop is a step in the transmission of data from one node through an intermediate node. Each server on a network counts as a hop. You may need to increase the hop count if your workstation cannot find a compatible server within 1 hop.
To Change the Hop Count
1. Right-click on the Network Neighborhood icon on your Windows 95 desktop. A context menu appears.
2. Select Properties. The Network property sheet appears.
3. Select Banyan VINES Client for Windows 95.
4. Click Properties. The Banyan VINES Client for Windows 95 property sheets appear.
5. Click the Drive Mapping tab.
6. Enter the minimum number of hops in the Low field.
7. Enter the maximum number of hops in the High field.
To connect a workstation to a specific VINES Files service, enter a text string that matches the contents of the VCONFIG.DAT on a network server. When the workstation boots, it searches the network for a server with a VCONFIG.DAT that matches the text string you entered. The text string is stored in the Windows 95 Registry.
To Set VCONFIG.DAT
1. Right-click on the Network Neighborhood icon on your Windows 95 desktop. A context menu appears.
2. Select Properties. The Network property sheet appears.
3. Select Banyan VINES Client for Windows 95.
4. Click Properties. The Banyan VINES Client for Windows 95 property sheets appear.
5. Click the Advanced tab.
6. Enter a text string in the VCONFIG.DAT field.
Supporting 16-bit Banyan Applications
You can enable the loading of a Terminate and Stay Resident (TSR) program that provides support for 16-bit Banyan applications. The BANSVC.COM TSR is added to your AUTOEXEC.BAT. This TSR is automatically enabled when you install the Banyan Windows 95 client.
You may need to change the BANV interrupt. The BANV interrupt enables support of 16-bit Banyan applications. The default value is 63. If you have another application that must use interrupt 63, you will need to reset the BANV interrupt.
1. Right-click on the Network Neighborhood icon on your Windows 95 desktop. A context menu appears.
2. Select Properties. The Network property sheet appears.
3. Select Banyan VINES Client for Windows 95.
4. Click Properties. The Banyan VINES Client for Windows 95 property sheets appear.
5. Click the Advanced tab.

6. Select the Load BANSVC.COM checkbox to load or unload the TSR.
1. From the Banyan VINES Client for Windows 95 property sheet, click the Advanced tab.
2. Use the arrows to select a value between 60 and 66 in the BANV Interrupt list box.
Selecting the Network Protocol
Before you can configure the protocol piece of the Banyan Client for Windows 95, you must select either VIP (VINES Internet Protocol) or IP (Internet Protocol) as the protocol that your client uses to communicate with the network. After you have selected the network protocol, you can configure other communications options for the client.
Note: The IP for Windows 95 option is not available unless you have the Microsoft TCP/IP software installed on the workstation.
To Select the Network Protocol
1. Right-click on the Network Neighborhood icon on your Windows 95 desktop. A context menu appears.
2. Select Properties. The Network property sheet appears.
3. Select Banyan VINES Protocol for Windows 95.
4. Click Properties. The Banyan VINES Protocol for Windows 95 property sheet.
5. Click the General tab.

6. Select either:
- VIP for Windows 95. If you enable VIP, you must select a LAN card. See "Configuring the Network Adapter" below for instructions on selecting a LAN card.
- IP for Windows 95. If you enable IP, you may want to specify preferred IP routing servers. See "Specifying Preferred IP Routing Servers" later in this chapter for instructions.
Configuring the Network Adapter
If you use VIP as the default network protocol, you must specify a network adapter for your workstation. You can select any network adapter installed and configured for Windows 95.
1. Right-click on the Network Neighborhood icon on your Windows 95 desktop. A context menu appears.
2. Select Properties. The Network property sheet appears.
3. Select Banyan VINES Protocol for Windows 95.
4. Click Properties. The Banyan VINES Protocol for Windows 95 property sheet.
5. Click the Network Adapter tab.

6. Select a network adapter from the drop-down list.
Specifying Preferred IP Routing Servers
An IP routing server is a Banyan server that is equipped to resolve IP addresses and route IP traffic across the network. For the client to use IP as its network protocol, the client must connect to an IP routing server on the network.
A preferred IP routing server is a specific IP routing server, identified by IP address, to which the client directly sends a connection request. If you do not provide the address of a preferred IP routing server, the client attempts to find one by broadcasting a request to the network. Since IP broadcasts are limited to the client's LAN segment, the client may be unable to find a routing server by broadcast.
To ensure that the client can find an IP routing service, you should specify the IP addresses of up to three preferred IP routing servers. The client sends connection requests to each server IP address in turn. If it is unsuccessful connecting to any of the preferred routing servers, the client broadcasts a connection request.
If you use IP for the default network protocol and connect to the network via a dial-up connection, you must specify at least one preferred IP routing server. If you connect to the network via a LAN, a preferred IP routing server is optional.
The client can use different routing servers when it connects direct to a LAN or when it connects to a LAN via a modem (dial-up connection). To enhance dial-up performance, only list preferred IP routing servers that are close to the LAN containing the dial-up server.
To Specify Preferred IP Routing Servers
1. Right-click on the Network Neighborhood icon on your Windows 95 desktop. A context menu appears.
2. Select Properties. The Network property sheet appears.
3. Select Banyan VINES Protocol for Windows 95.
4. Click Properties. The Banyan VINES Protocol for Windows 95 property sheet.
5. Click the Server IP Address tab.
Note: This tab is only available if you have enabled IP for Windows 95.

6. In the LAN IP section, the Dial-Up Addresses section, or both sections, enter one of the following:
- The IP addresses of IP routing servers on a remote segment.
- The IP addresses of remote segments on which one or more IP routing servers exist.
Note: To enhance dial-up performance, only list servers that are close to the LAN that contains the dial-up server.
7. Specify whether the client should use LAN IP addresses, Dial-up IP address, or both by selecting the appropriate radio button.
Configuring Communications Settings
You may need to change the following communications settings:
Communications Heap Size - The communications heap size (amount of buffers) must be large enough to handle the number of open SPP connections and open sockets you want to assign. In addition, it must be able to handle the data transmitted by those connections and sockets. Otherwise, the workstation may not have enough communication buffer space when these limits are reached.
Maximum Sockets - Whenever a program communicates with another program, at least one socket is open. Each socket requires 70 to 80 bytes of communications buffer space.
Maximum SPP Connections - Generally, there is one SPP connection for each network file service set at the workstation, and for each active VINES application. Each SPP connection requires 80 to 100 bytes of communications buffer space to maintain the connection.
To Set the Communications Heap Size
1 Right-click on the Network Neighborhood icon on your Windows 95 desktop. A context menu appears.
2 Select Properties. The Network property sheet appears.
3. Select Banyan VINES Protocol for Windows 95.
4. Click Properties. The Banyan VINES Protocol for Windows 95 property sheet.
5. Click the Configuration tab.
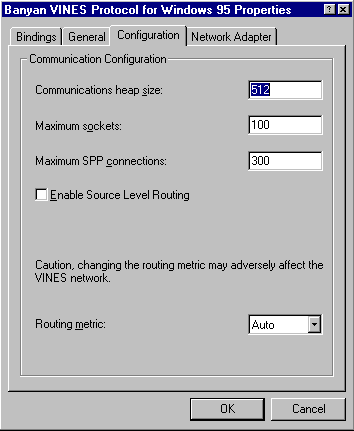
6. In the Communications Heap Size field, enter a value between 16 to 4096. The default setting is 64 KB.
7. In the Maximum Sockets field, enter a value between 10 and 500. The default setting is 100.
8. In the Maximum SPP Connections field, enter a value between 50 and 1000. The default setting is 300.
Enable SLR if both of the following conditions apply:
|
|
Your workstation sends and receives data through IBM Token-Ring bridges. |
|
|
The Token-Ring LAN to which your workstation is connected has no servers with SLR enabled. |
To Enable SLR
1. Right-click on the Network Neighborhood icon on your Windows 95 desktop. A context menu appears.
2. Select Properties. The Network property sheet appears.
3. Select Banyan VINES Protocol for Windows 95.
4. Click Properties. The Banyan VINES Protocol for Windows 95 property sheet.
5. Click the Configuration tab.
6. Select the Enable Source Level Routing checkbox.
To avoid timeouts in packet transmission, you may need to reset the routing metric. A routing metric is an approximation of the amount of time required by the network to move a packet from a workstation to a routing server.
Caution: You should change the routing metric only when instructed by your technical representative. Setting incorrect parameters can cause network communications to fail or adversely affect workstation performance.
To Change the Routing Metric
1 Right-click on the Network Neighborhood icon on your Windows 95 desktop. A context menu appears.
2 Select Properties. The Network property sheet appears.
3. Select Banyan VINES Protocol for Windows 95.
4. Click Properties. The Banyan VINES Protocol for Windows 95 property sheet.
5. Do one of the following:
- If VIP is the default protocol, click the Configuration tab.
- If IP is the default protocol, click the Server IP Address tab.
6. Click on the arrow in the Routing Metric field and select a setting.
![]()
![]()
![]()