Chapter 3 - Installing the Banyan Client for Windows 95
This chapter describes how to install and upgrade the Banyan Enterprise Client for Windows 95. Installation instructions vary depending on the type of media from which you are installing the client. In addition to installing the client on workstations, you must also configure network servers to support the Windows 95 clients.
This chapter covers:
The following list summarizes what you must do to install and support the Banyan Client for Windows 95:
|
|
Install the Win32 client files on servers that will provide VINES Files services to Windows 95 clients. See Chapter 5 for information on installing these files. |
|
|
Patch any 5.50 and earlier servers with the most recent kernel patch. See Chapter 5 for instructions. |
|
|
If you are using IP as the communication protocol for your Windows 95 clients, configure VINES server to support IP routing. See Chapter 6 for information on configuring servers to support IP clients. |
|
|
Install the Banyan Client software. Installation instructions vary depending on the type of installation media: |
- If you are installing the Banyan Client for Windows 95 from CD-ROM, a local disk, or from the network, see "To Install the Banyan Client" later in this chapter.
- If you are installing a combined Windows 95 and Banyan Client package from the network (this must be set up in advance), see "Installing the Banyan Client and Windows 95 from the Network" later in this chapter for instructions on setting up and executing a combined network installation.
- If you are upgrading the Banyan Client by running NEWREV, see "Upgrading the Banyan Client with NEWREV" later in this chapter. In order to run the NEWREV utility, you must have a prior version of the Banyan Client for Windows 95 installed on your workstation.
- If you are upgrading the Banyan Client from CD-ROM, a local disk, or from the network, see "Upgrading the Banyan Client from CD-ROM, a Local Disk, or from the Network" later in this chapter.
Your workstation should be configured with:
|
|
8 MB RAM minimum, 16 MB RAM recommended |
|
|
5 MB free space on the workstation's fixed disk |
|
|
A LAN adapter card supported by Windows 95 |
|
|
A CD-ROM drive (if installing the client from CD-ROM) |
|
|
Your network should include a Banyan server with the 7.32(0) or greater WIN32 client files installed. |
|
|
Install Windows 95 on your workstation (unless you are doing a combined Windows 95 and Banyan Client installation). You should keep the Windows 95 CD-ROM on hand during the installation of the Banyan Client. |
|
|
Check that a network adapter card is installed and detected by Windows 95. |
|
|
If you are installing the Banyan Client from the network, map a drive letter to the file service containing the client software. |
Checking Your Workstation's LAN Card Settings
After you have booted the workstation and the Windows 95 desktop appears, check your LAN card settings.
To Check Your LAN Card Settings
1. Right-click the My Computer icon and select Properties. The System Properties dialog box appears.
2. Click the Device Manager tab. A property sheet showing all of your workstation's hardware appears.

3. Double-click the Network adapters icon. The icon expands to show what network adapters are installed on your workstation.
4. Check for the following problems:
- If no LAN adapter is listed, add the Microsoft Network Client so that the system properly detects the workstation's adapter card. You must have a detected adapter card to successfully install the Banyan Client software. If your network does not require the Microsoft Client, you can delete it after you install the Banyan Client software.
- If two duplicate LAN adapters are shown, remove the one with the red mark by selecting it and clicking Remove.
5. Select the remaining LAN adapter and click Properties. The property sheet for that adapter appears.
6. Click the Resources tab and check the resource settings for your LAN card. If the resource settings are incorrect, change them to the correct settings.
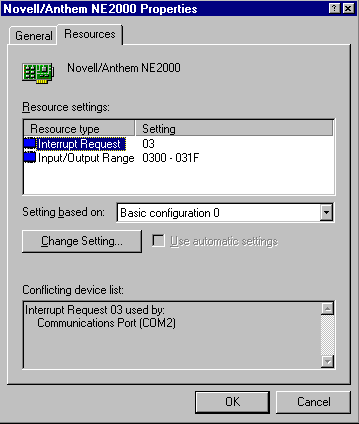
7. Click OK. The System Properties dialog box appears.
8. Click OK.
9. Reboot your workstation.
NDIS 2.x Real Mode (16 Bit) Drivers
If your workstation uses a LAN adapter that only uses NDIS 2.x drivers, you must add the following line to your AUTOEXEC.BAT file:
net start
If you do not add this line, you are unable to log in because the system is unable to bind to the card. If you check the LAN adapter's properties, the card shows as crossed out.
This section describes installing the Banyan Client from CD-ROM, the network, or a local disk.
1. Open the Control Panel.
2. Double-click the Network icon. The Network dialog box appears.
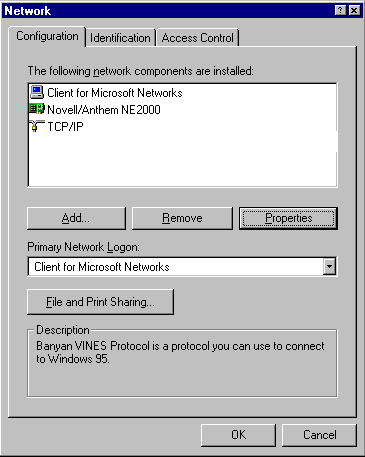
3. Click Add. The Select Network Component Type dialog box appears.
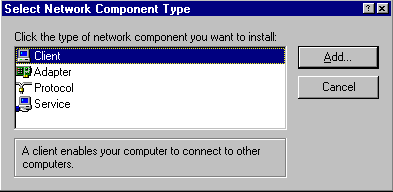
4. Select Client and click Add. The Select Network Client dialog box appears.

5. Click Have Disk. The Install From Disk dialog box appears.
6. If you are installing from the Banyan Client Components CD-ROM:
- Insert the CD-ROM into the CD-ROM drive.
- Enter D:\win95\<location>\client in the Path field (assuming D is your CD-ROM drive). <location> is the language-specific version of the client you want to install. Go to step 7.
If you are installing from a local drive:
- Enter C:\wintemp in the Path field (assuming that C is your local drive and you have copied the client files into a temporary directory named "wintemp"). Go to step 7.
If you are installing from the network:
- Enter the name of the network drive and path where the Banyan Client software is located.
7. Click OK. The Select Network Client dialog box appears.
8. Click OK. The Login Group List dialog box appears.

9. Enter up to three StreetTalk login groups using the group@org format.
10. Click OK. The Configuration tab on the Network property sheet appears.
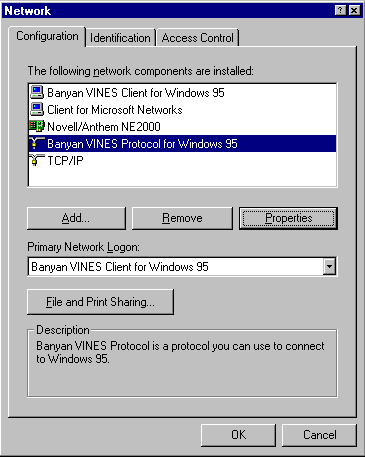
11. If more than one LAN adapter is listed on the Configuration tab, select the adapter you will use to log in to the Banyan network:
- Select the Banyan VINES Protocol for Windows 95 and click Properties.
- Click the Network Adapter tab.
- Select an adapter from the drop down list.
- Click OK. The Configuration tab appears.
12. Click OK. The system prompts for a Windows 95 disk.
13. Insert the Windows 95 CD-ROM into the CD-ROM drive.
14. Click OK. The Copying Files dialog box appears.
15. Enter D:\win95 as the pathname (assuming D is your CD-ROM drive).
16. Click OK. The system prompts you to restart your workstation.
17. Click OK. Your workstation reboots.
See Chapter 4 or Banyan's on-line help for instructions on configuring the client.
Installing the Banyan Client and Windows 95 from the Network
This section describes installing a combined Windows 95 and Banyan Client software package from the network. In order to install Windows 95 and the Banyan Client software simultaneously, you must set up both Windows 95 and the client software for a combined installation.
Preparing for a Combined Installation from the Network
Before you can install a combined Windows 95 and Banyan Client software package from the network, you must set up the files on the network.
You must complete the following tasks to enable combined installations:
1. Install and set up the Windows 95 files on the network. See "To Install Windows 95 on the Network" below for instructions.
2. Install and set up the Banyan Client files on the network. See "To Install the Banyan Client on the Network" below for instructions.
To install the combined Windows 95 and Banyan Client package on a workstation, see "Installing Windows 95 and the Banyan Client Software from the Network."
To Install Windows 95 on the Network
1. Insert the Windows 95 CD-ROM into the CD-ROM drive. The Windows 95 CD-ROM screen appears.
2. Click Start and select Run. The Run dialog box appears.
3. Enter D:\admin\nettools\netsetup\netsetup.exe (assuming D is your CD-ROM drive). The Server Based Setup dialog box appears.
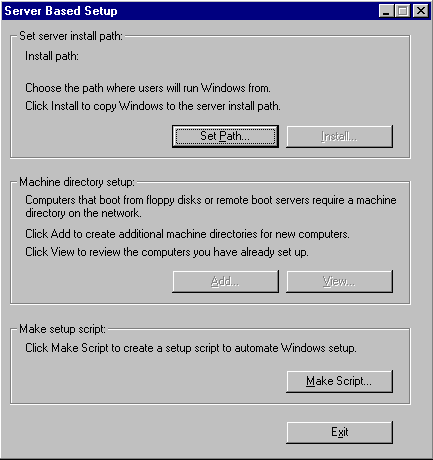
4. Click Set Path. The Server Path dialog box appears.
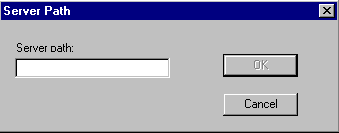
5. Enter the network drive and path where you want the Windows 95 files.
6. Click OK. The Server Based Setup dialog box appears.
7. Click Install. The Source Path dialog box appears.
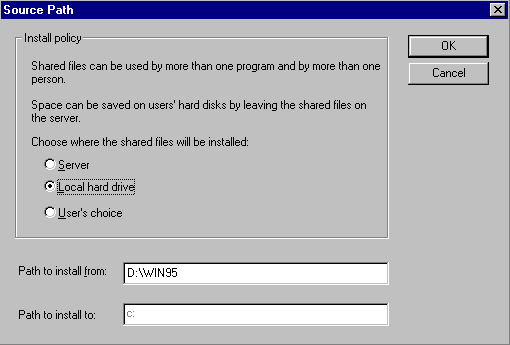
8. Select Local Hard Drive.
Note: If you select Workstation and do not run INFINST.EXE (see "To Install the Banyan Client on the Network"), users are unable to install the Banyan Client software.
9. Enter D:\win95 in the Path to Install From field (assuming drive D: is your CD-ROM drive). The Create Default dialog box appears.

10. Click Don't Create Default. The Product Identification dialog box appears.
11. Enter the product ID for your copy of Windows 95 and click OK.
The system copies the Windows 95 files to the network. When the Server Based Setup dialog box appears, click Exit. Go to "To Install the Banyan Client on the Network."
To Install the Banyan Client on the Network
1. Insert the Windows 95 CD-ROM into the CD-ROM drive. The Windows 95 CD-ROM window appears.
2. Click Start and select Run. The Run dialog box appears.
3. Enter D:\admin\nettools\netsetup\infinst.exe (assuming D is your CD-ROM drive). The INF Installer-Utility for Server based setup dialog box appears.
4. Click Set Path. The Server Path dialog box appears.
5. Enter the same network drive and path that you entered in step 5 in "To Install Windows 95 on the Network."
6. Click OK. The INF Installer-Utility for Server based setup dialog box appears.
7. Click Install INF. The Open dialog box appears.
8. Do one of the following:
- If you have the Banyan Client Components CD-ROM, insert the CD into the CD-ROM drive and type D:\win95\<location>\client\vinescli.inf in the file name field. <location> is the name of the language-specific directory for the client files.
- If you have the Banyan Client files on a local fixed disk, enter C:\<pathname>\vinescli.inf where <pathname> is the local path containing the client files. For example, if you are installing the German version of the Banyan Client and they are under the \germany directory, enter C:\germany\vinescli.inf.
9. Press ENTER. The system copies the Banyan Client files to the network.
Presetting a User's Login Group List
During the installation of the Banyan Client software, users are asked to enter up to three StreetTalk groups in the Login Groups List. The Login program appends these groups to an individual's username if they do not enter a complete StreetTalk username upon login.
You can alter the installation files on the network so that any user installing from those files will automatically have their Login Groups set to those you specify.
To Preset the Login Group List
1. Access the network drive and path where you placed the Windows 95 and Banyan Client files.
2. Use any ASCII text editor to open the MSBATCH.INF file.
3. Add the following lines to the file:
[LoginGroups]
Group1="group1@org"
Group2="group2@org"
Group3="group3@org"Groups1/2/3@org are any valid StreetTalk groups. You can enter up to three groups.
4. Save and close the file.
Installing Windows 95 and the Banyan Client Software from the Network
After you have set up the Windows 95 and Banyan Client files on the network, you can install them on any workstation in your network. This type of installation installs a combined Windows 95 and Banyan Client package - you do not have to install the Banyan Client separately.
If you already have some version of Windows installed on your workstation, follow the procedures in "To Install from Windows." If you do not have Windows on your workstation, use the procedures in "To Install from DOS."
Warning: If you have QEMM loaded on your workstation, unload it before you perform the following procedure. Having QEMM loaded during the installation can damage the contents of your workstation's fixed disk.
Note: To use IP as your client protocol, you must install Microsoft's TCP/IP protocol stack on your client. See Windows 95 on-line help for instructions on installing the Microsoft TCP/IP software.
1. Change your drive and directory to the network drive and directory containing the Windows 95 and Banyan Client files.
2. Enter setup.exe. The system installs the Windows 95 and Banyan Client software on your workstation.
When the installation completes, your workstation reboots and prompts you to log in. Log in and configure your client to use either VIP or IP (VIP is the default) as the client's network protocol. See "Selecting the Network Protocol" in Chapter 4 or Banyan's on-line help for information on configuring the protocol.
1. Select Run from the File menu. The Run dialog box appears.
2. Enter <drive>:\<path>\setup.exe in Open field. You should substitute the names of the network drive and path containing the Windows 95 and Banyan Client files for <drive> and <path>.
3. Click OK. The system installs the Windows 95 and Banyan Client software on your workstation.
When the installation is complete, your workstation reboots and prompts you to log in. Log in and configure your client to use either VIP or IP (VIP is the default) as the client's network protocol. See "Selecting the Network Protocol" in Chapter 4 or Banyan's on-line help for information on configuring the protocol.
Upgrading the Banyan Client with NEWREV
If you have a prior version of the Banyan Client for Windows 95 installed on your workstation, you can use the NEWREV utility to upgrade your Windows 95 client. NEWREV upgrades your client by copying client files from a network server. To upgrade with NEWREV, you must already have installed the Win32 client files on your servers. See Chapter 5 for instructions on providing server support for Banyan Clients for Windows 95.
1. Click Start and select Programs. The Programs Menu appears.
2. Select Banyan. The contents of the Banyan Program folder appear.
3. Click the Newrev icon. The NEWREV dialog box appears.
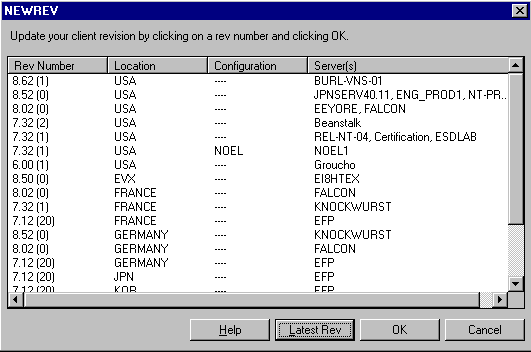
4. Select the new revision and click OK. Your workstation upgrades to the new revision.
Upgrading the Banyan Client from CD-ROM, a Local Disk, or from the Network
This section describes upgrading existing Banyan clients from the Client Component CD-ROM, from a local disk, or from the network.
Upgrading your existing Banyan client is divided into two parts:
|
|
Removing the existing client software |
|
|
Adding the new Banyan client software |
To Upgrade the Banyan Client from CD-ROM, Local Disk, or the Network
You need to remove existing Banyan Client for Windows 95 software before you upgrade the client software.
1. Open the Control Panel.
2. Double-click the Network icon. The Network property sheets appear.
3. From the list of network components installed, select the Banyan Client for Windows 95, and click Remove.
4. Click OK. The System Settings Change dialog box appears and prompts you to restart your computer.
You must click OK in the System Settings Change dialog box. The system settings will not be changed if you do not click OK, and upgrading the Banyan client will fail.
5. Select No. Do not restart your computer at this time.
You are now ready to add the new Banyan client software.
1. Open the Control Panel.
2. Double-click the Network icon. The Network property sheets appear.
If you receive the following error, ignore it and click OK to open the property sheets:
Failed to load resource DLL. (VNSDIR.DLL)
3. From the Configuration property sheet, click Add. The Select Network Component Type dialog box appears.
4. Select Client and click Add. The Select Network Client dialog box appears. The Banyan Client for Windows 95 may not appear. It is not necessary to select the client from the Network Clients pane.
5. Click Have Disk. The Install from Disk dialog box appears.
6. Specify the path to the directory containing the Banyan Client for Windows 95 software.
7. Complete the installation by entering information in the remaining dialog boxes.
Because this is a new installation, configuration information you entered previously, such as your Login Groups, is not preserved and must be re-entered.
8. Click OK when you are done and restart the workstation for the new client configuration to take effect.