![]()
![]()
Chapter 14 - Interprocess Communications for OS/2 Workstations
Providing Named Pipe Software Support for OS/2 Workstations
To view, add, or delete the Banyan networking software that supports Named Pipe applications at a Banyan OS/2 workstation, use the VCLIENT program. Follow these steps:
1. Log in to the network.
2. At an OS/2 command prompt, enter vclient. The VINES Installation Options screen, Figure 14-1, appears.
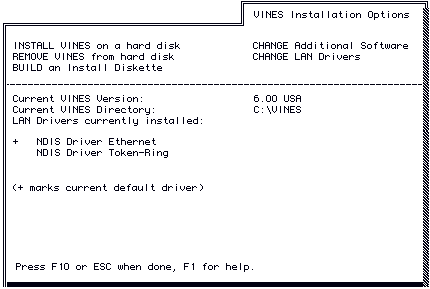
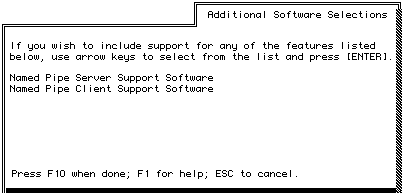
3. Select CHANGE Additional Software. The Additional Software Selections screen, Figure 14-2, appears. Software already installed at this workstation is marked with an asterisk (*).
4. Add or remove software according to directions on the screen. When you finish making your changes, press F10. The VINES Installation Options screen appears, which shows your changes.
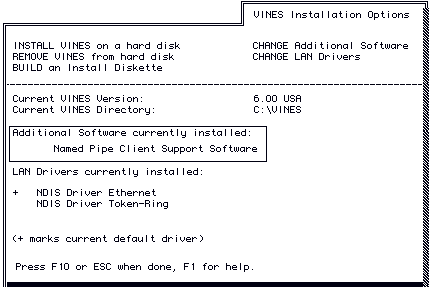
Example Selecting Named Pipe Client Support Software
If you select Named Pipe Client Support Software, the VINES Installation Options screen, Figure 14-3, reflects that change, as shown in the following screen example.
5. Press F10 to confirm the changes.
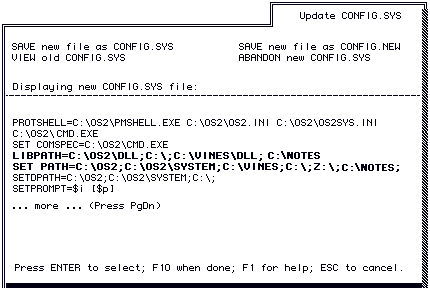
If the installation of the selected software requires changes to the CONFIG.SYS file, the Update CONFIG.SYS screen appears with the LIBPATH and SETPATH statements highlighted, as shown in Figure 14-4.
6. To enable the workstation, select SAVE new file as CONFIG.SYS. The VINES Installation Complete screen appears.
The VCLIENT program exits, returning you to the OS/2 command prompt. Reboot the workstation and start VINES for your changes to take effect.
Setting Up Named Pipe Servers and Clients
This section describes how to set up Named Pipe application servers and application clients at OS/2 workstations.
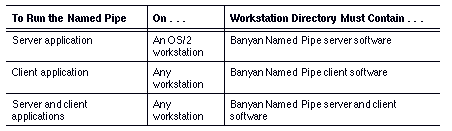
Table 14-1 describes Named Pipe software requirements for workstations.
If Named Pipe support was selected when VINES was first installed at this workstation, you can proceed to the following sections that describe how to start server and client applications. Otherwise, follow the instructions to install the necessary software first described earlier in this chapter.
Starting Up an OS/2 Named Pipe Server
There are two ways to start up Named Pipe server applications at an OS/2 workstation. You can either:

Start up a server application manually Run a command file
For both procedures, you need to run:
BAN to log in to the network using your StreetTalk name and password SETNETB, specifying the computer name of the workstation and the StreetTalk name of the Netbios registration service NPSERVER, starting the NPSERVER as a detached process and enabling the server application to receive Named Pipe requests from client applications
It is recommended that you use a command file to ensure that the same machine name is assigned to the workstation each time it boots.
To set up a workstation to run both a Named Pipe client application and a Named Pipe server application, use the manual or command file procedures for installing a Named Pipe server as described in "To Manually Start Up an OS/2 Workstation to Run a Named Pipe Server Application," and "To Create a Command File to Start Up an OS/2 Workstation," which follow.
To Manually Start Up an OS/2 Workstation to Run a Named Pipe Server Application
1. At an OS/2 workstation on which VINES is installed, change to the VINES directory and enter ban.
2. Log in to the network using your StreetTalk name and user password.
3. At the command prompt, enter the SETNETB command, specifying both the workstation's computer name, and the name of the Netbios service, as shown below:
setnetb /name:my_computer Netbios_service@group@org
4. At the command prompt, enter:
detach npserver
This workstation is now ready to run Named Pipe server applications.
To create a command file that displays the VINES login screen, runs SETNETB, and runs the DETACH NPSERVER command automatically, use the following procedure.
To Create a Command File to Start Up an OS/2 Workstation
1. Create a login command file that contains the VINES BAN, SETNETB, and detach NPSERVER commands. If you want this command file to run when the workstation boots, name it C:\STARTUP.CMD. For example:
ban
setnetb /name:my_computer Netbios_service@group@org
detach npserver2. Reboot the workstation.
If you named the file STARTUP.CMD, the file runs automatically when you reboot the workstation. Otherwise, run your command file at any time to log in to the network and run Named Pipe client applications.
For workstations running OS/2 2.x, open the Startup folder and create a program icon for your command file.
This workstation is now ready to run Named Pipe server applications.
You can create a Named Pipe trace log useful in debugging Named Pipe problems. To create the trace log, run NPCTL from the command line.
Starting Up OS/2 Named Pipe Clients
There are two ways to start up Named Pipe clients at an OS/2 workstation. You can either:
Start up a client manually. Run a command (or batch) file.
For both procedures, you need to run:
BAN to log in to the network using your StreetTalk name and password SETNETB to specify the computer name of the workstation and the StreetTalk name of the Netbios service
It is recommended that you use a command file to ensure that the same name is assigned to the workstation each time it boots. The next two sections describe these procedures.
To Manually Start Up an OS/2 Workstation to Run a Named Pipe Client Application
1. At an OS/2 workstation on which VINES and Named Pipe software is installed, change to the VINES directory and enter ban.
2. Log in to the network using your StreetTalk name and user password.
3. At the command prompt, enter the SETNETB command, specifying both the workstation's computer name and the name of the Netbios service:
setnetb /name:my_computer Netbios_service@group@org
Your workstation is now ready to run Named Pipe client applications.
To create a command file that displays the VINES login screen and runs SETNETB automatically, use the following procedure.
To Create a Command File to Start Up a Named Pipe Client Application
1. Create a login command file that contains the VINES BAN and SETNETB commands. If you want this command file to run when the workstation boots, name it STARTUP.CMD. For example:
ban
setnetb /name:my_computer Netbios_service@group@org2. Reboot the workstation.
If you named the file C:\STARTUP.CMD, the file runs automatically when you reboot the workstation. Otherwise, run your command file at any time to log in to the network and run Named Pipe client applications.
For workstations running OS/2 2.x, open the Startup folder and create a program icon for your command file.
Creating Distributed Application Command Files
This section provides sample command files that run a distributed Named Pipe database application on a Banyan network. All components of this application require the use of a Named Pipe application.
The next sections describe the role of the following network nodes:
The Banyan server containing the file service, DBfiles@MIS@WCTUS, and a Netbios service, DBnames@MIS@WCTUS The Named Pipe application servers, SVR1 and SVR2 The Named Pipe application clients, DOS_CL1, OS2_CL2, and WIN_CL3
Figure 14-5 shows how these network components are connected.
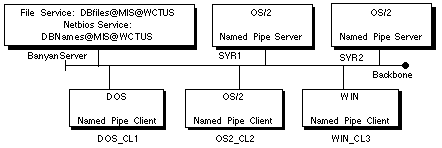
In this example, the database is stored on a Banyan server in a Banyan networking file service, DBfiles@MIS@WCTUS.
The Banyan networking file service provides a central location for data, making it easy for administrators to maintain daily backups. To access this file service, Banyan users run the SETDRIVE command, as follows:
setdrive m DBfiles@MIS@WCTUS
Where m is the drive letter associated with this file service.
A Banyan Netbios service, DBnames@MIS@WCTUS, is maintained on the same server. To register a computer name with this service, a command file at each workstation runs a command similar to the one that follows:
setnetb /name:anyname DBnames@MIS@WCTUS
Where anyname is the Named Pipe computer name for this workstation.
Role of the Named Pipe Application Server
Two components of the database application server software, which control user access to the database, are distributed over two Banyan OS/2 workstations running as Named Pipe servers:
Table 14-2 describes two components of the database application server software.

For database applications, the application software that runs on the application servers is referred to as database engine software.
Roles of Named Pipe Application Clients
The Named Pipe application clients are defined with the names listed in Table 14-3.

The database client application gives users access to the data controlled by the database application servers, SVR1 and SVR2.
For database applications, the application software that runs on the client workstations is referred to as database front-end software.
The following examples provide sample command files that load Banyan Named Pipe software and application software for each workstation shown in Figure 14-5.
This example uses a common implementation of distributed applications as its model. The program names used in the command files below are only an example. However, the sequence for loading Banyan networking software and application software applies to all distributed Named Pipe applications.
Each command file runs BAN and then runs SETNETB to register a computer name with a common Netbios service.
For workstations running OS/2 2.x, open the Startup folder and create a program icon for your command file.
Note: When installing Name Piped applications, you may be asked to specify the type of installation. Always specify Banyan software. If this selection is not available, call the application vendor for further instructions.
Command File for Named Pipe Application Servers
Using this command file, a typical OS/2 application server loads the required Banyan networking software and runs the application server process, making server functions available to network users.
A STARTUP.CMD or other command file for SVR1 might look like this:
c:
cd vines
ban
setnetb /name:SVR1 NBNames@MIS@WCTUS
detach npservecd myapp
myapp -data M:myappdatamaster.dat - query
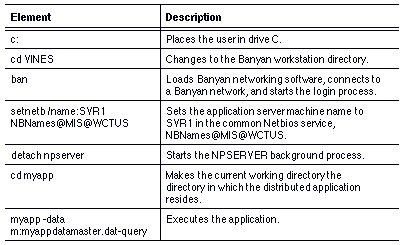
The elements of this command file are listed in Table 14-4.
A similar command file can be used for SVR2, except that this command file executes a different portion of the application server software:
c:cd vines
ban
setnetb /name:SVR2 NBNames@MIS@WCTUS
detach npserver
cd myapp
myapp -data m:myappdatamaster.dat -control
Restarting Distributed Applications Using a Command File
You can create a login command file (C:\STARTUP.CMD) for workstations running as application servers. The command file automatically restarts the distributed application in the case of a power interruption. To do this, add a line to the command file that redirects the input containing the user ID created for the application server. If you added this feature to the command file for SVR2 it would look like this:
c:cd vines
ban < login1.txt
setnetb /name:SVR2 NBNames@MIS@WCTUS
detach npserver
cd myapp
ppdatamaster.dat -control
Note that "login.txt" includes the StreetTalk name and password of the database engine.
Command File for the DOS_CL1 Application Client
A typical DOS application client might be used to perform simple interactive operations. An AUTOEXEC.BAT file or other command file for DOS_CL1 would look like this:
c:cd vines
ban
setnetb /name:DOS_CL1 NBNames@MIS@WCTUS
j:
cd myapp
myapp
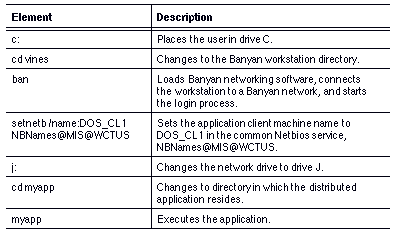
The elements of this command file are listed in Table 14-5.
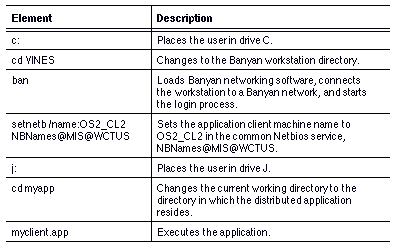
Command File for the OS2_CL2 Application Client
A typical OS/2 application client might be used to perform server system administration functions. A typical STARTUP.CMD or other command file that loads the application software might look like this:
c:cd vines
ban
setnetb /name:OS2_CL2 NBNames@MIS@WCTUS
j:
cd myapp
myclient.app
The elements of this command file are listed in Table 14-6.
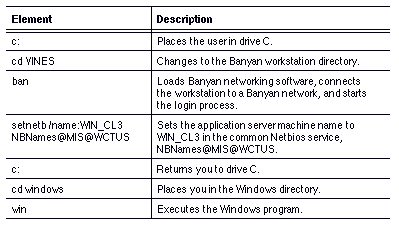
Command File for the WIN_CL3 Application Client Under Windows
A typical command file for a Windows workstation running the client component of an application might look like this:
c:cd vines
ban
setnetb /name:WIN_CL3 NBNames@MIS@WCTUS
c:
cd windows
win
The elements of the command file are listed in Table 14-7.
Installing and Configuring Banyan Netbios for OS/2
This section describes how to install and configure Banyan Netbios for OS/2 software. Banyan Netbios for OS/2 provides support for two separate Netbios Application Interfaces (APIs):
NetBiosSubmitTM - from NETAPI.DLL Netbios - from ACSNETB.DLL
Depending on your application requirements, you will need specific products from IBM. These requirements, and the specific products from IBM, are described in the section, "Pre-installation Requirements." In addition, you should back up all files before beginning the installation procedure.
This installation procedure for Netbios assumes that your OS/2 workstation is running OS/2 2.x. Earlier versions of Banyan Netbios for OS/2 are unsupported in VINES version 6.00 or greater.
OS/2 2.x is fully integrated with the Netbios implementation from IBM as specified in the IBM LAN 1.0 specifications.
A new run-time trace facility allows the analysis of all Netbios command and communications activities. A new end-to-end protocol improves communications efficiency.
This section describes necessary software and tasks you need to complete before proceeding with the installation procedures. It is divided into two parts:
IBM LAN software Banyan Netbios software
IBM LAN Software
This section describes the software you need to obtain from IBM before installing OS/2 2.x. The software depends on the interfaces your Netbios applications require, and the version of OS/2 2.x installed on your workstations. You cannot successfully install the Banyan Netbios for OS/2 client software without first installing the appropriate LAN software from IBM.
If your Netbios applications require only the Netbios interface, the "LAPS from NTS/2" is required. If your Netbios applications use either the NetBiosSubmit interface or the NetBiosSubmit and the Netbios interfaces, the LAN Enabler from IBM is required.
The two versions of LAN Enabler are:
LAN Enabler 2.0 for OS/2 2.0 LAN Requester 3.0 for OS/2 2.1 Note: LAN Requester 3.0 is currently only available as a "distributed feature" of LAN Server 3.0 and requires "LAPS from NTS/2" software. Contact your IBM support provider for information on obtaining this software.
If you are upgrading your OS/2 1.x workstation with Banyan Netbios software installed to OS/2 2.x, you must remove existing Banyan Netbios software prior to the workstation upgrade. Removing the software is described in the README documentation provided with the Banyan VINES OS/2 1.x Netbios.
Installing this software involves several steps:
1. Installing IBM Netbios support
2. Updating Banyan client drivers
3. Installing and configuring the new VNSNETB2.SYS device driver
4. Updating the new PROTOCOL.INI and IBMLAN.INI files to use the new device driver. (This step is divided into two parts, depending on the IBM software you install.)
5. Specifying the Netbios name service to use
The remainder of this section describes these steps in detail.
Installing IBM Netbios Support
To install IBM Netbios support, follow the documentation provided by the "LAN Enabler/LAN Requester" or "LAPS from NTS/2" software packages.
This installation involves installing the driver and associated Dynamic Link Libraries (DLLs) into the proper subdirectory. If you are unsure about which IBM Netbios support software to install, contact your IBM support provider. If the IBM Netbios protocol support is not required, you can remove NETBEUI.OS2 from the workstation's CONFIG.SYS file.
Do not, however, remove the NETBIOS.OS2 driver, because this driver is required for the Banyan Netbios for OS/2 implementation.
Prior to the installation of the VNSNETB2.SYS Netbios driver, you need to update the existing client drivers: BANCOMM2.SYS, NBDAEMON.EXE, VINES2.IFS, and VINESNP2.IFS.
These files are located in C:\VINES (the directory specified during client installation).
To Update the Client Drivers
1. Reboot the workstation without loading Banyan network client software. It may be necessary to modify your workstation startup configuration.
2. Overwrite the existing files with the new versions supplied with this release.
3. Restore the startup configuration to load Banyan network client.
4. Reboot the workstation and verify that network functions operate normally.
After the client drivers are updated, the Banyan Netbios driver VNSNETB2.SYS must be specified in the workstation CONFIG.SYS file. Insert the modifications after the Banyan drivers section and before the IBM Netbios section (NETBIOS.OS2). In addition, if you have not installed IBM Netbios support, do so now. This procedure is described in "Installing IBM Netbios Support" earlier in this chapter.
To Install the VNSNETB2.SYS Driver and NBDAEMON.EXE
1. Copy the VNSNETB2.SYS driver to your workstation. You can copy the file to the same directory that contains other Banyan OS/2 client drivers.
2. Use a text editor to open the workstation CONFIG.SYS file.
3. Add the following line after the existing Banyan section:
DEVICE=C:\VINES\VNSNETB2.SYS
This example assumes C:\VINES is the directory containing Banyan OS/2 client software.
4. Add the following line after the DEVICE= statements:
RUN=C:\VINES\NBDAEMON.EXE
This example assumes C:\VINES is the directory containing Banyan OS/2 client software.
5. Save the CONFIG.SYS file and exit the text editor.
6. Reboot the workstation and verify that the network functions operate normally.
Once you have rebooted the workstation and have verified that the network functions operate normally, the next step is to edit workstation configuration files to reflect the recent software updates.
If you installed LAPS from NTS/2, refer to the next section,"To Edit the PROTOCOL.INI File for an OS/2 Workstation." If you installed LAN Enabler 2.0 software, refer to the section, "To Edit the IBMLAN.INI File." This installation automatically installs the Netbios functionality of LAPS from NTS/2.
If you installed LAN Requester 3.0, you must install LAPS from NTS/2 first. Therefore, refer to the next section, "To Edit the PROTOCOL.INI File for an OS/2 Workstation."
The PROTOCOL.INI file is an NDIS configuration file used by the protocol manager (PROTMAN.OS2) that specifies LAN card settings and protocol configuration settings. In this case, you need to edit the file to indicate an additional Netbios adapter is available for use, and to reflect the software updates.
To Edit the PROTOCOL.INI File for an OS/2 Workstation
1. Use a text editor to open the PROTOCOL.INI file. This file is located in the C:\IBMCOM directory.
2. Add the following section if it does not already exist:
[NETBIOS]
3. Add the Banyan Netbios driver using this format:
= ,
For example:
[NETBIOS]
DriverName = NETBIOS$
Adapter0 = VNSNETB$, 04. Save and close the PROTOCOL.INI file.
In the previous example, Adapter0 is the adapter number, VNSNETB$ is the driver name, and 0 is the LAN adapter number. The adapter and LAN adapter numbers can be any number (not necessarily 0), but must match each other.
The LAN adapter number specifies the number that applications use to direct Netbios commands to a specific adapter. You can provide configuration information in either upper case or lower case.
Once the new files are in place, either the LAN Enabler or LAN Requester from IBM must be configured to indicate that an (additional) Netbios adapter is available for use. To configure these programs, modify the IBMLAN.INI file. IBMLAN.INI is usually found in C:\IBMLAN directory. Each Netbios driver is described to the LAN Enabler or the LAN Requester by a statement in the [NETWORKS] section in IBMLAN.INI configuration file. The format of each Netbios network/adapter definition is shown in Figure 14-6.
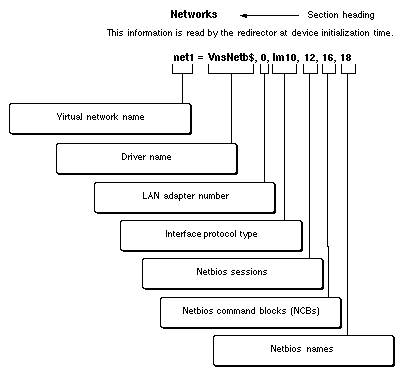
Table 14-8 list and explains the definitions in the NETWORKS section of a sample IBMLAN.INI configuration file.
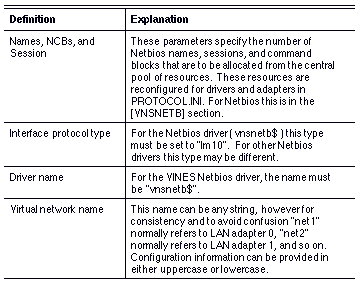
Note: The number of Names, Sessions, and NCBs configured here are allocated from the central pool of resources for the specified adapter in PROTOCOL.INI. This reduces the number of resources reported by NETBIOS.OS2 to the remainder.
Specifying the Name Service
Before you can use the Netbios driver, you need to configure the name service the driver will use. The two ways to configure the name service are:
Use the SETNETB command from an OS/2 session Add a SETNETB statement to the user profile
Refer to the Command Reference for information on using the SETNETB command.
Note: Using Netbios prior to running SETNETB causes the IBM Netbios driver to stop. You must reboot the workstation and run SETNETB first.
Configuring VNSNETB2.SYS
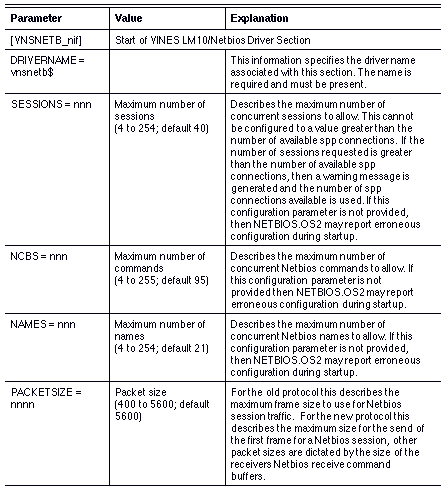
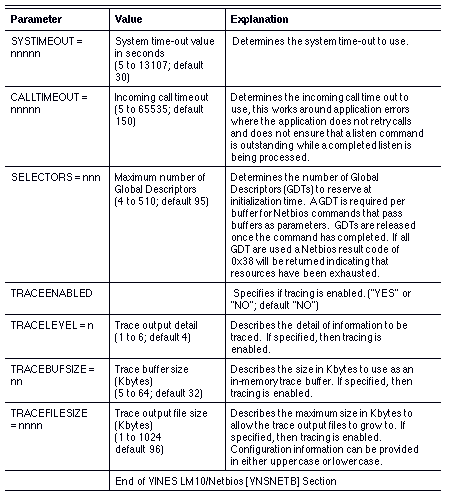
This section describes configuring VNSNETB2.SYS through the PROTOCOL.INI file. This configuration involves creating a [VNSNETB_nif] section.
Table 14-9 lists and explains the parameters in the [VNSNETB_nif]

![]()
![]()
![]()