Chapter 2 - Configuring LDAP for StreetTalk Services
This chapter describes how to configure the LDAP for StreetTalk service. To configure LDAP:

Use LDAP Configuration Manager to select appropriate configuration settings for your service: service settings, Access Control List (ACL) configuration, logging options, and referrals 
Use StreetTalk Explorer to configure and rebuild STDA 
Use StreetTalk Explorer to restart the LDAP for StreetTalk service on the host server 
Use LDAP command line tools to manage entries in the LDAP database You install LDAP Configuration Manager when you install the LDAP for StreetTalk software on a StreetTalk for Windows NT server, or you can install Configuration Manager separately on a Windows NT 4.0 workstation.
Configuring LDAP for StreetTalk software involves using LDAP Configuration Manager to:

Load the LDAP configuration files 
Specify a suffix, so you can access the StreetTalk for Windows NT LDAP database through LDAP 
Specify additional LDAP options to meet the needs of your site 
Configure the Access Control List Use StreetTalk Explorer to configure STDA to support LDAP. Refer to "STDA Configuration Guidelines" in Chapter 1 for more information about configuring STDA to support LDAP for StreetTalk.
LDAP for StreetTalk Installation Guide details the requirements and prerequisites for installing the LDAP for StreetTalk software. Read the installation guide before you use LDAP Configuration Manager to configure and manage your LDAP for StreetTalk service.
You must create an STDA service on the StreetTalk for Windows NT server where you install LDAP for StreetTalk.
You install, create, and start the LDAP for StreetTalk service after you install StreetTalk for Windows NT. Refer to your StreetTalk for Windows NT documentation for information about installing StreetTalk for Windows NT software.
If STDA is running, the LDAP for StreetTalk installation stops the StreetTalk Name Collector and StreetTalk Directory Assistance services before installing LDAP for StreetTalk software.
LDAP Configuration Manager is the management tool you use to modify LDAP schema. This section describes how to use the LDAP Configuration Manager to configure your LDAP for StreetTalk service. You can create a shortcut on your desktop for the LDAP Configuration Manager.
After you install LDAP for StreetTalk software, you use LDAP Configuration Manager to set the path to your configuration files and select the directory suffix for the service.
Other configuration options are already set to reasonable default values. Modify only those items that define site-specific information. Add additional options only if you need them.
Using LDAP Configuration Manager
This section provides an overview of using LDAP Configuration Manager to configure your LDAP service. Refer to the LDAP Configuration Manager online help files for details about how to perform a particular operation. To access online help, click Help on the menu bar and select Help Topics to start the online help system or right-click the item of interest in the dialog and select What's This? to get help about the option.
When you start LDAP Configuration Manager, the Open LDAP Configuration Files dialog, shown in Figure 2-1, prompts you to select the configuration to do-local or remote.
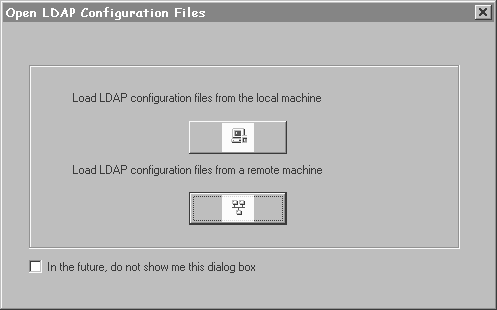
You first select the configuration type. The Open LDAP Configuration Files dialog provides two configuration options:

Local File - Loads LDAP configuration files for the local LDAP for StreetTalk server. When you load the configuration files for an LDAP for StreetTalk server, you set the path to the local configuration files. LDAP configuration files reside in the DATA\LDAP\CONFIG subdirectory of the StreetTalk for Windows NT installation root directory.

Remote file - Loads LDAP configuration files for a remote LDAP for StreetTalk server on your network. Remote file, or Network Configuration, lets you configure other LDAP servers on the network by modifying their LDAP configuration files. You must enter your StreetTalk username and password and be a member of the StreetTalk AdminList for the other server, to access that server`s configuration files and make changes.
To Configure a Local LDAP for StreetTalk Service
1. Click Load LDAP Configuration Files From the Local Machine.
2. Set the path to the file LDAP.CNF. Click the Browse button if needed to locate the file.
3. Select the file LDAP.CNF and click Open.
To Configure a Remote LDAP Service
1. Click Load LDAP Configuration Files From a Remote Machine.
If LDAP Configuration Manager is already running, select Network Services from the Configure menu, and continue to step 2.
2. From the Servers Providing LDAP Server List, select a server name or IP address.
3. Click Server List.
LDAP servers appear on the Server list only when the servers are configured to collect the labeledURI attribute. Refer to the LDAP for StreetTalk Installation Guide for more information about configuring LDAP and STDA services on the StreetTalk for Windows NT server.
4. In the LDAP Server List on the Select LDAP Server dialog shown in Figure 2-2, select an LDAP server to manage and click Select.

The first time you select Network configuration, you must select a default server that can provide a list of available LDAP servers. You see a message telling you to select a default server and then the dialog shown in Figure 2-2.
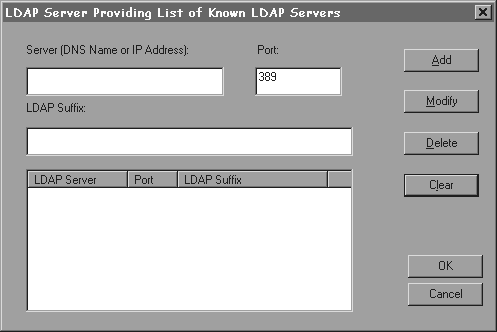
To designate a server to provide a list of LDAP servers on your network, click Edit. You see the dialog shown in Figure 2-3.
Note
By default, LDAP uses port number 389. Banyan does not recommend changing the port number. Most LDAP clients expect the LDAP service to listen on port number 389 and cannot connect if you change the port.Enter the Windows NT Server DNS name or IP address, and the LDAP suffix of the LDAP service that can provide a list of known LDAP servers. You can enter your current server or any LDAP server on the network whose STDA collects the labeledURI information. Click Add. The server information appears in the lower window. Click OK to close the dialog, or repeat the preceding steps to add more servers.
The buttons on the LDAP Server Providing List of Known LDAP Servers dialog (Figure 2-3) do the following:
|
|
Add - Adds information from the server, port, and LDAP suffix fields to the lower window for selection. |
|
|
Modify - Lets you change the information about a server that appears in the lower window by editing the information in the server, port, and LDAP suffix fields. You click Modify after making the edits to save your changes. |
|
|
Delete - Deletes a selected server from the lower window. You cannot delete the last server but you can modify the server's information. |
|
|
Clear - Clears the information from the server, port number, and LDAP suffix fields. |
Setting Service Control Options
Use entries on the Service Control dialog, Figure 2-4, to configure LDAP service access parameters.
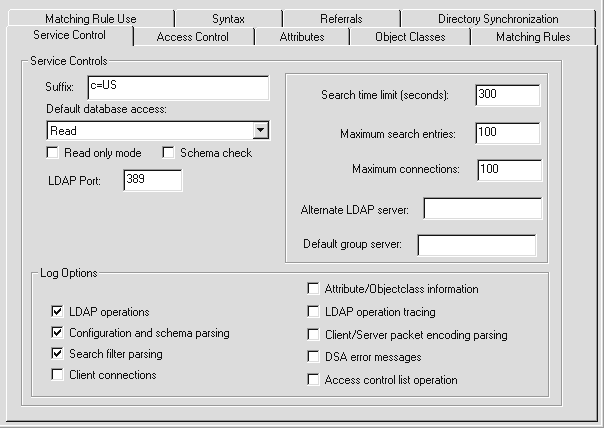
The Service Control dialog includes the following configuration options:
Suffix - configures the LDAP for StreetTalk directory suffix string. The suffix string defines the location of this server's LDAP service within the global LDAP directory information tree. The suffix string is a comma-separated list of values beginning with the lowest LDAP entry and ending with the highest. (Refer to Figure 1-2.)
Set the suffix to suit the needs of your organization. In general, your organization name should appear subordinate to the country (c=) level, for example, o=yourOrg, c=yourCountry. Refer to "LDAP for StreetTalk and StreetTalk Directory Tree Structure" in Chapter 1 for additional information about how the LDAP hierarchy maps to StreetTalk for Windows NT.
Default Database Access - configures user access to the database. LDAP uses the default access setting when the Access Control List does not contain an entry that applies to the request.
Access can be:
None - Lets administrators access the database. No one else is given access.
Compare - Lets the client perform the LDAP compare operation to determine if an entry has a certain attribute value or values. Return True if found or False if not found. If the desired attribute does not exist in the entry, LDAP returns No Attribute.
Read - Allows compare and search operations.
Write - Allows modify operations on entries and attributes in the LDAP directory, including adding and deleting entries.
Higher levels of access, for example, Read, include lower levels, such as Compare.
Read Only Mode - Sets the database to read-only mode for all users. Generally, LDAP administrators use this option to restrict access to the database temporarily. Read only mode overrides all other access control settings, including the default database access setting.
Schema Check - Sets the service to enforce schema checking on new entries added to the LDAP database. Schema checking is not enforced when you modify existing LDAP entries.
When you select the Schema check option, the LDAP for StreetTalk service enforces schema checking. If you add a new directory entry that includes an undefined object class or attribute, or omits a required attribute, the LDAP for StreetTalk service returns an error message and does not add the new entry to the directory tree.
Search Time Limit - Specifies the maximum time, in seconds, that the LDAP for StreetTalk service spends responding to a search request. The range is 0 to 3600 seconds (1 hour). By default, the time is left blank, meaning unrestricted, or no time limit on searches. You can enter a 0, which is equivalent to a blank, or no time limit.
Maximum Search Entries - Specifies the maximum number of entries returned from a LDAP for StreetTalk search operation. The range is from 0 to 32000 entries. The default number of entries is 100, meaning a maximum of 100 entries is returned by a search. You can enter a value of 0, which is equivalent to a blank, meaning no limit to the number of entries returned.
Maximum Connections - Specifies the maximum number of connections that can be made to an LDAP server at the same time. The range is from 1 to 512 simultaneous connections. The default is 100 connections.
Note
Clients open a new connection each time they request an LDAP operation such as search or compare. A client that issues three LDAP search requests opens three connections.Alternate LDAP server - specifies an LDAP server name that clients save and use when the current server is not available.
Default group server - Specifies a Banyan server to host new groups. LDAP does not include the concept of associating groups with servers, but StreetTalk does. If Default group server is not specified, new groups are created on the server hosting the LDAP for StreetTalk service.
To override the default group server setting when you create a new group, specify the attribute destinationIndicator with value StreetTalk server name to specify the server to host the new group.
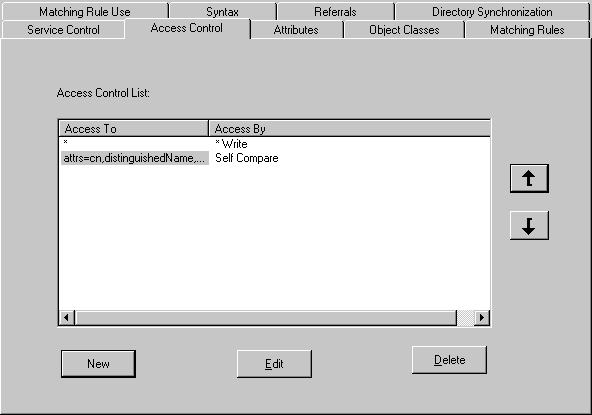
As shown in Figure 2-4, LDAP Configuration Manager includes a tab for performing Access Control List (ACL) configuration tasks. When you click the Access Control tab, you see the dialog presented in Figure 2-5. Under Access Control List, you see the ACL entries configured for the LDAP for StreetTalk service on the server. Entries are listed in the order in which they are searched by LDAP when a client requests an LDAP operation. Any number of entries can appear on the list. If the Access By column is empty, the default database access setting is applied for all users. By default, all users have Read/Write access to the directory as specified by the default database access setting on the Service Control dialog. Use the Service Control dialog to change the default database access setting for the service.
Use the up arrow and down arrow buttons to reorder the ACL by moving entries as desired. Clicking Delete removes the selected entry from the ACL. Clicking Edit opens the selected entry on the ACL so you can change the access settings specified in the Access To and Access By fields.
Use the New, Edit, and Delete buttons to perform Access Control list configuration tasks, such as adding a new ACL entry, modifying an existing entry, or deleting an entry from the list.
When you click New or Edit, you open the Access Control List dialog shown in Figure 2-6.
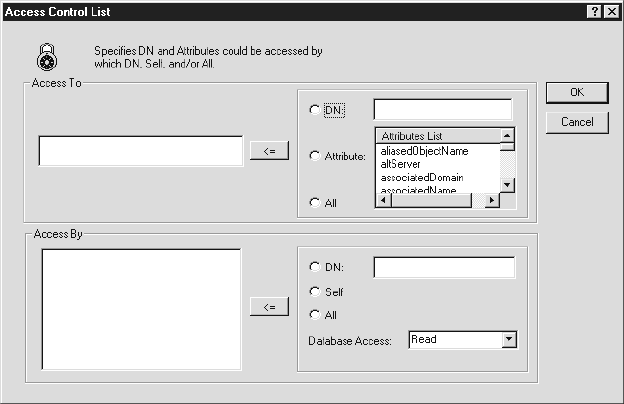
The Access Control List dialog includes the following options for setting access rights:
Access To - Lists LDAP entries to which access is being granted by the new ACL entry. Three options govern the entries that appear in the Access To list: DN (used with the text box to enter a DN), Attribute (used with the Attributes List), and All.
Attributes List - Lists all the attributes configured for the LDAP service. Use this list in conjunction with the Attribute option to grant access to selected attributes.
Access By - Lists the users that are being granted access to the LDAP entries in the Access To list by the new ACL entry. Three options determine the contents of the list: DN (used with the text box to enter a DN to grant access by), Self, and All. You must also select the database access level from the Database Access list to assign the access setting for each entry in the Access By list.
Database Access - Shows the access type options for the database: None, Compare, Read, and Write. You must select a database access level for each Access By entry before you can add it to the ACL.
To Set Access Controls for the Service
1. Click the Access Control tab.
The Access Control list appears showing the entries on the list.
2. Click New to add an entry to the list.
3. Choose one of the following options to set Access To controls for the new ACL entry:
| To Allow Access To | Select Option | Enter |
| DN | DN | Distinguished Name |
| Selected Attribute | Attribute | Select Attributes from list |
| All Attributes | All | Not Applicable |
4. Click the <= button to add your selection to the Access To list.
Clicking the <= button replaces the Access To entry with the new entry. It does not append your selection to the existing entry.
5. Choose one of the following options to set Access By controls:
| To Allow Access by | Select Option | Enter | Select Database Access |
| DN | DN | DN | None/compare/read/write |
| Self | Self | None/compare/read/write | |
| All Users | All | None/compare/read/write |
6. Click the <= button to add your selection to the Access By list.
Clicking the <= button adds your Access By selection to the list of Access By entries that apply to the selected Access To entry.
7. Click OK to close the dialog, or repeat steps 3 through 6 to add another entry to the ACL.
Logging options appear on the Service Control dialog shown in Figure 2-4. Select or clear the logging option check boxes to specify the kinds of events and messages recorded in the LDAP log files. LDAP logging options work in combination with the StreetTalk for Windows NT log levels. For each log option, LDAP records different amounts of information based on the StreetTalk for Windows NT log level setting. LDAP for StreetTalk provides two rolling log files, LDAP0.log and LDAP1.log. Log files reside in the DATA\LDAP subdirectory of the StreetTalk for Windows NT installation root directory. You can choose to record the following LDAP operation information in the LDAP log files:
LDAP Operations - Records the LDAP operation as well as any command arguments. Selected by default.
Configuration and Schema Parsing - Records information about the successful or unsuccessful parsing of LDAP configuration file information. Selected by default.
Search Filter Parsing - Records details about the filters used to conduct a search operation. Selected by default.
Client Connections - Records TCP socket information for all client activity on the server.
Attribute/Objectclass Information - Records information about mapping between StreetTalk for Windows NT and LDAP attributes and object classes.
LDAP Operation Tracing - Records the start and finish of LDAP operations. LDAP operations include search, compare, add, and the like.
Client/Server Packet Encoding Parsing - Records detailed information about client connections, as well as lower layer protocol information.
Access Control List Operation - Records information about access control operations as users access the LDAP service.
DSA Error Messages - Records error messages returned by the Directory System Agent (DSA) during LDAP operations. The DSA is an application process defined by OSI that is part of the directory, whose role is to provide access to the DIT.
Select the check box next to a logging option to include the option's information in the logs. Clear the check box to exclude the associated information.
Installing LDAP Configuration Manager sets the first three - LDAP operations, Configuration and schema parsing, and Search filter parsing - by default. You can change the default by clearing the check box adjacent to an item or by clicking other items.
Note
The logging options presented above set the types of messages logged by the LDAP for StreetTalk service. Use StreetTalk Explorer to set the LDAP service log message level to determine the detail included in LDAP log messages.
The Referrals dialog, shown in Figure 2-7, lets you define and manage LDAP referrals. Referrals enable LDAP to handle a request for data that is not available in the local database, by returning an address to another LDAP service that has the requested data.
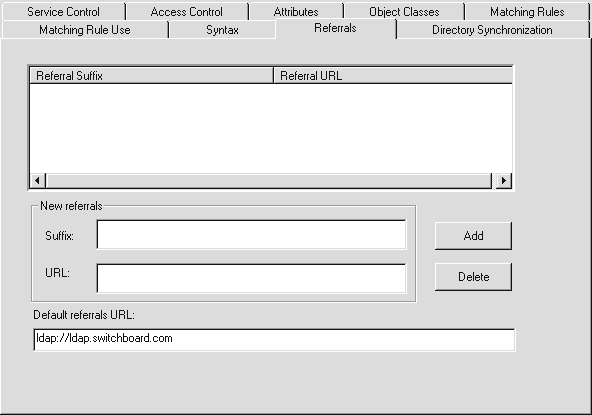
The Referrals dialog lets you:

Add the suffix and URL of a new referral server. 
Delete a referral. The window displays added referral suffixes and URLs that you can select for deletion. 
Specify the default referrals URL. Refer to "Referrals" in Chapter 1 for a discussion of how referrals work.
To Enter Referrals
1. Click the Referrals tab.
2. To change the referrals for the server, do one of the following:
-To add a referral, enter the suffix and URL for the referral LDAP server in the Suffix and URL fields in the New referrals area and click Add.
-To delete a referral server, select the referral suffix to remove from the Referral Suffix list and click Delete.
3. To change the default referral server, type the URL for the desired LDAP server in the Default Referrals URL option.
Saving LDAP Service Configurations
After you make changes to the configuration settings for an LDAP service, save the new settings to the current LDAP service or to other appropriate LDAP services in the network. By saving the modified LDAP configuration settings to services other than the current LDAP service, you assure that all LDAP services on the network maintain a consistent configuration without logging in to and configuring each service in turn.
Note
You must be on the LDAP server's StreetTalk AdminList (AdminList@servername@servers) to save LDAP configuration settings to the LDAP service.
To Save LDAP Service Configuration to the Current (Local or Remote) LDAP Server
1. Select Save from the Configure menu.
Configuration Manager saves the configuration file to the server you are managing, whether it is a local server or a remote server.
To Save LDAP Service Configuration to Remote LDAP Servers
1. Select Save As from the Configure menu. The Save Files to a Local Directory dialog appears.
2. Select Network Server.
3. On the Server List, select the address or name of the remote LDAP server to update.
4. Click OK to close the dialog. The Login dialog appears.
5. Enter your StreetTalk name and password in the name and password fields, and click OK. The LDAP configuration settings are saved to the selected server.
6. Repeat steps 3 through 5 to update the LDAP configurations on other servers.
Restarting LDAP for StreetTalk Services
You must restart LDAP for StreetTalk service to activate your configuration options whenever you change the LDAP for StreetTalk service configuration.
To Restart LDAP for StreetTalk Services:
1. Open StreetTalk Explorer.
2. Navigate to the desired LDAP server.
3. Select the LDAP for StreetTalk service to restart.
4. Select File, Properties.
5. From the Summary dialog, if the LDAP for StreetTalk service is currently running, click Stop.
6. Click Start to restart the LDAP for StreetTalk service.
Note
Do not use Windows NT Server Manager to stop or start the LDAP service. Use StreetTalk Explorer to stop and start the LDAP service. Using Window's NT Server Manager leaves the service in an inconsistent state.