Chapter 5 - Using Your Address Book
The address book feature of mail lets you form your own labeled sets of names that you can use for addressing mail. If you frequently send mail to sets of users that are not defined as StreetTalk lists or to users who do not have nicknames, this feature is particularly useful.
Mail provides you with your own private address book. This address book is an on-line storage place for addresses you use most often. You can add, modify, and delete addresses.
Your address book can also shorten the time you spend addressing messages. The address book's labeling system lets you create one- or two-letter abbreviations for lengthy StreetTalk names, lists, or gateway addresses. You can then use these abbreviations instead of their lengthy counterparts when addressing messages.
Sample Uses of the Address Book
You may want to use your address book to create a tailored list of StreetTalk names or to abbreviate StreetTalk names you use frequently.
Example Abbreviating StreetTalk Names
Mary Aspen, a secretary at WTCUS, uses her address book for both of these purposes.
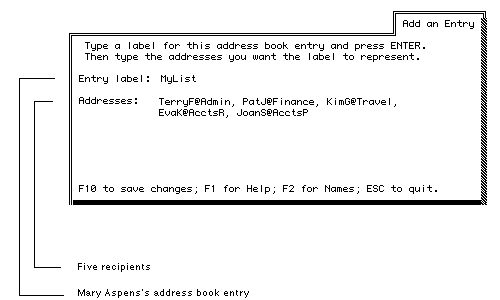
Mary frequently sends messages to five secretaries, who are all in different departments in the company. In her address book, Mary creates an entry with the label "MyList" to represent the secretaries' StreetTalk names. Whenever she sends mail to them, she types MyList in the To address field instead of typing their five individual StreetTalk names.
Mary also uses entries in her address book as private nicknames for users to whom she frequently sends mail. For example, she sends a lot of mail to Virginia Malton in Finance at WCTUS. Mary creates an address book entry, labeled "Ginny," which represents the StreetTalk name - Virginia Malton@Finance@WCTUS. Whenever she sends mail to Virginia, Mary types Ginny in the address field, instead of the complete StreetTalk name.
This chapter uses Mary Aspen's address book as an example.
Using Mail Gateway and Other Addresses
In addition to StreetTalk names, address books can contain the addresses of users on gateway mail systems, and network servers with restricted access or temporary connections to your server.
These addresses have a different format than StreetTalk names and are usually created by your system administrator. If you need information on these addresses, see your system administrator.
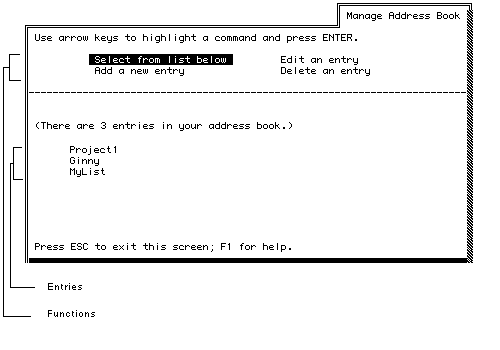
To access your address book from the Read, Compose, Answer, and Forward a Message screens, press F6. The Manage Address Book menu appears.
The menu lists is divided into a list of functions and a list of address book entries. The very first time you access the address book menu, the lower part is empty.
The Manage Address Book menu that follows, shows sample entries.

To select functions and items in this menu, use the same selection techniques as you use in the Select Names menu.
The next section describes how to use the functions in the Manage Address Book menu.
You can use the Manage Address Book menu to:

Add entries in your address book 
Edit entries in your address book 
Delete entries in your address book 
List the addresses included in an address book entry
You create an address book entry by giving it a label. Then you specify the names you want the label to represent. The names can include: StreetTalk users, lists, and nicknames; addresses of users on gateways; and addresses of users on network servers with restricted or temporary connections to your server.
To add an entry to your address book:
1. From the Manage Address Book menu, select the Add a New Entry function. The Add an Entry screen appears. The sample Add an Entry screen shows Mary Aspen's address book entry, MyList.
2. In the Entry Label field, type a label for the entry and press ENTER.
A label can be a maximum of 15 characters. Select concise labels because they are easier to remember and to enter in address fields.

3. In the Addresses field, enter one or more names of the users and lists you want the label to represent. Nicknames are allowed. Separate each name by a comma.
If you need help finding names, press F2 to use the StreetTalk database or press the STDIRECT hotkey to access STDA. After locating names, select them for automatic insertion in this field.
An address can be a maximum of 512 characters.
4. When you have finished entering the names in this field, press F10 to save the new address book entry.
Mail returns you to the Manage Address Book menu and displays the new entry.
You can enter a maximum of 1000 characters in your address book. If you exceed this limit, mail informs you with a screen message.
With your address book open, you can edit entry labels and their addresses. To edit an entry in your address book:
1. From the Manage Address Book menu, select the Edit an Entry function. The cursor moves to the bottom part of the screen.
2. Select an entry. The Edit an Entry screen appears.

3. Edit the selected entry as needed by typing over existing text, using the data entry keys.
4. When you have finished editing, press F10 to save your changes. The Manage Address Book menu appears.
Press ESC to retain the original entry and return to the Manage Address Book menu.
When you no longer need an entry in your address book, you can delete it to accommodate other entries.
To delete an entry from your address book:
1. From the Manage Address Book menu, select the Delete an Entry function. The cursor moves to the bottom part of the screen.
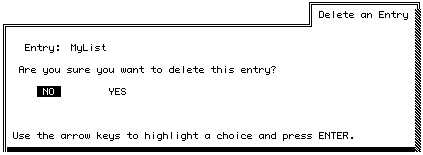
2. Select an entry for deletion. The Delete an Entry screen appears, prompting you to confirm the deletion.

- To select NO, press ENTER. The deletion is canceled.
- To select YES, press the right arrow key once and press ENTER. The entry is deleted.
You return to the Manage Address Book menu.
To view the addresses of an entry in your address book:
1. From the Manage Address Book menu, choose the Select From List Below function. The cursor moves to the bottom part of the screen. On the bottom line of the screen is a new option, called F2 for Members.
2. Select an entry.
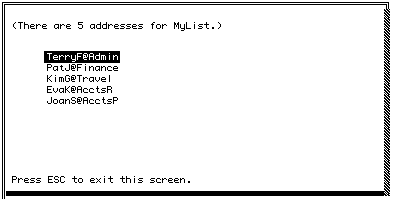
3. Press F2 to display the addresses of the selected entry.

For example, if Mary Aspen selected "MyList," she would see the listing shown in the sample screen
4. Press ESC to return to the Manage Address Book menu.
Using Entries in a Mail Message
After you create entries in your address book, use the entry labels in the address fields of any message you compose or forward in the same way you use StreetTalk names. Type entry labels directly in message address fields, or press F6 to select them for automatic insertion from the Manage Address Book menu.
When you send or save a message containing address book entries, the labels expand to show every address they represent.
To continue the example of the previous section:
Example Using Customized Address Labels
When Mary Aspen types "MyList" in the To address field of a message and sends it, the label expands to show the StreetTalk names of the five secretaries:
To: TerryF@Admin,PatJ@Finance,KimG@Travel,EvaK@AcctsR,JoanS@AcctsP
The five recipients see the StreetTalk names, not Mary's abbreviation. If Mary saves the message and reads it later, she will also see the StreetTalk names.