![]()
![]()
Chapter 8 - Using VINES File Programs and Commands
This chapter describes one VINES program and three VINES commands you use to manage your files in a network that includes DOS, OS/2, and Macintosh workstations:
|
|
The SETDRIVE program lets you access file volumes not already specified in your user profile. |
|
|
The VDIR, VCOPY, and VRENAME commands let you, as a DOS or OS/2 user, display and manipulate the long filenames used by Macintosh users and stored on native VINES servers. |
The SETDRIVE program lets you look at your current file volume settings. If authorized by your system administrator, you can also use the SETDRIVE program to access other file volumes on your network.
Note: Any changes you make in SETDRIVE during a particular login session are valid only for that session. Once you log out, SETDRIVE changes are not saved. If you want SETDRIVE changes to be saved, you must include these changes in your user profile. For assistance, ask your system administrator.
With the SETDRIVE program, you can:
|
|
Look at your current file volume settings. |
|
|
Search for file volumes in other groups. |
|
|
Set drives to file volumes. |
|
|
Add new file volume settings. |
|
|
Delete unnecessary file volume settings. |
OS/2
Drives set to file volumes are global across all OS/2 screen sessions. However, pathnames are unique to each OS/2 screen session.
To use SETDRIVE, do one of the following:
|
|
From the system prompt, type setdrive and press ENTER. |
|
|
From the VINES Main Menu, select File Sharing and press ENTER. |
The File Sharing menu appears.
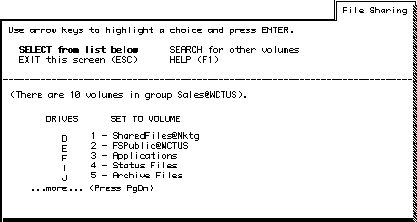
The SELECT from list below option is automatically highlighted at the top of the menu. All your current settings and your group's file volumes appear in the lower portion of the menu.
From the File Sharing menu, select a file volume from the list or search for other volumes. Once you make a selection, the Set Drive to Volume menu appears.
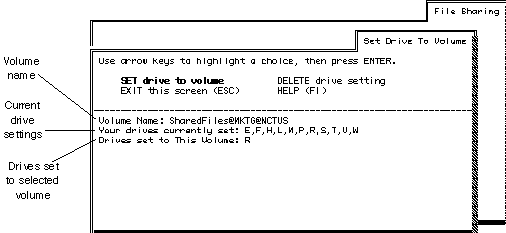
From the Set Drive To Volume menu, you can:
|
|
Set a drive to a volume |
|
|
Delete a current drive setting |
DOS
A DOS workstation can have a maximum of 26 drive/volume settings active at one time. However, your VINES software has a default configuration of six drive/volume settings. If you need more than six settings, ask your system administrator for assistance. The letters A through Y are available to set to any network file volume and directory within that volume. The letter Z is reserved for VINES Files.
OS/2
An OS/2 workstation has no default configuration. However, you cannot assign drives to devices that OS/2 controls. For example, if drive A was assigned to a diskette drive and drive B was assigned to fixed disk when OS/2 was installed, you cannot use SETDRIVE to assign drives A and B to a network drive. The letters available to be set to any network file volume and directory within that volume depend on the devices installed on your system. If A through D are assigned to disk drives and a CD-ROM, the letters E through Y are available and fewer than 26 drive/volume settings can be active at one time. The letter Z is reserved for VINES Files.
You can also change volume settings directly from the system prompt by typing the SETDRIVE command with the appropriate parameters. For more information about the SETDRIVE command, see your system administrator.
Setting a Drive to a Volume in Your Group
To assign a drive to a file volume in your group, follow these steps:
1. From the File Sharing menu, select the file volume from your group and press ENTER.
2. Select SET drive to volume from the Set Drive To Volume menu and press ENTER.
3. When prompted, type the letter of the drive you want to set and press ENTER.
After you set a drive to point to the volume, the system displays the new setting.
You can set more than one drive to the same file volume, but you cannot set the same drive to more than one file volume.
Setting a Drive to a Volume Outside Your Group
To assign a drive to a file volume outside your group, follow these steps:
1. From the File Sharing menu, select SEARCH for other volumes and press ENTER. The Search for Volumes menu appears.
2. From the Search for Volumes menu, select one of the following:
- File volumes in another group
- File volumes belonging to an organization
- File volumes whose StreetTalk names match a pattern
The procedure for searching for file volumes is the same as searching for any StreetTalk name. See Chapter 4, "Finding Names in the Catalog" for instructions.
3. When the file volume is found, select the SELECT function and press ENTER.
4. Highlight the file volume and press ENTER. The Set Drive To Volume menu appears.
5. From this menu, select SET drive to volume and press ENTER.
6. If you have already set the maximum number of drives, delete an old drive setting first. Deleting a drive is described in the next section.
7. When prompted, type the letter of the drive you want to set and press ENTER.
After you set a drive to point to the volume, VINES displays the new setting.
Deleting a Drive/Volume Setting
To delete a drive/volume setting, follow these steps:
1. Select DELETE drive setting from the Set Drive To Volume menu and press ENTER.
2. Type one or more letters to indicate which drives to delete. Separate multiple letters by commas. Press ENTER.
The SETDRIVE program erases these settings from the screen.
VINES file management commands are similar to DOS and OS/2 commands in that you follow certain guidelines when entering the command at the system prompt. These guidelines are referred to as command syntax. The command syntax is made up of parameters that supply additional information to the command when it executes.
Some commands, like the DOS FORMAT command, require parameters to perform anything useful. Most commands, like the DOS DIR command and the VINES VDIR command, have optional parameters. If you do not include one or more parameters, the command provides or displays a default result.
There are three common types of parameters:
|
|
File specifications |
|
|
Switches |
|
|
Arguments |
You must specify a filename or a pathname for the command to operate on in many instances.
Switches are often represented by a slash (/) followed by a letter or number that uniquely identifies the switch. Switches are usually optional and customize the result a command provides.
Arguments define the scope of a switch, and take the form:
/Switch:Argument
Table 8-1 shows an example of using parameters.
The rest of this chapter describes the VINES VDIR, VCOPY, and VRENAME commands. Use these commands to manage your files in a network of DOS, OS/2, and Macintosh workstations. Because DOS and OS/2 use similar file naming rules, "DOS" refers to both DOS and OS/2.
Using VINES Commands with OS/2
The OS/2 versions of VINES commands and programs display character-based screens from which you select items using cursor keys. To run a VINES program, type the appropriate command name at the system prompt.
VINES commands and programs for OS/2 allow you to:
|
|
Run multiple VINES programs at the same time |
|
|
Run VINES programs using the OS/2 File Manager |
|
|
Minimize an active window that is running a VINES program |
Caution: Be careful using VINES commands that control network resources - SETDRIVE and SETPRINT - while running applications that use those resources. For example, resetting a network drive with SETDRIVE while an application in another OS/2 window accesses the old network drive may result in the application unexpectedly quitting.
Similar to the DOS DIR command, the VDIR command lets you display the short DOS names of files in one or more specified directories. In addition, VDIR lets you display any associated long filenames created by Macintosh users and stored on a native VINES server.
This command also lists the size, date, and time stamp information associated with each file or directory.
VDIR only works on VINES file volumes. For files on a workstation's local drive, the VDIR command cannot add what the native file system does not provide. For example, if your workstation runs DOS, VDIR only displays DOS filenames. You do not see any associated long Macintosh filenames.
The command syntax of VDIR is:
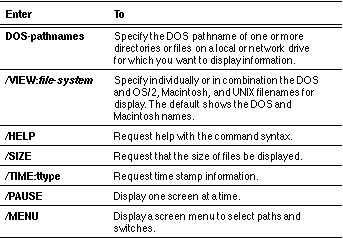
VDIR [DOS-pathnames] [/VIEW:file-system] [/HELP] [/SIZE]
[/TIME:ttype] [/PAUSE] [/MENU]
Note: In all cases, you can enter only the letters that make the switch unique (/V:, /H, /S, /T:, /P, /M).
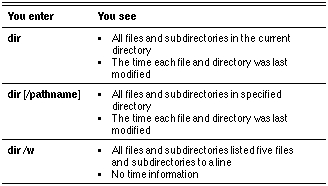
When you specify VDIR without any switches, the command displays all names of all the files and subdirectories in the current directory. It does not display any other information about the files. For example, if DOS and Macintosh names exist for the files in the current directory, you display all these names by entering VDIR without any switches.
VDIR displays the long Macintosh names of hidden and system files, but only if you explicitly specify the DOS pathname of these files.
Enter a unique combination of characters to abbreviate the switches in the VDIR command.
Table 8-2 provides a brief description of the VDIR command parameters.
The rest of this section describes these parameters and switches in more detail.
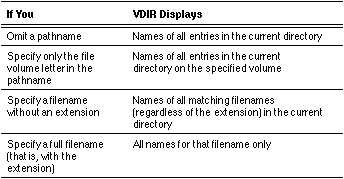
DOS-pathnames
This parameter refers to one or more DOS pathnames you specify to display information. You must separate multiple pathnames with blank spaces. You can specify wildcard characters (* or ?) in the file part of the pathname, but not in the directory part.
Table 8-3 shows you the different ways you use this parameter.
/HELP
This switch displays VDIR syntax and a definition of each switch. If you make a syntax error when entering commands, help information appears.
/VIEW:file-system
This switch lets you specify which file system names you display. Enter VDIR [DOS-pathnames] /V:file-system, where file-system can be any of the following arguments and can be used in any combination. Table 8-4 shows how you can use the arguments to this switch.
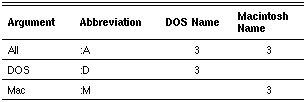
The :D argument refers to both DOS and OS/2 operating systems running the FAT file system.
/SIZE
This switch displays the size of files in kilobytes (KB). For Macintosh files, the resource and data fork information appear as a sum in the size column (as at a Macintosh workstation).
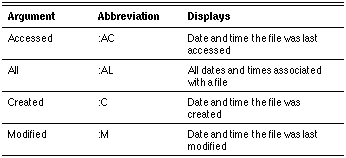
/TIME:ttype
This switch displays a date and time associated with each file. The entry, ttype, is any of the arguments in Table 8-5 and can be used multiple times.
Table 8-5 shows how you can use the arguments for the /TIME:ttype switch.
Depending on the country code specified in your workstation's CONFIG.SYS file, VDIR uses that country's format for date and time. For example, if the country code is set to 033 (France), the date has the DD-MM-YY format and the time is displayed using a 24-hour clock.
Not all file systems provide all of the above time stamp information. For example, the DOS file system provides only the date and time last modified. The Macintosh file system provides the date and time the file was created, as well as the date and time the file was last modified.
VDIR provides all of the above time stamp information, because VINES maintains this information. VDIR provides this information on network drives only.
/PAUSE
This switch displays one screen of information and pauses. Press any key to display the next screen. If you omit /P, VDIR displays the specified directory listing in its entirety and the top-most listings may be lost to view.
/MENU
This switch displays a screen menu to let you choose among the switches described above without having to remember the correct syntax. The screen menu lets you select and de-select switches before displaying the list of files and directories. In addition, you can scroll through the list of files and directories that is displayed. Use the /M switch without any others, since you specify the other switches later using the menu screen.
You cannot display the contents of multiple paths using this switch.
This section describes the three ways to use VDIR:
|
|
VDIR without switches |
|
|
VDIR with the size and date/time switches |
|
|
VDIR with the /MENU switch to display the VDIR Command menu |
Using VDIR Without Switches
If you enter VDIR without any switches, VDIR displays all the names of the files and subdirectories in the current directory, as shown in the following screen.
The screen illustrates the display format for VDIR, listing the two file system names in this order: DOS and Macintosh. Any files created under OS/2 appear in the DOS field, because both operating systems use the FAT file system. OS/2 HPFS is not supported on VINES network drives.

Using VDIR with Switches
Use VDIR switches to request additional information. The following screen illustrates how the information displays. Note that the added information displays in the DOS line.
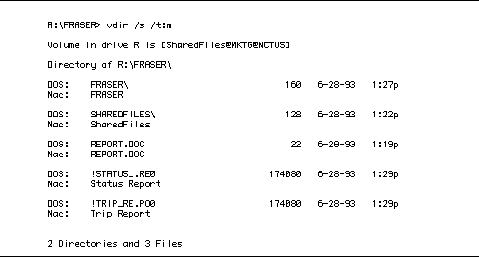
In this screen, the /S switch displays the size of the file in bytes, and the /T:m switch displays the date and time the file was last modified.
Using the VDIR Command Menu
The VDIR Command menu appears when you use VDIR with the /M switch.
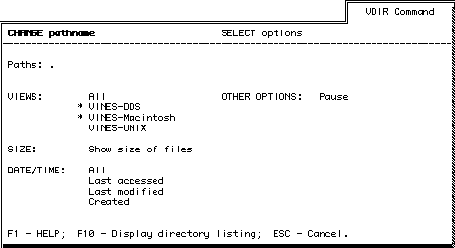
You can view on-line help at any time by pressing F1. The default directory is the current directory (.).
To display the contents of the current directory, press F10.
The VDIR Command Menu has two options:
CHANGE pathname - This option lets you change the pathname, including the network drive and is selected by default.
SELECT options -This option lets you select among the switches on the VDIR Command menu.
These options are discussed in the next sections.
Changing the Pathname
To change the pathname, follow these steps:
1. Select CHANGE pathname and press ENTER. The cursor appears at the Paths field below the option. The cursor is in overstrike mode.
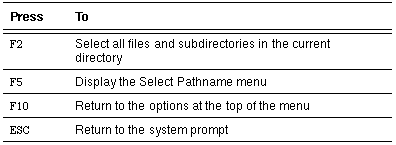
Note the new function key template at the bottom of the menu:
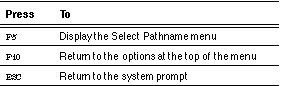
F2-All; F5-Select from list; F10-Done; ESC-Cancel.
Table 8-6 describes these keys.
2. To change the pathname, either:
- Type a new path, including a network drive letter. Press F10. The cursor moves to the top of the screen, where CHANGE pathname is selected. You can only enter one path at a time.
- Press F5 to display the Select Pathname menu:
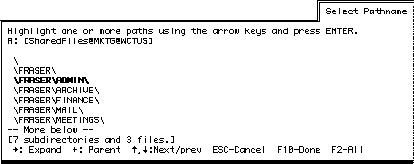
The current directory is highlighted. Use the arrow keys to move through the directory structure.
Press ENTER to select a directory or file. Press F2 to select all the subdirectories and files in the current directory. Press F10 when you finish selecting files. The VDIR menu screen appears with the pathnames you selected appearing in the Paths field.
3. Press F10 to display the directory or select SELECT options from the VDIR Command menu to set switches.
Selecting Options
To select among the switches in the VDIR Command menu, follow these steps:
1. Select SELECT options and press ENTER. The cursor moves to the first of the VIEWS fields.
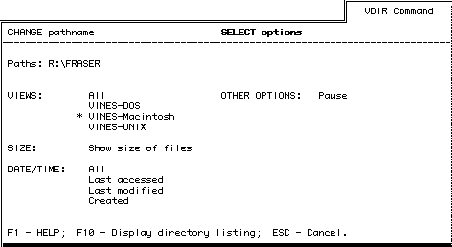
2. Move the cursor to the desired switch. Press ENTER to select the switch. An asterisk (*) appears next to the enabled switch.
You disable or de-select a switch by moving the cursor to that switch and pressing ENTER. Pressing ENTER at a switch toggles the asterisk on and off. As shown in the following screen, the selected switches are marked with an asterisk (*).
3. When you finish selecting the switches, press F10 to display the directory listing.
Press ESC once to return to the VDIR Command menu. Press ESC twice to return to the system prompt.
The VCOPY command lets you copy files and directories, optionally including subdirectories. VCOPY automatically copies any Macintosh resource and data forks associated with the specified files, as well as copying or updating the associated Macintosh desktop database information.
The command syntax of VCOPY is:
VCOPY source-pathname [destination-pathname] [/A] [/EMPTY] [/OVERWRITE] [/PROMPT] [/SUBDIRECTORIES] [/HELP]
Note: In all cases, you need to type only the letters that make the switch unique (/A, /E, /O, /P, /S, /H).
If you do not specify any switches, the VCOPY Menu appears.
When you specify a destination pathname, VCOPY first checks if the DOS filename is a duplicate. If not, VCOPY creates the new file under the specified directory.
If you specify a destination DOS filename that already exists in the target directory, VCOPY returns a message:
Are you sure you want to overwrite <pathname:\filename>?
Enter Y or N to continue or cancel the copy. If you enter Y, VCOPY overwrites the existing file with the source file contents. The destination file's long names become those of the source. VCOPY informs you that the file is overwritten and displays the existing names of the destination file.
source-pathname
This parameter refers to the DOS name of the file (or group of files) that is the source of the copy. If the source pathname is a group of files, the group is indicated by wildcards. Specify a volume (drive), path, or filename for the source pathname.
destination-path
This parameter refers to the DOS name of the destination, or target filename of the copy. If you omit a destination pathname, the default is the current directory. If filenames are omitted or if *.* is specified, the source filenames are used.
When you specify a destination pathname, a prompt asks you to specify if the destination is a file or a directory. For more information, see "Copying a Directory" later in this chapter. If the destination pathname ends with a backslash (\), the prompt does not appear.
/A
This switch copies the Access Rights List (ARL) associated with the source file to the target file.
/EMPTY
This switch copies all directories, even those that are empty. Always use the /E switch in conjunction with the /S switch.
/OVERWRITE
This switch bypasses the Are you sure you want to overwrite <pathname:\filename>? prompt that appears if you omit this switch and the specified destination file already exists. Use the /O switch with care, as you might overwrite a file by mistake.
/PROMPT
The /P switch prompts you before each file is copied. Use this switch if you copy multiple files and need to interrupt the process.
/SUBDIR
This switch copies all subdirectories and their contents. If you omit the /S switch, VCOPY copies only the contents of the specified directory and does not copy the subdirectories or their contents. Use the /E switch in conjunction with the /S switch.
/HELP
The /H switch displays the VCOPY syntax and a definition of each switch.
This section describes the four ways to use VCOPY:
|
|
Copying a file |
|
|
Copying a directory |
|
|
Copying a directory with switches |
|
|
Using the VCOPY Command menu |
Copying a File
This example uses VCOPY to copy a file:
vcopy f:\user\catchup.all h:\public\catch.exe
VCOPY returns the prompt:
Does catch.exe specify a directory (D) or a file name (F) on the target?
Enter F. VCOPY copies the file catchup.all in the f:\user directory and names the copy catch.exe in the h:\public directory.
Copying a Directory
This example uses VCOPY to copy a directory:
vcopy f:\user\catchup.all \new
VCOPY returns the prompt:
Does NEW specify a directory (D) or a file name (F) on the target?
If you enter D, VCOPY copies the file catchup.all to the new directory, which it creates. The copy keeps the same filename.
If you enter F, VCOPY copies the file catchup.all to the file called new within the user directory.
You can override this prompt by specifying a backslash (\) at the end of the target pathname. For example, if you type \new\ as the destination, VCOPY automatically creates a directory called new and copies the file to this directory. If you type \new\mydoc\ as the destination, VCOPY creates a directory called new and a subdirectory under new called mydoc.
Copying a Directory Using Switches
This example uses VCOPY switches to copy a directory:
vcopy f:\user\applica*.* h:\public\*.* /e /p /s
VCOPY copies everything within the f:\user directory matching "applica*.*", including files, directories, and empty subdirectories, to the h:\public directory and prompts you before copying each file.
Using the VCOPY Command Menu
Use the VCOPY command without any switches to display the VCOPY Command menu.
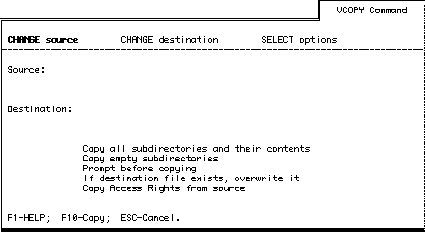
The VCOPY Command menu has three options:
CHANGE source - This option lets you enter and change the source file or directory and is selected by default.
CHANGE destination - This option lets you enter and change the destination file or directory.
SELECT options - This option lets you select among the switches on the VCOPY Command menu.
Press F1 at any time to view on-line help.
Note that you must first enter a source file or directory before you enter a destination file or directory. These options are discussed in the next sections.
Changing the Source and and Destination
To change the source and destination pathnames, follow these steps:
1. Select CHANGE source and press ENTER. The cursor appears at the Paths field. The cursor is in overstrike mode.
Note the new function key template at the bottom of the menu screen:
F5-Select from list; F10-Done; ESC-Cancel.
Table 8-7 describes these keys.

2. To change the source, either:
- Type a pathname, including a network drive letter. Press F10. The cursor moves to the top of the screen, where CHANGE destination is selected.
- Press F5. The Select Source Pathname menu appears.
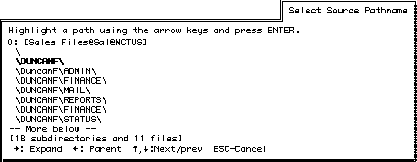
The current directory is highlighted. Use the arrow keys to move through the directory structure.
3. Press ENTER to select a directory or file. The VCOPY Command menu appears with the source pathname you selected in the Source field. CHANGE destination is selected.
Follow steps 1 and 2 for selecting or changing the destination pathname. Either enter a destination pathname manually or press F5 to use the Select Destination Pathname menu.
The VCOPY Command menu appears with the destination pathname you selected in the Destination field. SELECT options is selected.
4. Press F10 to perform the VCOPY command or use SELECT options to set switches.
Selecting Options
To select among the switches in the menu screen, follow these steps:
1. Select SELECT options and press ENTER. The cursor moves to the first of the options, or switches.
2. Move the cursor to the desired switch. Press ENTER to select the switch. An asterisk (*) appears next to the enabled switch.
You disable or de-select a switch by moving the cursor to that switch and pressing ENTER. Pressing ENTER at a switch toggles the asterisk on and off. The selected switches are marked with an asterisk (*).
3. When you finish selecting the switches, press F10 to perform the VCOPY command. A message appears confirming the copy.
4. Press ESC to return to the system prompt.
The VRENAME command lets you rename files and directories, and control the names of the files and directories in file system views other than the DOS and OS/2 view. File system views are views of files and directories created by file systems such as DOS, OS/2, or Macintosh. Thus, if your workstation is running DOS or OS/2, you can use VRENAME to rename a file or directory in the Macintosh file system view.
File and directory names in one file system have related names in other file system views. Changing the name of a file affects its related names. For example, changing the name of a file created in DOS changes its related Macintosh filename. Likewise, if a Macintosh user changes the name of a file, the related DOS short name changes as well.
There are three command syntaxes for the VRENAME command:
|
|
If you want to use the VRENAME Command menu, type the VRENAME command without any switches: |
VRENAME
|
|
If you are renaming a file or directory using its DOS name, use this command syntax: |
VRENAME DOS-pathname new-name /VIEW:file-system
[/HELP]
|
|
If you are renaming a file or directory using its name in a file system view other than DOS, use this command syntax: |
VRENAME DOS-directory\ old-name new-name
/VIEW:file-system [/HELP]
The rest of this section describes the switches that make up the three command syntaxes.
DOS-pathname
This switch specifies the DOS pathname of the file or directory you want to rename. If you specify a filename instead of a full pathname, the filename in the current directory is used.
DOS-directory\ This switch specifies the pathname of the directory that includes the file or directory you want to rename. Make sure you enter a backslash (\) as shown in the syntax. If the file or directory you want to rename is in the top-level directory, enter a backslash only. If the file or directory is in the current directory, enter the directory name preceded and followed by a backslash or enter a period followed by a backslash (.\).
Use this switch to rename a file or directory in a file system view other than DOS. This switch identifies the directory that contains the source file or directory.
If you are in the directory, precede the directory name with a backslash (\). For example:
vrename \DOS-directory\ old-name new-name
old-name
This parameter specifies the complete pathname of the file or directory that you want to rename. If you specify a filename without a directory, the default directory is the current directory.
If the name contains a blank character, enclose the name with double quotation (") marks.
new-name
This parameter specifies the file or directory's new name. VRENAME will not move files from one directory to another. To move a file, you must first copy a file using VCOPY and then delete the source file.
If you try to rename a file or directory to a name that already exists (a related name in another file system view), VRENAME displays an error.
If the name contains a blank character, enclose the name with double quotation (") marks.
/VIEW:file-system
This switch designates the file system view for the files or directories you want to rename. Enter the first letter of the file system, as shown in Table 8-8.
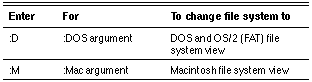
If you omit the /V:file-system switch, VRENAME defaults to the DOS file system view for the files and directories you want to rename.
/HELP
This switch displays the VRENAME syntax and a definition of each switch.
Ways to Use the VRENAME Command
This section describes three ways to use VRENAME:
|
|
Using VRENAME to rename files |
|
|
Using a different file system view to rename files |
|
|
Using the VRENAME Command menu to rename files |
Using VRENAMES to Rename Files
The following example illustrates using VRENAME at a DOS client:
vrename f:\user\light1.exe f:\user\light2.exe
The VRENAME command changes the DOS filename light1.exe in the f:\user directory to light2.exe in the same directory. Because no file system view was specified, the command defaults to the DOS file system view. The next example shows how to specify a different file system view from a DOS workstation.
Using a File System View
This example shows how to use the VRENAME command to rename a file under the Macintosh file system view:
vrename /VIEW:MAC applica "applications folder"
The VRENAME command changes the Macintosh filename applica in the current directory to applications folder. The DOS name of the file changes from APPLICA to !APPLICA.TIO.
Using the VRENAME Menu
Use the VRENAME command without any switches to display the VRENAME Command menu.
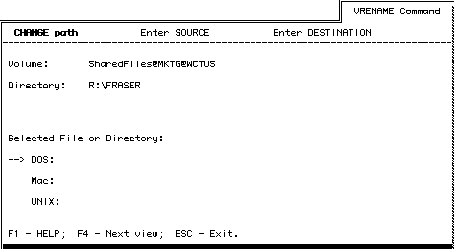
This menu displays the current volume and directory. The default file system view is DOS (marked by the arrow). The VRENAME Command Menu has three options:
CHANGE path - This option lets you choose a different directory name or filename to rename.
Enter SOURCE - This option lets you enter the source directory name or filename you want to rename.
Enter DESTINATION - This option lets you enter the new name of the directory or file.
To change the file-system view, press F4 to toggle between the DOS (and OS/2) and Macintosh file-system views.
Note: The UNIX file system view is reserved for a future release.
Changing the Path
To change the path, follow these steps:
1. Select CHANGE path and press ENTER. The cursor appears at the Directory field below the option. The cursor is in overstrike mode.
Note the new function key template at the bottom of the menu:
F5 - Select from list; F10 - Done; ESC - Cancel.
Table 8-9 describes these keys.
2. To change the path, either:
- Type a pathname and press F10. The cursor moves to the top of the screen, where Enter SOURCE is selected.
- Press F5 to display the Select Source Pathname menu.
The current directory is highlighted. Use the arrow keys to move through the directory structure.
Press ENTER to select a directory or file. The VRENAME Command menu appears with the new pathname you selected appearing in the Directory field.
If you select a directory, Enter SOURCE is selected. If you select a file, the parent directory appears in the Directory field, and the file appears in the file system view fields. Enter DESTINATION is selected.
Entering a Source and Destination
Before entering a source name and a destination name, select the file system view you want by pressing F4 to toggle between the file system views.
To enter a source name and a destination name, follow these steps:
1. Select Enter SOURCE and press ENTER. The cursor moves to the selected file system view.
2. Enter the source name of the directory or file you want to rename and press ENTER. Enter DESTINATION option is selected.
3. Press ENTER. The cursor moves to the selected file system view, and is in overstrike mode.
4. Enter the new name of the file or directory, and press ENTER or F10. A message appears at the bottom of the menu confirming rename operation.
If you use CHANGE path and select a file (rather than a directory), the filename appears in the file-system view fields, and Enter DESTINATION is selected. In this case, follow steps 3 and 4.
![]()
![]()
![]()