Banyan Server Operations Guide
The Banyan Server Operations Guide explains how to perform common administrative operations on Banyan servers.
Note: Most of the information in this book is relevant only to native VINES servers. However, Chapter 15 (Managing and Setting Time) contains information relevant to StreetTalk for Windows NT servers.
You perform most Banyan server operations from the server console. This document includes information on backing up and restoring system information, installing Banyan patches and third-party software, and setting the system time.
The procedures in this document use the following server console menus:
|
|
Operator Menu |
|
|
Backup/Restore Menu |
|
|
System Maintenance Menu |
This document covers the following main topics:
General Operations
Chapter 1 - Starting Up and Shutting Down the Server
Explains how to reboot and shut down the server and how to interpret
information on the Service Monitor screen. Discusses some common
problems that occur while rebooting.
Chapter 2 - Shutting Down and Restarting Services
Explains how to shut down and restart services. Includes procedures
for sending messages to users before shutting down services.
Managing Backups
Chapter 3 - Manual Backups
Explains four methods of backing up server information: a complete
system backup, an incremental backup, a system configuration
backup, and a single-service backup. Includes information on
configuring the incremental backup range, moving StreetTalk groups
between servers, and confirming the readability of backup tapes.
Chapter 4 - Scheduled Backups
Explains how to automatically schedule various backup types.
Chapter 5 - Viewing Backup Information
Explains how to access and display information about backup activities,
including the automatic backup schedule and current backup history.
Restoring and Rebuilding Data
Chapter 6 - Restoring Files and Services
Explains how to restore files to a service. This chapter also
discusses the problems you may encounter restoring files.
Chapter 7 - Rebuilding Services or the System
Explains how to rebuild individual services or the complete system.
Installations
Chapter 8 - Applying Banyan Patches
Explains how to apply Banyan patches.
Chapter 9 - Using Banyan Maintenance Patches
Explains how to use Banyan maintenance patches.
Chapter 10 - Installing Options and Third-Party Services
Explains how to manage Server Option Codes supplied by Banyan
to boot a server and install Banyan software options on the server.
It also explains how to load third-party services onto the server.
Chapter 11 - Re-installing Banyan Server Software
Explains how to reinstall Banyan software and reload backup information
from tape or diskettes. Also explains how to duplicate release
media.
Chapter 12 - Renaming a Server
Explains how to change the name of a Banyan server.
Troubleshooting
Chapter 13 - Tracking Server Events
Explains how to use server logs to track events. Includes information
on using the OPERATE and MSERVICE commands to specify the type
of messages the server reports to logs and the Event Management
Service (EVS), generate log reports, view log reports on-line,
and save log reports to a file.
Chapter 14 - Additional Diagnostics
Explains how to use the troubleshooting tools that are available
at the server console.
Chapter 15 - Managing and Setting Time
Explains how servers exchange time information and how to set
or change the date, time, and time zone settings on a server.
Also contains information on obtaining time from the national
time service.
Chapter 16 - Operating the Server from a Remote Console
Explains how to add a remote console connection, establish a
remote console session and use the remote server console.
Appendixes
Appendix A - Setting Read-After-Write Verification
Provides procedures for verifying the integrity of data after
it has been written to disk.
Appendix B - Recovering from Power Failures and Disk Overloads
Explains how a server reacts to a power failure when battery
backup is and is not present. Explains what to do when the primary
server disk (disk1) becomes full.
Appendix C - Kernel Configuration Utility
Explains how to load and remove peripheral drivers from the kernel,
copy the kernel to diskette, and restore the kernel from diskette.
Appendix D - Maintaining Media and Hardware
Describes how to write-protect, load, and remove tapes. Discusses
tape drive maintenance and the compatibility of tapes among various
types of tape drives.
Appendix E - Installing Options and Third-Party Services
Using Keys
Describes how to manage the hardware Server Keys and Option Keys
previously supplied by Banyan to boot a server and install Banyan
software options on the server.
Appendix F - Insufficient Disk Space in the Root Directory
Prevents the Server from Booting
Describes how to recover if the server does not boot because
of insufficient disk space in the root directory and how to reduce
the size of the kernel to increase space in the root directory.
Chapter 1 - Starting Up and Shutting Down the Server
Overview of Rebooting and Shutting Down a Server
After the initial startup of a server (refer to the Server Installation Guide), you perform all subsequent startups by rebooting the server. In this section, you learn the proper procedures for rebooting and shutting down a server.
Caution: Always shut down services before you power off or reboot the server. An abrupt power off or reboot can result in inconsistent data.
You can perform certain server operations only from a workstation. For example, to display information about server resources or to manage a service, invoke the Banyan management tool or enter the appropriate Banyan commands from a DOS or Windows workstation.
Notifying Users About a Server Shutdown
Before shutting down a server's services, be sure to notify users so they can prepare for the unavailability of the server.
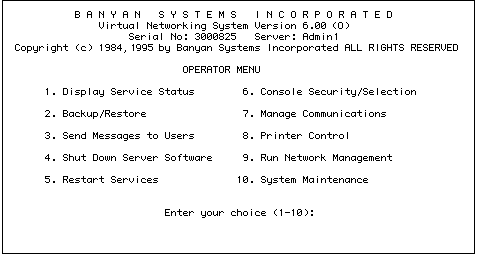
1. From the Operator Menu, select Send Messages to Users. The Message Courier screen appears and you are prompted to enter a message destination.

2. Indicate who you want to send the message to by entering one of the following:
ALL - Broadcasts a message to all users within one hop. This broadcast does not reach users across a WAN link.
StreetTalk name or nickname of an individual or list - Sends a message to the user or list specified.
StreetTalk wildcard - Sends a message to all users in a group or organization, such as *@Mkt@XYZCorp or *@*@XYZCorp.
Note: When sending a message to a StreetTalk name or wildcard, you may not be able to reach all of the intended users. SEND transmits to a maximum of 400 StreetTalk destinations. If the StreetTalk group or list that you specify includes more than 400 destinations, the message is not sent. No limit exists for the number of destinations reached when a message is sent to ALL. Also, if you send a message to a StreetTalk list and the list includes StreetTalk groups, users belonging to the group do not receive the message.
The StreetTalk name you enter must be in the following format:
name@group@organization
You are prompted to enter a message.
3. Enter a message and press ENTER. For example:
Server1 is shutting down at 5PM today.
The message is sent to all specified users, except for those who have disabled incoming messages at their workstations. The message prompt appears again.
4. To send another message, do one of the following:
- To send another message to the same users, repeat step 3.
- To send a message to other users, press ENTER once and repeat step 2.
5. To exit the Message Courier screen, press ENTER two times. The Operator Menu appears.
You are now ready to shut down the server.
To Shut Down and Reboot a Server
1. From the Operator Menu, select Shut Down Server Software.

If the console is locked, you are prompted for the console password. Enter a password and press ENTER.
You are prompted to confirm the shutdown.
2. Enter Y. The Shut Down Menu appears.
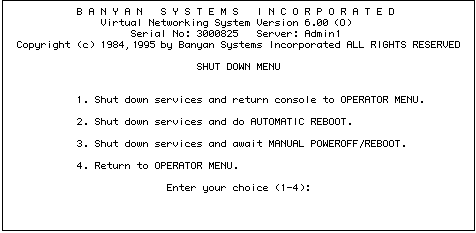
3. Select one of the following:
- To reboot the server automatically, select Shut down services and do AUTOMATIC REBOOT.
- To reboot the server manually, select Shut down services and await MANUAL POWEROFF/REBOOT.
You are prompted to notify network users of the shutdown.
4. Enter Y to send users three warnings that the server is shutting down.
A message appears, confirming that users are receiving notice of the shutdown. Users receive warning messages every 30 seconds until shutdown. After one minute, a message informs you that the server is shutting down.
5. If you select automatic or manual reboot, one of the following occurs:
- If you are rebooting the server automatically, following shutdown, the initialization screens and then the Service Monitor screen appear.
- If you are rebooting the server manually, when prompted, turn the power switch OFF.
6. When you are ready to reboot the server, turn the power switch ON.
The power-on LED lights up when you start the server. Server initialization messages appear at the console, and the server runs system memory tests and displays information about the disks or devices it locates.
For more information about powering the server on and off, refer to the Server Installation Guide.
For more information on shutting down server software, see Chapter 2.
You can also reboot a server from a network workstation. You can reboot the server immediately or schedule a time for the reboot to occur.
Note: You can reboot the server only from a VINES client workstation.
To Reboot a Server from a Workstation
1. At the DOS or OS/2 command prompt, enter:
REBOOT servername
where servername is the name of the server that you want to reboot.
The Reboot menu appears. The name of the server appears on the top right of the screen.
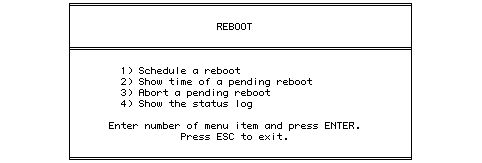
2. Select Schedule a reboot. You are prompted to enter a time to reboot the server.
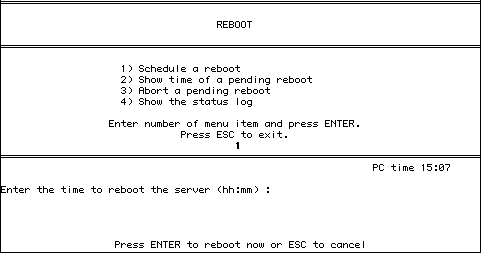
3. Do one of the following:
- To reboot the server now, press ENTER. You are prompted to press any key to reboot the server.
- To reboot the server at a later time, enter the time in HH:MM format and press ENTER. The time of the scheduled reboot appears at the bottom of the screen. The server reboots approximately one minute after the scheduled time.
Before the server reboots, users receive a series of warnings, indicating that the server is about to reboot.
You can cancel a scheduled reboot at any time until the server broadcasts the following warning:
Server servername shutting down all services now!
1. At the DOS or OS/2 command prompt, enter
REBOOT servername
where servername is the name of the server that you want to reboot.
The Reboot menu appears.
2. Select Abort a Pending Reboot. The screen displays the scheduled time of the reboot and the time at which you cancelled the reboot.
Displaying the Reboot Status Log
You can view the reboot status log to verify the time of a pending reboot or to determine when the server was previously rebooted.
To Display the Reboot Status Log
1. At the DOS or OS/2 command prompt, enter:
REBOOT servername
where servername is the name of the server that you want to reboot.
The Reboot menu appears.
2. Select Show the status log.
The reboot log contains the following types of status messages:
- The time of the next scheduled reboot
- The scheduled and actual time of any completed reboot
Note: You can use REBOOT to reboot servers in different time zones. If your DOS workstation is not in the same time zone as the server you want to reboot, be sure to adjust the scheduled time accordingly. For example, to reboot a server in California at midnight (24:00 PDT) from a workstation on the same WAN in New York, add three hours and schedule the reboot for 03:00 EDT.
Avoiding Conflicts Between Reboot and Patch Schedules
Avoid scheduling reboots that conflict with patch applications on the same server. If you schedule a server to reboot and then schedule a patch session for that server at the same time, the reboot interrupts the patch. Similarly, scheduling a patch may interrupt a reboot scheduled for the same server.
Be sure to schedule the reboot so that you allow sufficient time for the patch process to finish.
Following a reboot, the server performs a series of system checks and reloads the device and communications drivers before returning to operation. After all checks are complete, the Service Monitor appears.
After the server restarts, the system runs a series of programs that examine the disks and file systems for possible errors. The programs detect and repair file system damage that may have resulted from an improper system shutdown. Three disk and file system checking programs may be run:
|
|
ckdisk mounts the file systems and checks that they were shut down normally. |
|
|
fsck checks and repairs the internal UNIX file system if the system was not shut down normally (for example, a panic or services not shutting down gracefully). |
|
|
vfsck checks and repairs the VFS structures if the system was not shut down properly. |
If vfsck has to repair the VFS structures, it takes about three or four times as long to run as the fsck program. The actual amount of time depends on many variables, such as the speed of the CPU, the size of the disks, the types of files, and the severity of the abnormal shutdown. For example, on a system with two 320 MB and two 660 MB disks, the fsck program may take 20 minutes to run and vfsck an hour.
Verify that the system shut down properly by checking the server logs. Refer to "Generating Server Log Reports from the Console" in Chapter 13 for instructions on how to view the server logs. If the system shut down properly, the File System Checker Log in the Server Operating System log contains a vfsck log entry similar to the following:
===== vfsck log =====
vfsck -y
Fri May 24 15:16:40 1996
vfs shut down normally
If, however, vfsck has to repair the VFS structures, the log may look like this example:
===== vfsck log =====
vfsck -y
Tue May 28 18:26:10 1996
vfs didn shut down normally - vfsck required
current_fid too low: current_fid = 3393 max fid in fid file = 3410
...
...
vfsck finished fixing at Tue May 28 18:42:21 1996
If vfsck is supposed to run as part of the reboot but cannot for some reason, it displays the following message during the reboot procedure:
vfsck failed to run!
Consult the Server Operating System log from the SYSTEM MAINTENANCE Menu
after the server is up, to find out why.You must fix the problem and reboot before continuing to use the server,
otherwise inconsistent file system information may result!Press <RETURN> to continue booting.
The most common reason for this message is that the disk is full, and therefore vfsck does not run because it cannot write to the disk. You should also look for "disk full" messages on the server console.
The Server Operating System log should contain an entry explaining why vfsck did not run. Your corrective action depends on the cause:
|
|
If the problem was caused by a full disk, delete a sufficient number of files from the disk and reboot the server. If you deleted enough files, vfsck should run successfully. |
|
|
If the problem was caused by any other reason or if you deleted enough files but vfsck still will not run, contact the Banyan Response Center for further assistance. |
The combination of the fsck and vfsck programs assures you that VINES can detect and repair any file system damage that may have resulted from an improper system shutdown.
Verifying the File System Type
Prior to VINES 5.x, servers used the S5 file system rather than the current S10 file system. Upgrading a server with an S5 file system does not change the file system type. The file system type changes only if you perform a full installation. If any disks on a server use the S5 file system, the following message appears during the disk checking:
mount -f S51K /dev/adusr/diskn
The message does not appear on servers that use the S10 file system. You can also verify the file system type by checking the Server Service log following a reboot.
To Verify the File System Type
1. Reboot the server.
2. After the server is running, examine the following log:
SS@servername@servers
where servername is the name of the server. Refer to "Generating Server Log Reports from the Console" in Chapter 13 for instructions on how to view the server logs.
For each disk installed, the following line appears:
File Volume Name: diskn Type Sx
where n = the number of the disk and x = the file system type.
When the system software starts, the appearance of the Service Monitor indicates that the server has connected to the StreetTalk service. Before the connection is complete, the following message appears on the screen:
Service Monitor waiting for system initialization...
The Service Monitor displays period characters (......), indicating that the Service Monitor is still waiting for the system to initialize itself.
Note: Establishing a connection to StreetTalk takes time following any new installation, upgrade, reloading of the system software, or full restoration.
When the server successfully establishes the StreetTalk connection, the Service Monitor screen appears at the server console (Figure 1-7).
When the Service Monitor screen appears, the STATUS column for each service may read:
Initializing
After the services initialize, the STATUS column should read:
Running
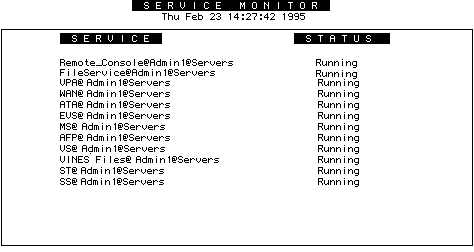
If the service status does not indicate that a service is running, try starting the service. Refer to "To Restart Services" in Chapter 2 for information on starting a service.
After you successfully boot your system, the Service Monitor screen at the server console displays the name and the current status of each network service on the server. It also displays the system date and time and the name of the server being monitored.
To Display the Status of a Service
From the Operator Menu at the server console, select Display Service Status. The Service Monitor appears.
If services on the server are shut down, the following message appears:
The server is not currently in operation.
You also can display information about the server and about individual services from a workstation. If you have administrator privileges, you can stop and start individual services. For more information on starting and stopping individual services, refer to Managing VINES Services.
The Service Monitor reports any change in the status of a service. A service may exist in any of five states (Table 1-1).
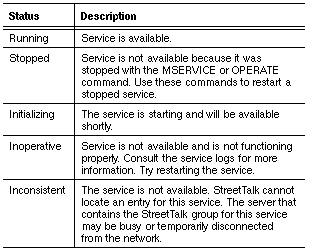
If a service remains inconsistent or inoperative, contact your Banyan service representative for assistance.
For more information on stopping and starting services, see "Shutting Down Services" and "Restarting Services from the Server Console" in Chapter 2.
Displaying Information About a Server's Disks and Printer Ports
You can view information about a server's disks and printer ports from either the server console or a network workstation.
By reconciling high utilization and demand figures with known or suspected file access problems, you can balance the load on the disks to achieve better performance. In some cases, you may need to move services to another server.
To Display Information About Server Resources from a Workstation
From StreetTalk Explorer
1. Click on the server in the left pane.
2. Right-click the server in the right pane and select Properties.
3. Select the Resources tab. See step 2 below for an explanation of the information.
From the DOS Prompt
1. At the DOS prompt, enter:
OPERATE servername
where servername is the name of your server. The Operate A Server menu appears.
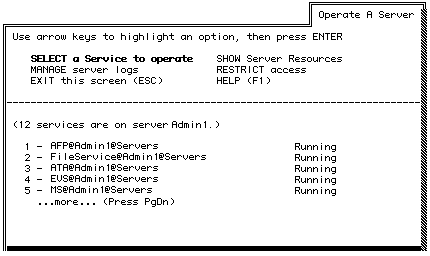
2. Select SHOW Server Resources. The Server Resources screen appears and displays the following information:
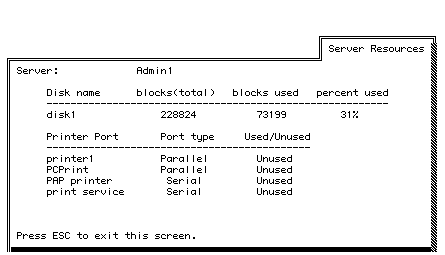
- Number of disks, or file systems, on the server
- Number of 1024-byte blocks available on each disk
- Number of disk blocks in use
- Percentage of total blocks in use
- Number and type of printer ports available on the server
- Status (Used or Unused) of each printer port
Displaying Information About Disk Use from the Server Console
The Server Console Disk Use Screen displays information about disk use on the selected server (Table 1-2). Data is both cumulative, in the form of averages, and relative, in the form of number of operations.
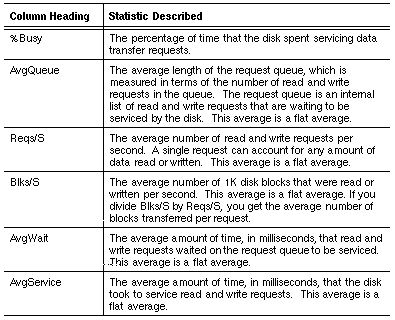
To Display Information About Server Disk Usage from the Server Console

1. From the Operator Menu, select Run Network Management. The Available Servers screen appears.
2. Select the name of the server from the list of available servers.
3. Press F10. The Network Summary screen appears.
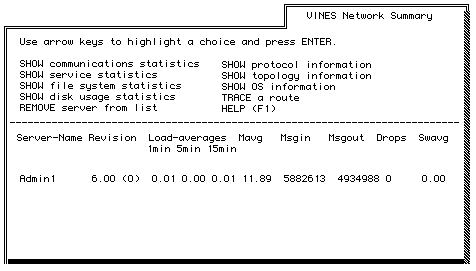
4. Select SHOW disk usage statistics. The cursor moves to the server name in the lower half of the screen.
5. Press ENTER. The Disk Use screen appears. The screen shows a table with each row representing the activity for a single disk volume. The names of the disks are in the left-most column. The item entries are named by headings in the first row.
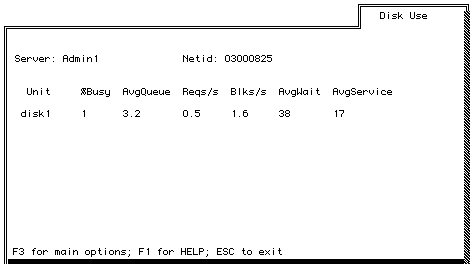
6. Press ESC three times when you are finished viewing the information. The Operator Menu appears.
When you reboot a server, the following message appears, indicating that the server is attempting to set up a session with the StreetTalk service:
Service Monitor waiting for system initialization...
Reboot problems can occur before or after this Service Monitor message appears.
Initialization problems - Occur before the Service Monitor message appears
Service monitor problems - Occur while the server is attempting to establish a connection with the StreetTalk service
Initialization problems during a reboot occur before the Service Monitor message appears.
To Recover from Initialization Problems
1. Check that the power cord and console cable are connected securely.
2. Check that you followed instructions properly in making any changes to the server.
3. Reboot the server.
4. If the server does not start, refer to the Server Installation Guide for further information, or contact your Banyan service representative for assistance.
Service Monitor problems occur after the Service Monitor message appears.
The interval between the time the Service Monitor message appears and the time it takes for all services to be running varies from a few minutes to a maximum of one hour, depending on the size of your network and the type of changes you make to your server software.
If, after one hour, the Service Monitor is unable to establish a session with StreetTalk, you receive this error message:
Service Monitor timed out waiting for StreetTalk. Check the StreetTalk and Server Service logs for errors.
Press RETURN to continue.
If the StreetTalk service is not responding when the Service Monitor checks the status of system services, this error message appears:
Unable to make connection with StreetTalk. Check the Server Service and StreetTalk logs for errors.
Press RETURN to continue.
Check the server logs to determine the cause of the problems. Refer to "Generating Server Log Reports from the Console" in Chapter 13 for information on how to create and view log reports.